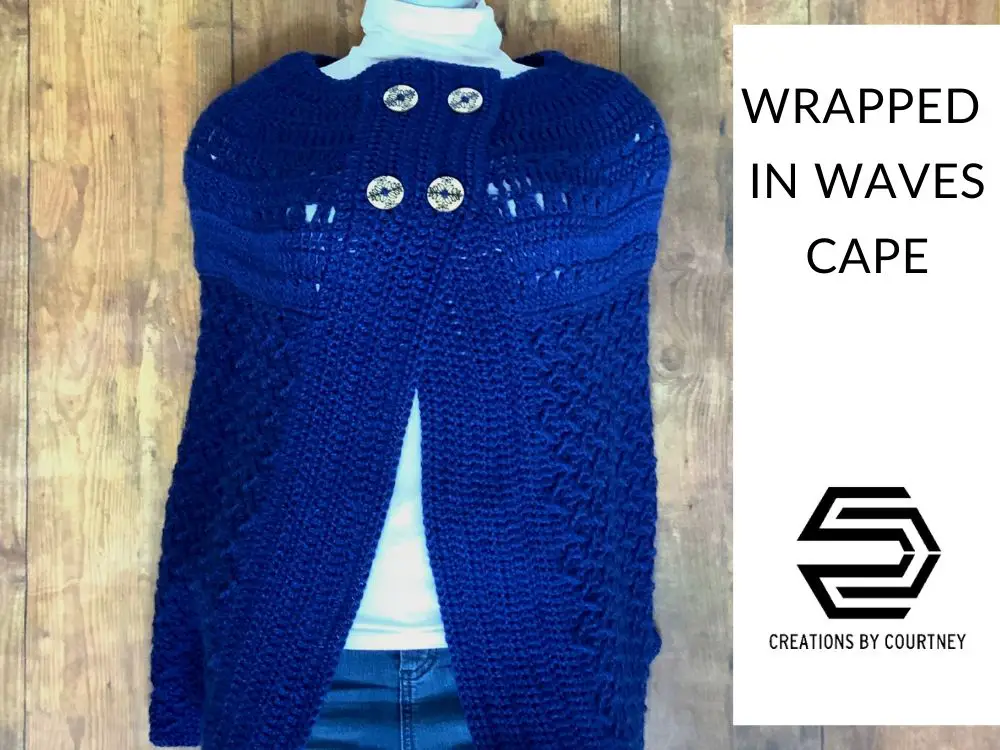
The Wrapped in Waves Cape was born out of an idea to make a poncho and wanting lots of texture. I grabbed the book, 99 Crochet Post Stitches, from my shelf and started flipping through it. I slowly looked at each one three times before choosing the Prong Stitch. I found the Prong Stitch appealing because it reminded me of a mountain peak.
Being true to myself, I had to change the stitch just a little bit. I added a few yarn overs and pull through to remove the common gap that is created by post stitches. The Wrapped in Waves Cape offers texture on the right side, and a solid fabric on the inside because of this little change. 🙂 It’s truly a three season piece. Well, you can wear it in summer too, but if your summer gets as hit as Georgia, you won’t want to wear anything more than. Tank or short sleeves outside. 😂
If you’re new to my designing style, I like to minimize/avoid seaming, like most crocheters. My dislike for seaming is probably why I have made only 1 granny square blanket, and never finished any motif project. 😂 So I decided to dig through my crochet resources to review a join as you go method. That means that there are only two seams in this entire project to attach the pockets!
Oh, I forgot to tell you that there are pockets too. I love pockets, and I hope you love pockets too. They’re just large enough to hold your phone and essentials
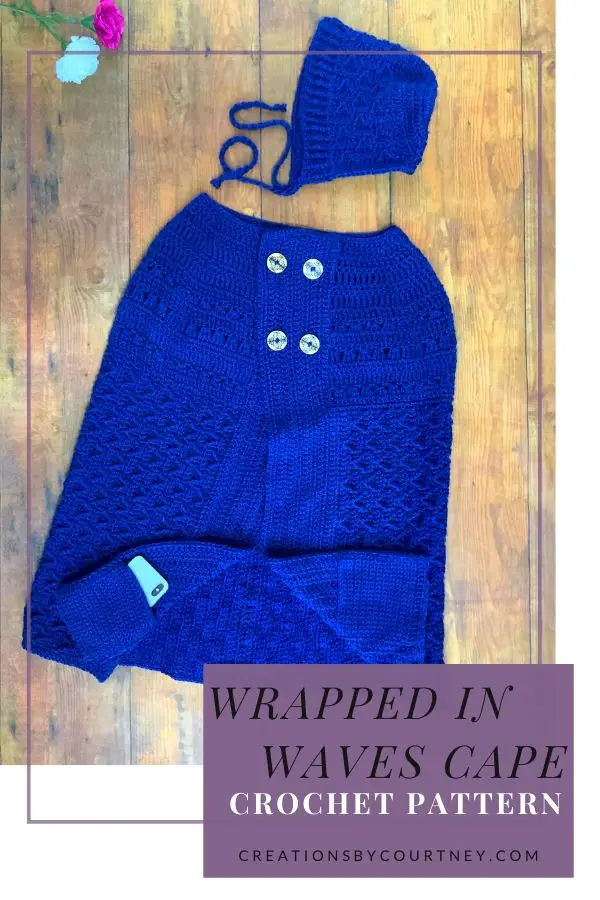
The Wrapped in Waves Cape pairs perfectly with the Wrapped in Waves Bonnet + Hat.
This pattern was tested by Jacqueline H., Elaine E., Lynette N., Cheryl J., and Synthia N. I’m so grateful for their help in checking stitch counts and final fit. I hope you love it as much as they do!
*Disclosure: This post may contain affiliate links to products that I use, and think you will enjoy using too. Should you decide to use any such link, I will earn a small commission at no cost to you. Thank you for supporting this small business.

Add to Ravelry Queue
MATERIALS
- Lion Brand Yarns Heartland (100% acrylic, 247 yards / 226 meters, 7 ounces / 200 grams): Lake Clark, 5 (7, 9, 11) skeins
- Hook US J/10 (6.00 mm) or size needed to meet gauge
- Scissors
- Yarn needle
- 1 stitch marker
- Measuring tape
GAUGE
- 12 stitches = 4”, 6 rows in yoke = 4”
- Approx. 14 pattern stitches = 4”, 7 body pattern rows = 4”
SIZES
- Small/Medium: To fit Busts: 28-38”, Length: 28”
- Large/ 1X-Large: To fit Busts: 40-46”, Length: 28”
- 2X-Large/ 3X-Large: To fit Busts: 48-54”, Length: 30.5”
- 4X-Large/5X-Large: To fit Busts: 56-66”, Length: 30.5”
PATTERN KEY
- Ch: chain
- slst: slip stitch
- sc: single crochet
- dc: double crochet
- tr: treble stitch
- fdc: foundation double crochet
- fsc: foundation single crochet
- CSDC: chainless starting double stitch
- CSTR: chainless starting treble stitch
- Split FPtr: split front post treble crochet
- YO: yarn over
- beg: beginning
- sk: skip
- st(s): stitch(es)
- M: stitch marker
- RS: right side
- WS: wrong side
SPECIAL STITCHES & TECHNIQUES
- CSDC: pull up a tall loop, holding loop in place and wrap yarn around hook (yarn over), insert hook in first st, YO, pull up a loop, [YO, pull through 2 loops] twice
- CSTR: pull up a loop to height of row, holding loop in place and wrap yarn around hook twice (yarn over), insert hook in first st, YO, pull up a loop, [YO, pull through 2 loops] three times
- Split FPtr: YO twice, working in front of previous row, insert hook from front to back around post of dc indicated 2 rows below, YO, pull up a loop, [YO, pull through 2 loops on hook] twice, YO, insert hook in next st, YO, pull up a loop (4 loops on hook), YO, pull through 2 loops (3 loops on hook), YO twice, sk next 3 sts 2 rows below, insert hook front to back around post of next dc, YO, pull up a loop (6 loops on hook), [YO, pull through 2 loops] twice, YO, pull through 4 loops
- For the following Split FPtr, you will work around the next st after skipping 3 sts 2 rows below. There will always be 3 sts between the legs of each Split FPtr.
- Video Tutorial Below
- Join As You Go
- First double crochet: after turning and RS facing you, pull yarn tail towards the WS, pull up a loop, *insert hook from front to back through next st of first piece (yoke), sl st loosely, repeat from * one more time, (2 sl st count as beginning ch), dc in first st
- Last double crochet: YO, insert hook in last st, YO, pull up a loop, YO, pull through 2 loops (2 loops remaining), insert hook front to back through the next st of first piece (yoke) that lines up with the height (usually 2 stitches of first piece), YO, pull through first piece and 2 loops on hook, turn
- First single crochet: keep yarn tail in front facing you, insert hook from back to front through next st of first piece, sl st (counts as ch 1), insert hook in first st, YO, pull up a loop, YO, pull through 2 loops
- Last single crochet: keep yarn tail on front facing you, insert hook in last st, YO, pull up a loop (2 loops on hook), insert hook back to front in next st of first piece, YO, pull through first piece and 2 loops on hook, turn
EXPERIENCE LEVEL
Intermediate
Check out this video!
Add to Your Ravelry Favorites
NOTES
- Pattern is written US terms.
- Read the entire pattern before beginning.
- Pattern is worked in 6 sections: Yoke, Right Body and Edging, Left Body and Edging, Neck Edging, Bottom Edging, Pockets
- Every double crochet and split FPtr row of the body will be the RS.
- Every single crochet row of the body will be the WS.
- The Body will appear horizontal to the yoke. Each row of the body will be attached as you work to ensure proper width is achieved.
- One can make the body separately and attach by seaming each body piece together and then seamed to the yoke. Be sure to make each piece long enough to match the yoke’s width.
- Any additional changes to the neck and length are not accounted for in the listed yarn totals.
You can purchase the ad-free, printable PDF from your favorite site below:


Want to check out more crochet patterns?
Pin it for Later!
If we’re not hanging out on social media yet, come check me out on Facebook, Instagram and Pinterest.
Want to talk about yarn goodness, crochet tips, and exclusive weekly deals? Join my Facebook Group, Creations By Courtney Community.
Join my newsletter for sneak peeks, crochet tips, and more. HERE
Please use #CreationsByCourtney on social media when sharing your projects.
This pattern is not to be duplicated or resold, and not to be reproduced commercially. You may sell finished products on Etsy, at farmers markets, and craft fairs, but please credit Creations By Courtney as the pattern’s author.
9 Responses
So far I think this cape and its matching bonnet is my all time favorite pattern you did, Courtney!
Thank you, Suzanne!
This cape is very fashionable…the textures in the garment bring attention to the eye
So beautiful Courtney