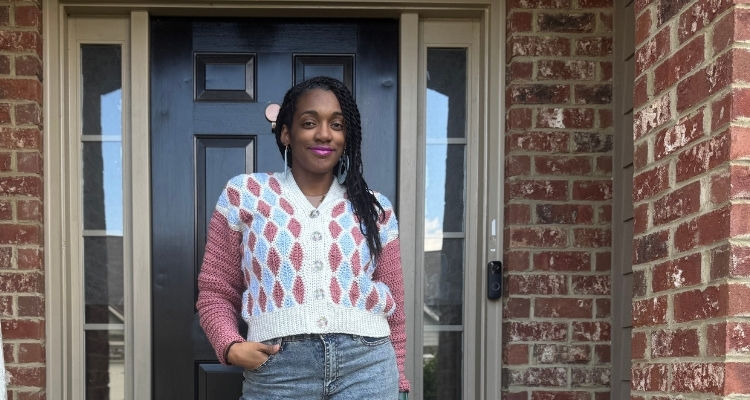
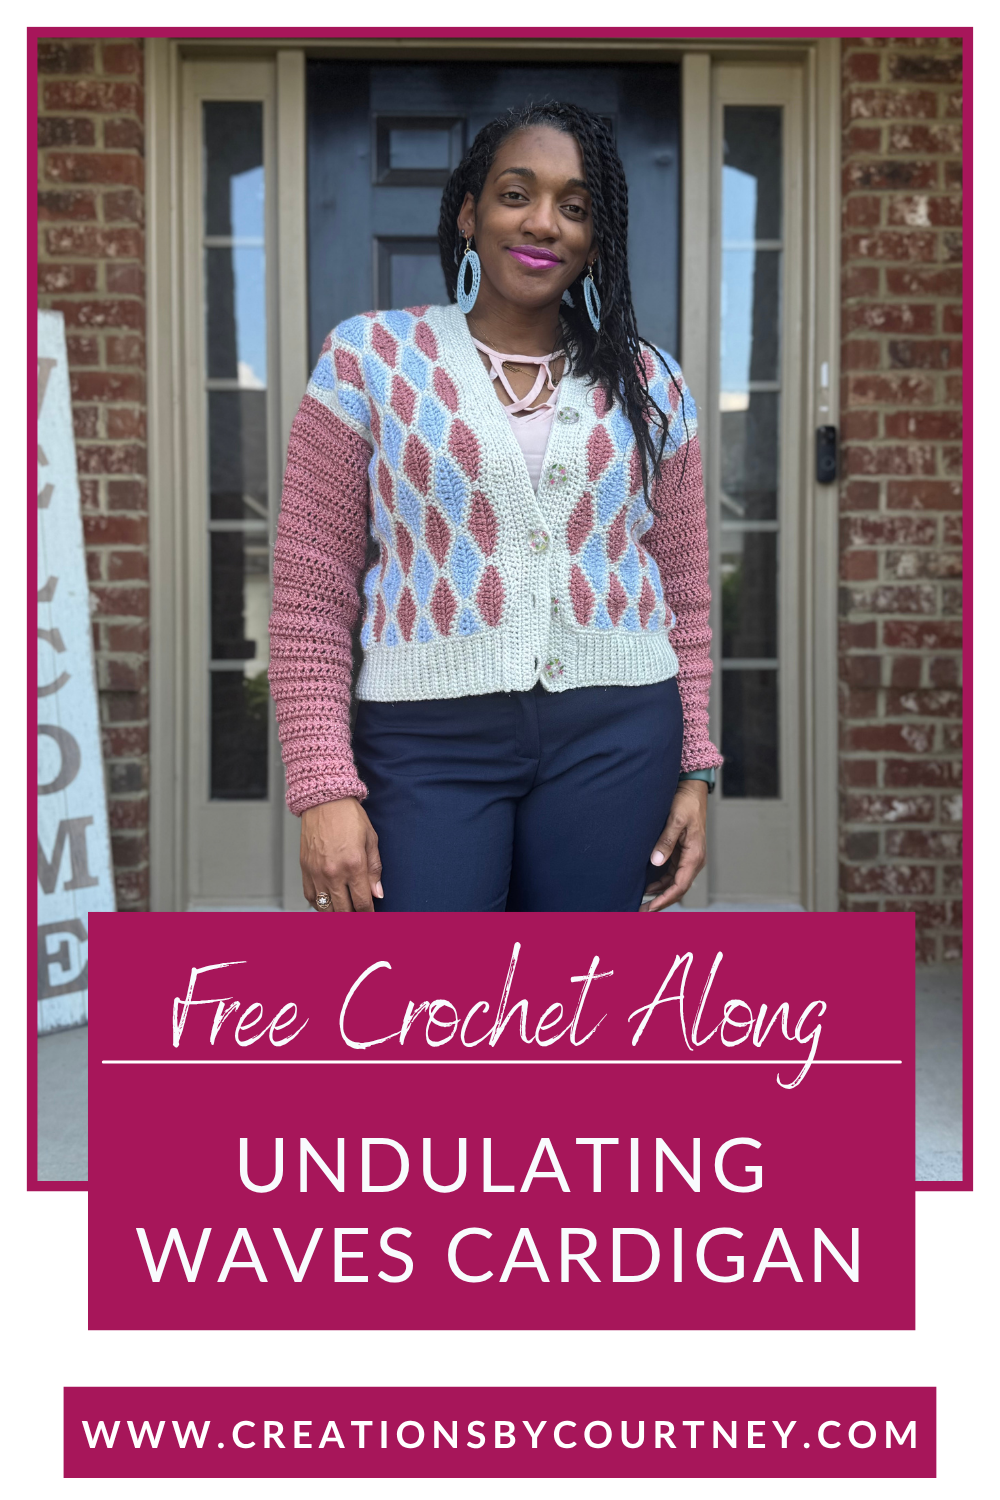
Picture a cardigan that captures the essence of intricate tile work. Every row of the Undulating Waves Cardigan builds a soft, rolling texture that can be a subtle or bold wardrobe piece. This is exactly the kind of project that’s more fun to make with company. Welcome to the Undulating Waves Cardigan Crochet Along, or CAL, where we’ll stitch together, section by section, as a group of Crochet Besties who get just as excited about a good stitch pattern as you do.
The tile brick stitch pattern is the star here. It’s a stitch pattern that looks impressive and easy to make. For this crochet cardigan, the stitch is worked side to side rather than the usual bottom-up, which lets the waves run vertically across your body. By the end of this CAL, you’ll have a brand new stitch pattern in your back pocket along with a finished cardigan you’ll actually reach for.
Grab your hook and let’s get started.
Why Join the Waves Cardigan CAL?
A CAL means you get to build camaraderie with others that get the lingo, and no need to get stuck on whether it’s right or not. Share your progress, ask a question, find inspiration in someone else’s color choice, and celebrate every finished section along the way.
This is also a great project to build confidence with side-to-side construction and shaped sleeves, both of which behave differently than a lot of patterns you may have made before. If you’ve been wanting to stretch your skills without feeling in over your head, this is the project for that.
A New Way to Watch the Stitch Come Together
For this CAL, I’m trying something new. It is a lot of work to create video for garments, so I’ve created a doll-size cardigan to demonstrate each section we’ll be stitching together. No long videos that you’ll have to try to fast forward or rewind to find right point of what you’re stitching in the moment. Short, focused, and easy to reference whenever you need it.
Pick the Right Yarn for Your Undulating Waves Cardigan
I was going through a spell of productive procrastination this summer — organizing the yarn — to rediscover three colors of Uru.Yarn Glimmer. Unfortunately, it is a discontinued yarn line by Knit Crate, but luckily I scored 10 skeins of each color during a Jimmy Beans Wool Watch sale. Uru.Yarn Glimmer is a soft, 90% wool and 10% stellina, worsted weight yarn. Each hank offers 215 yards.
Seeing the shimmer of the stellina, I decided that it was time for the yarn to come off the shelf. After sharing pictures in the FB group with a poll, the Crochet Besties chose all three colors.
Wool is a fantastic option for making garments, as the created fabric drapes well, offers warmth and is moisture-wicking. It is commonly used in crochet patterns that are worn close to the skin, as it’s soft.
For those that cannot use wool, acrylic and cotton are also great choices. Now, acrylic sometimes gets bad mouthed, but it can work wonderfully for garments when you understand the fabric created and choose an anti-pilling option. Cotton is strong, drapes well, and will hold it’s shape over time when compared to wools.
Learn more about choosing yarns for garments.
Keeping reading to find a list of alternative yarns in the Materials section
I LOVE color, but was stumped for a bit on what stitch to incorporate all three colors. So I headed to my bookshelves to start flipping through stitch dictionaries (always find inspiration!) and landed on a fun stitch, This book only numbers the stitch patterns, but through some ‘research’, it’s likely a version of the tile brick stitch.
Follow the Schedule
This CAL runs in weekly sections over several weeks so you always know what’s next. Life happens, so there’s room to catch up if you fall behind, this is meant to be enjoyable, not a race.
Week 1: Gauge swatch, Back & Right Front
Week 2: Continue Back & Right Front, Back
Week 3: Back & Left Front, Sides
Week 4: Button Band & Collar
Week 5: Sleeves
Week 6: Finishing + Wear it in the wild
Short YouTube videos accompany each part, including the new doll-size demos, so you can watch exactly the technique you need without hunting through a long video.
Style Your Undulating Waves Cardigan
The Undulating Waves Cardigan crochet pattern is designed to hit at the high hip, a length that’s flattering on just about everybody and easy to wear with anything already in your closet. A clean edge runs along the hem and continues up the front, around the neck, and back down the other side, giving the whole cardigan a polished, finished look no matter how you wear it.
Buttoned Up
Add buttons down the front for a classic, put-together cardigan you can wear buttoned or left open. The pattern includes buttonhole instructions, so this look is ready to go without any extra guesswork.
Open and Draped
Skip the buttonholes entirely for a relaxed, open cardigan that layers easily over tanks, dresses, and everyday outfits. Same ribbed edge, same wave stitch, just a different vibe.~~
Weekend Errands
Grab a plain white tee, straight-leg jeans, and white sneakers. Leave the top button or two undone, push the sleeves up slightly, and you’ve got that effortless, put-together look for coffee runs and grocery store trips, no effort required.
Dinner with Friends
Worn open over a fitted tank or bodysuit, wide-leg trousers, and a pair of loafers or ankle boots. Don’t forget a small clutch for your essentials, a bangle, stud or dangly earrings for a polished look.
Dress and Cardigan
Who doesn’t love a cardigan and dress? It always works, whether it’s a midi dress, slip dress, knit sweater dress, or a cotton sundress depending on the season. The high hip length hits right where you want a little definition at the waist, and the wave texture adds visual interest without competing with the dress underneath. Finish with boots in cooler months or sandals when it’s warm.
Cozy and Buttoned
Buttoned all the way up over a turtleneck or mock neck, paired with leggings or joggers and slouchy boots. This is the version for chilly mornings, pumpkin patches, and anywhere you want to feel cozy without sacrificing style.
Office Ready
Open over a fitted button-down or blouse tucked into tailored trousers or a pencil skirt. The clean edging keeps this from looking too casual, so it reads intentional rather than thrown on, perfect for the days you want to look put together without wearing a blazer.
Dress It Up or Down
Because the length and edging stay the same either way, this is one pattern that moves easily between casual and put-together. Whichever look you land on, this is a cardigan that’s just as at home running errands as it is out for a nice dinner, which is exactly what makes a handmade piece worth the time you put into it.
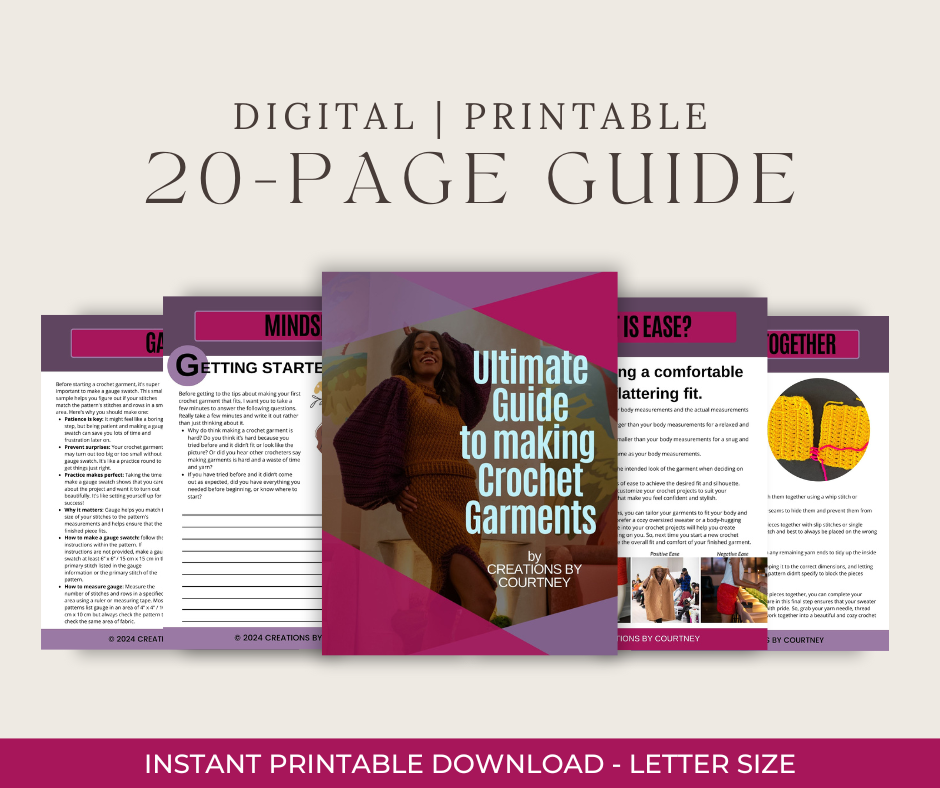
Meet the Undulating Waves Cardigan Customizer
Every body is different with different style preferences. And the Undulating Waves Cardigan Crochet Pattern Customizer makes sure your cardigan fits like it was made for you, because it was. Plug in your measurements and the customizer walks you through fitting the body, the sleeves, and the button band and collar, so you’re not stuck guessing between sizes or adjusting on the fly mid-project.
It’s the same confident-fit approach behind everything I design, just built directly into this pattern so you can customize as you stitch.
Get the Pattern
The Undulating Waves Cardigan pattern will be free on the blog in sections for the crochet along. If you prefer the ad-free PDF, it is $12 and includes full color-coded written instructions in sizes 1-11 to fit chest circumferences 30”-70” / 76-178” with 2-4” / 5-10 cm of positive ease.
Want the customizer too? Upgrade to VIP and create the same look at your preferred length and fit.
Upgrade to VIP for Exclusive Perks
Want everything in one place? For $25, the VIP experience includes:
- Ad-free PDF with color-coded tables and schematics for easy size-picking while you stitch
- The pattern broken into sections for easy following
- Early access to videos with no ad interruptions
- The Undulating Waves Cardigan Customizer included
- Unlimited access to all of the above
The VIP experience is perfect if you like to work ahead of schedule or want to pick this project back up after the CAL wraps, because life happens.
From September 1- October 9, save $5 when you upgrade to VIP
Disclosure: This post may contain affiliate links to products that I use, and think you will enjoy using too. Should you decide to use any such link, I will earn a small commission at no cost to you. Thank you for supporting this small business.
add to your favorites on GoSadi and Ravelry
MATERIALS
- Uru.Yarn Glimmer (90% wool, 10% stellina, 215 yd/ 197 m, 100 g): refer to the table at Week 1 for yarn amounts
- Color A: Soft Snow
- Color B: Toasty
- Color C: Chilly Day
- Alternative yarns:
- 5.5 mm hook or size needed to meet gauge. These are my favorite hooks for pain free stitching.
- 24 mm buttons x 5 These are my favorite by LSFiberArts
- Tapestry needle
- Stitch markers
- Scissors
- Tape measure
GAUGE
Post-block:
Tile Brick Stitch: 1 repeat = 3.25 [8 cm], 10 rows =3.25 measured along peak of wave
Double Crochet: 13.5 sts x 8 rows = 4” x 4” [10 cm x 10 cm]
Single Crochet: 8 sc x 10 rows = 2” x 2” [5 cm x 5 cm]
Yo-slst: 5 yo-slst x 5 rows = 1” x 1” [2.5 cm x 2.5 cm]
EXPERIENCE LEVEL
Intermediate
SIZES
| Size | To Fit Chest Circum. | Ease | Finished Circum. | Sleeve Length | Sleeve Circum. at bicep | Finished Length |
| 1 | 30 in. (76 cm) | 2 in (5 cm) | 32 in. (81 cm) | 18 in. (45.7 cm) | 14 in. (35.6 cm) | 19.5 in. (49.5 cm) |
| 2 | 34 in. (86cm) | 2 in. (5 cm) | 36 in. (91.4 cm) | 18 in. (45.7 cm) | 15 in. (38 cm) | 19.5 in. (49.5 cm) |
| 3 | 38 in. (96.5 cm) | 2 in. (5 cm) | 40 in. (101.6 cm) | 18.5 in. (47 cm) | 16 in. (40.6 cm) | 19.5 in. (49.5 cm) |
| 4 | 42 in. (107 cm) | 2 in. (5 cm) | 44 in. (112 cm) | 18.5 in. (47 cm) | 18 in. (45.7 cm) | 21 in. (53 cm) |
| 5 | 46 in. (117 cm) | 2 in. (5 cm) | 48 in. (122 cm) | 18.5 in. (47 cm) | 19 in. (48.3 cm) | 21 in. (53 cm) |
| 6 | 50 in. (127 cm) | 2 in. (5 cm) | 52 in. (132 cm) | 19 in. (48.3 cm) | 20 in. (50.8 cm) | 21 in. (53 cm) |
| 7 | 54 in. (137 cm) | 3 in. (7.6 cm) | 57 in. (144.8 cm) | 19 in. (48.3 cm) | 21 in. (53.3 cm) | 23.5 in. (60 cm) |
| 8 | 58 in. (147 cm) | 3 in. (7.6 cm) | 61 in. (155 cm) | 19.5 in. (49.5 cm) | 22 in. (56 cm) | 23.5 in. (60 cm) |
| 9 | 62 in. (157.5 cm) | 4 in. (10 cm) | 66 in. (167.6 cm) | 19.5 in. (49.5 cm) | 23 in. (58.4 cm) | 23.5 in. (60 cm) |
| 10 | 66 in. (168 cm) | 4 in. (10 cm) | 70 in. (177.8 cm) | 20 in. (50.8 cm) | 24 in. (61 cm) | 23.5 in. (60 cm) |
| 11 | 70 in. (178 cm) | 4 in. (10 cm) | 74 in. (188 cm) | 20 in. (50.8 cm) | 25 in. (63.5 cm) | 23.5 in. (60 cm) |
PATTERN KEY
ch: chain
cnr: corner
CSDC: chainless starting double crochet
btw: between
Dc: double crochet
Fsc: foundation single crochet
FO: fasten off
hdc: half double crochet
Lsc: long single crochet
M: stitch marker
PM: place stitch marker
rem: remaining
RS: right side
sc2tog: single crochet 2 together
sc: single crochet
sk: skip(ped)
sl st: slip stitch
sp: space
st(s): stitch(es)
Tr: treble crochet
WS: wrong side
yo: yarn over
yo-slst: yarn over slip stitch
SPECIAL STITCHES AND TECHNIQUES
CSDC: pull up a loop that is row height, holding loop in place and wrap yarn around hook (yarn over), insert hook in first st, YO, pull up a loop, [YO, pull through 2 loops] twice
Join round in Fdc: For final fdc, yarn over and insert hook through foundation chain of last st made, yarn over and pull up loop (3 loops on hook), insert hook through foundation of first st (starting ch-3), yarn over and pull through two loops (3 loops on hook), [yarn over, pull through two loops] twice, sl st to 3rd ch to join
Lsc: insert hook in indicated row below, yarn over, pull loop through, then pull loop up to the height of the current row, yarn over, pull through 2 loops on hook.
yo-slst: YO, insert hook in BL of next st, YO and pull through st and loops on hook
CAL Giveaway
Sharing your progress isn’t just fun, it earns you a shot at a prize. Here’s how to enter:
- Post progress pictures of each section as you complete it, either in the Confidently Crochet with Creations By Courtney Facebook group or via this form if you don’t use Facebook.
- Post a picture of your finished Waves Cardigan (modeled, if you’re comfortable, so your stitching gets the spotlight it deserves) by October 9, 2026. Tag me @creationsbycourtneyllc on Facebook and Instagram, or @creationsbycourtney on TikTok, with #CreationsByCourtney #UWavesCardiganCAL, or submit it via the form.
- Progress pictures and a finished cardigan picture are both required for your entry to count.
Three winners will be drawn October 10th
- 1st place: $25 coupon to use on Creations By Courtney patterns and products
- 2nd place: $15 coupon
- 3rd place: $10 coupon
Don’t Forget to Join the Community
Come share your yarn choices, ask questions, and cheer each other on in the Confidently Crochet with Creations By Courtney Facebook group. Not on Facebook? You can still follow along and submit progress pictures through the form linked above.
NOTES
- Pattern is written US terms.
- Read the entire pattern before beginning. Instructions are within tables to easily choose the relevant counts for the size you are making.
- This cardigan has 2-4” (5-10 cm) of positive ease.
- This cardigan body is constructed flat in turned rows from side to side.
- The sleeves are constructed in turned rounds.
- Constructed in 7 parts: Back and Right Front, Back and Neck opening, Back and Left front, Ribbing, Collar and Button band, Sleeves x 2, and Finishing.
- Refer to the Schematics for construction and additional sizing information in the ad-free PDF.
Purchase the ad-free PDF from your favorite shop
INSTRUCTIONS
Week 1
This week is all about choosing yarn and making gauge swatches BEFORE you start making your cardigan.
Check out this table for the yarn amounts per color. These amounts are based on using Color A for the ribbing and button band, and using Color C for the Sleeves. If you would like to use Color A or B for the Sleeves, send me an email with the size that you’re making, and I can you with updated yardage amounts. Or you’re wanting to make additional changes, purchase the Pattern + Customizer, which will provide yarn amounts for your custom Undulating Waves Cardigan crochet pattern.
If you do purchase, don’t forget the special discount that can be used only during the CAL. The code has been sent via newsletter and posted in the FB group.
Yarn Amounts for the Cardigan
| Color A | |||||||||||
| Size | 1 | 2 | 3 | 4 | 5 | 6 | 7 | 8 | 9 | 10 | 11 |
| Yards | 544 | 600 | 670 | 722 | 833 | 894 | 1039 | 1104 | 1168 | 1241 | 1305 |
| Meters | 497 | 549 | 613 | 660 | 762 | 817.5 | 950 | 1010 | 1068 | 1135 | 1193 |
| Skeins | 3 | 3 | 4 | 4 | 4 | 5 | 5 | 6 | 6 | 6 | 6 |
| Color B | |||||||||||
| Yards | 163 | 187 | 211 | 230.7 | 270 | 297 | 350 | 379 | 393 | 422 | 450 |
| Meters | 149 | 171 | 193 | 211 | 247 | 272 | 320 | 347 | 359 | 386 | 411.5 |
| Skeins | 1 | 1 | 1 | 2 | 2 | 2 | 2 | 2 | 2 | 2 | 2 |
| Color C | |||||||||||
| Yards | 590 | 639 | 700 | 769 | 840 | 913 | 979 | 1057 | 1104 | 1171 | 1226 |
| Meters | 539.5 | 584 | 640 | 703 | 768 | 835 | 895 | 966.5 | 1010 | 1071 | 1121 |
| Skeins | 3 | 3 | 4 | 4 | 4 | 5 | 5 | 5 | 6 | 6 | 6 |
I know that checking gauge is not fun, but it’s an important step to complete, especially when sizing matters. The Undulating Wave Cardigan crochet pattern uses simple stitches that are forgiving to variations in tension, but this is why blocking matters. Blocking relaxes the fabric, and helps it lay flat, which impact the size. Even my tension changed between the gauge swatches and making two different versions of the sleeve.
On to the actually stitching, you’ll need to make 4 gauge swatches: tile brick stitch, double crochet, single crochet and yarn over slip stitch with 5.5 mm hook. The last two swatches do not have to be as large as they are used in a small area compared to the Body and Sleeves.
How to make a gauge swatch in tile brick stitch
Row 1: Using A, 22 fsc OR ch 23, starting in 2nd ch from hook, sc in each ch, turn.
Row 2: Sc in each st, change to B, turn.
Row 3: CSDC in first st, dc in next st, hdc in next st, sc in st, *ch 2, sk next 2 sts, sc in next st, hdc in next st, dc in next 2 sts, tr in next 2 sts, dc in next 2 sts, hdc in next st, sc in next st, rep from * to last 6 sts, ch 2, sk next 2 sts, sc in next st, hdc in next st, dc in last 2 sts, turn.
Row 4: CSDC in first st, dc in next st, hdc in next st, sc in st, *ch 2, sk ch-2 sp, sc in next st, hdc in next st, dc in next 2 sts, tr in next 2 sts, dc in next 2 sts, hdc in next st, sc in next st, rep from * to last ch-2 sp, ch 2, sk ch-2 sp, sc in next st, hdc in next st, dc in last 2 sts, change to A, turn.
Row 5: Sc in first st, sc in next 3 sts, *Lsc in sk sc 3 rows below, sc in next 10 sts, rep from * to last ch-2 sp, Lscin sk sc 3 rows below, sc in rem sts, turn.
Row 6: Sc in each st, change to C, turn.
Row 7: Sc in first st, hdc in next st, dc in next 2 sts, tr in next 2 sts, dc in next 2 sts, hdc in next st, sc in next st, *ch 2, sk 2 sts, sc in next st, hdc in next st, dc in next 2 sts, tr in next 2 sts, dc in next 2 sts, hdc in next st, sc in next st, rep from * to end, turn.
Row 8: Sc in first st, hdc in next st, dc in next 2 sts, tr in next 2 sts, dc in next 2 sts, hdc in next st, sc in next st, *ch 2, sk ch-2 sp, sc in next st, hdc in next st, dc in next 2 sts, tr in next 2 sts, dc in next 2 sts, hdc in next st, sc in next st, rep from * to end, change to A, turn.
Rows 9-10: Rep Rows 5-6, change to B
Rep Rows 3-10 continuing to change colors in established pattern until at least 6”(15 cm) in length
For the double crochet swatch, ch 24, and starting in the 4th ch from hook, dc in each st to the end, turn; or 22 fdc, turn. You’ll make several rows of dc until the swatch is at least 6″ [15 cm] long.
For the single crochet swatch, ch 17, and starting in 2nd ch from hook, sc in each ch to end, turn; or 16 fsc (foundation single crochet). You’ll make several rows of sc until the swatch is at least 3″ [7.6 cm] long.
For the yarn over slip stitch swatch, ch 11, and starting in 2nd ch from hook, sl st in each ch, turn. Ch 1 (does not count as st), yo-slst in first st, working in BLO, yo-slst in next 8 sts, yo-slst in last st, turn. Continue making rows of yo-slst until the swatch is at least 2″ [5 cm] long.
Steam block all swatches until they lay flat, and allow to dry. Once dry, check your gauge. If your gauge is smaller, increase hook size, and if it’s larger, decrease hook size.
If your gauge matches, then it is time to start working on the Back & Right Front 🎉
Not sure how to measure gauge? Watch this video.
Back & Right Front
With 5.5 mm hook and A, ch 131 (131, 131, 143, 143) (143, 155, 155, 155) (155, 155), turn
Row 1: Starting in 2nd ch from hook, sc in each ch, turn. 130 (130, 130, 142, 142) (142, 154, 154, 154) (154, 154) sc OR 130 (130, 130, 142, 142) (142, 154, 154, 154) (154, 154) fsc, turn/
Row 2: Ch 1, sc in each st, change to B, turn.
Row 3: CSDC in first st, dc in next st, hdc in next st, sc in next st, *ch 2, sk next 2 sts, sc in next st, hdc in next st, dc in next 2 sts, tr in next 2 sts, dc in next 2 sts, hdc in next st, sc in next st, rep from * to last 6 sts, ch 2, sk next 2 sts, sc in next st, hdc in next st, dc in last 2 sts, turn. 10 (10, 10, 10, 11) (11, 11, 11, 12) (12, 12, 12, 12) (12, 12) rpts, 4 dc, 2 hdc, 2 sc
Row 4: CSDC in first st, dc in next st, hdc in next st, sc in next st, *ch 2, sk ch-2 sp, sc in next st, hdc in next st, dc in next 2 sts, tr in next 2 sts, dc in next 2 sts, hdc in next st, sc in next st, rep from * to last ch-2 sp, ch 2, sk ch-2 sp, sc in next st, hdc in next st, dc in last 2 sts, change to A, turn.
Row 5: Sc in first st, sc in next 3 sts, *Lsc in sk sc 3 rows below, sc in next 10 sts, rep from * to last ch-2 sp, Lscin sk sc 3 rows below, sc in rem sts, turn.
Row 6: Sc in each st, change to C, turn.
Row 7: Sc in first st, hdc in next st, dc in next 2 sts, tr in next 2 sts, dc in next 2 sts, hdc in next st, sc in next st, *ch 2, sk 2 sts, sc in next st, hdc in next st, dc in next 2 sts, tr in next 2 sts, dc in next 2 sts, hdc in next st, sc in next st, rep from * to end, turn. 10 (10, 10, 10, 11) (11, 11, 11, 12) (12, 12, 12, 12) (12, 12) rpts, 2 sc, 2 hdc, 4 hdc, 2 tr
Row 8: Sc in first st, hdc in next st, dc in next 2 sts, tr in next 2 sts, dc in next 2 sts, hdc in next st, sc in next st, *ch 2, sk ch-2 sp, sc in next st, hdc in next st, dc in next 2 sts, tr in next 2 sts, dc in next 2 sts, hdc in next st, sc in next st, rep from * to end, change to A, turn.
Row 9: Sc in first st, sc in next 3 sts, *Lsc in sk sc 3 rows below, sc in next 10 sts, rep from * to last ch-2 sp, Lscin sk sc 3 rows below, sc in rem sts, turn.
Row 10: Sc in each st, change to B, turn.
Rows 11-18 (22, 26, 26, 30) (34, 38, 42, 42) (46, 50): Rep Rows 3-10 continuing to change colors in established pattern. Do not FO.
Watch & Stitch as your start your crochet cardigan
Week 2 – Keep Stitchin’ and Sharing those pictures!
This week, we are moving onto the Back and Neck Opening. If you’re still working on the first section, that is okay too. We have plenty of time together to make progress and finish by October.
On to the next section!
Back
PM in 64th (64th, 64th, 70th, 70th)(70th, 70th, 76th, 76th)(76th , 76th) st from end.
Continue in pattern to end of row for 64 (64, 64, 70, 70) (70, 70, 76, 76) (76, 76) sts, turn.
Note: Depending on the size, the end of the row may differ from the beginning of the row in Colors B and C.
Continue for 18 (18,18, 18, 22) (22, 22, 22, 26) (26, 26) rows
Note: End on Row 4 or Row 8 of repeat. Change to A.
Watch and Stitch
Week 3
Back & Left Front
NOTE: Row numbering starts at 1 for clarity. Row 1 extends to create the Left Front.
Row 1:
Sc in first st, sc in next 3 sts, *Lsc in sk sc 3 rows below, sc in next 10 sts, rep from * to last ch-2 sp, Lsc in sk sc 3 rows below, sc in rem sts, 66 (66, 66, 72, 72) (72, 72, 78, 78)(78, 78) fsc, turn.
Row 2: Sc in each st, change to B or C to continue in pattern, turn. 130 (130, 130, 142, 142) (142, 154, 154, 154) (154, 154)
Continue in established pattern for a total of 18 (22, 26, 26, 30) (34, 38, 42, 42) (46, 50) rows. Do not FO.
Underarms
Fold Body in half; measure 6.75 (6.75, 7.25, 7.5, 8)(8.25, 8.75, 9, 9.25)(9.75, 10) in./17 (17, 18.4, 19, 20.3)(21, 22.2, 23, 23.5)(24.8, 25.4) cm downward from the shoulder (fold line) and place M in Front and Back on each side.
Row 1: Continue in pattern to M, turn.
Rows 2-10: Continue in pattern and changing colors, turn.
Row 11: With Color A, fold the fabric and line up the first and last stitch but flat, ch 1, *sl st through the FL of right fabric and BL of left fabric of each st until ch-2 sp, sl st around ch-2 in next 2 sts, rep from * until M reached. Front and Back now seamed together.
Armhole: Working counter clockwise, Fill the dip with (sc in first st, hdc in next 2 sts, dc in next 4 sts, hdc in next 2 sts, sc in next st); At the peak, sc in next 2 sts, rep around to Underarm, 14 sc evenly in row ends of Underarm, sl st to join, FO.
Note: This creates an even edge for attaching the Sleeve. Each arm hole will be slightly different so use the appropriate sts to create the even edge.
Rep for the Right Side by attaching C to Row 1 of Right side.
Week 4
Ribbing
Foundation Row: With 5.0 mm hook, attach A in corner of Left Front, evenly sc in row ends around to Right Front.
Ch 14,
Row 1: Starting in 2nd ch, sl st in each ch, sl st in next 2 sc to attach, turn. 13 sl st
Row 2: Yo-slst BLO in next 11 sts, yo-slst in last st, turn. 13 yo-slst
Row 3: Ch 1 (does not count as st), yo-slst in first st, yo-slst BLO in next 11 sts, sl st in next 2 sc to attach, turn. 13 yo-slst
Rep Rows 2-3 across the bottom hem. FO if using B or C for Collar.
Collar + Button Band
Row 1: With 5.5 mm, starting at the bottom of the Ribbing, loose ch 1, dc in each st of Ribbing (13 dc), dc in side of next sc, dc in next st, hdc in next 2 sts, sc in next 4 sts, *hdc in next 2 sts, dc in next 4 sts, hdc in next 2 sts, sc in next 4 sts*, rep btw * – * to Neck Opening, evenly sc across Neck Opening, sc in next 2 sts, rep from * – * to Ribbing, dc in side of next sc, dc in each st of Ribbing, turn.
Suggested # of stitches along Neck: 22 (22, 22, 22, 26) (26, 26, 26, 32) (32, 32)
Row 2: Sc in each st to the Neck Opening, sc2tog in the cnr, sc in each st across Neck Opening, sc2tog in next cnr, sc in each st, turn.
Row 3: Ch 1, sc in each st, turn.
SIZE 4 ONLY
Rows 3-5: Ch 1, sc in each st, turn.
Row 6: Complete Row 4 from below
Row 7: Complete Row 7
Rows 8-11: Ch 1, sc in each st, turn.
Note: If adding buttons, layout the placement starting at least 7”/ 18 cm down from Neck Opening. It helps to place the top and bottom buttons, count the stitches between these buttons and evenly place rem buttons. Count the stitches between each button and shift as needed to ensure an equal number of stitches between each button. PM on each side where buttons will be sewn and matching button holes on opposite side.
Make note of stitches between buttons: ★_______
Row 4: Ch 1, sc in each st around until 2nd group of M, [starting with st before M, ch 3, sk next 3 sts (this includes the M in the middle), sc in next ★ sts] 5 times,sc in rem sts, turn.
Row 5: Ch 1, [sc in each st until button hole, 3 sc around ch-3 sp] 5 times, sc ineach st to end, turn.
Rows 6-7: Ch 1, sc in each st, turn. FO.
Week 5
Make 2
Row 1: 27 (28, 29, 30, 32) (32, 33, 34, 35) (37, 38) fdc, sl st to join, turn.
INCREASE IN THE CENTER OF THE FOLLOWING ROWS (make 2 increases when +2 is listed):
SIZE 1: [2-13], 15, 17, 19, 21, 23, 25, 27, 29, 31, 33 – 49 dc
SIZE 2: [2-19], 21, 23, 25, 27, 29, 31, 33 – 53 dc
SIZE 3: [2-22], 24, 26, 28, 30, 32, 34 – 56 dc
SIZE 4: 2-34 – 63 dc
SIZE 5: [2-17], 18 (+2), [19-33], 34 (+2) – 67 dc
SIZE 6: [2-9], 10 (+2), [11-17], 18 (+2), [19-26], 27 (+2), [28-34], 35 (+2) – 70 dc
SIZE 7: [2-5], 6 (+2), [7-10], 11 (+2), [12-15], 16 (+2), [17-20], 21 (+2), [22-25], 26 (+2), [27-30], 31 (+2), [32-34], 35 (+2) – 74 dc
SIZE 8: [2-5], 6 (+2), [7-9], 10 (+2), [11-14], 15 (+2), [16-18], 19 (+2), [20-22], 23 (+2), [24-27], 28 (+2), [29-31], 32 (+2), [33-35], 36 (+2) – 77dc
SIZE 9: [2-4], 5 (+2), [6-7], 8 (+2), [9-10], 11 (+2), [12-13], 14 (+2), [15-16], 17 (+2), [18-20], 21 (+2), [22-23], 24 (+2), [25-26], 27 (+2), [28-29], 30 (+2), [31-32], 33 (+2), [34-35], 36 (+2) – 81 dc
SIZE 10: [2-4], 5 (+2), [6-7], 8 (+2), [9-10], 11 (+2), [12-14], 15 (+2), [16-17], 18 (+2), [19-20], 21 (+2), [22-23], 24 (+2), [25-27], 28 (+2), [29-30], 31 (+2), [32-33], 34 (+2), [35-36], 37 (+2) – 84 dc
SIZE 11: [2-3], 4 (+2), [5-6], 7 (+2), 8, 9 (+2), [10-11], 12 (+2), 13, 14 (+2), [15-16], 17 (+2), 18, 19 (+2), [20-21], 22 (+2), [23-24], 25 (+2), 26, 27 (+2), [28-29], 30 (+2), 31, 32 (+2), [33-34], 35 (+2), 36, 37 (+2) – 88 dc
Last 3 rows: CSDC in first st, dc in each st, sl st to join, turn.
If you would like to make adjustments to the sleeves, this blog post will walk you through what you need to know + a tool that makes it easy peasy.
Week 6
Finishing
- Set Sleeves inside of arm opening from the inside, sl st to attach in same manner as underarm. It helps to use M or clips to hold Sleeve in place as you attach.
- Alternatively, you can cut a long tail for sewing Sleeve into place.
- Steam block and allow to dry.
- Add buttons to button band at M, then remove M.
- Wear it in the wild with confidence!
Other Crochet Patterns You May Like
Pin it for Later
You’ve Got a Beautiful Waves Cardigan Waiting
There’s nothing like finishing a project alongside people who understand exactly how good that last stitch feels. Once your cardigan is done, drop a comment and tell me how you’re planning to style it.
If we’re not hanging out on social media yet, come find me on Facebook, Instagram, and Pinterest.
Join my newsletter for sneak peeks, crochet tips, and more.
Use #CreationsByCourtney on social media when sharing your projects.
This pattern is not to be duplicated or resold, and not to be reproduced commercially. You may sell finished products on Etsy, at farmers markets, and craft fairs, but please credit Creations By Courtney as the pattern’s author.