
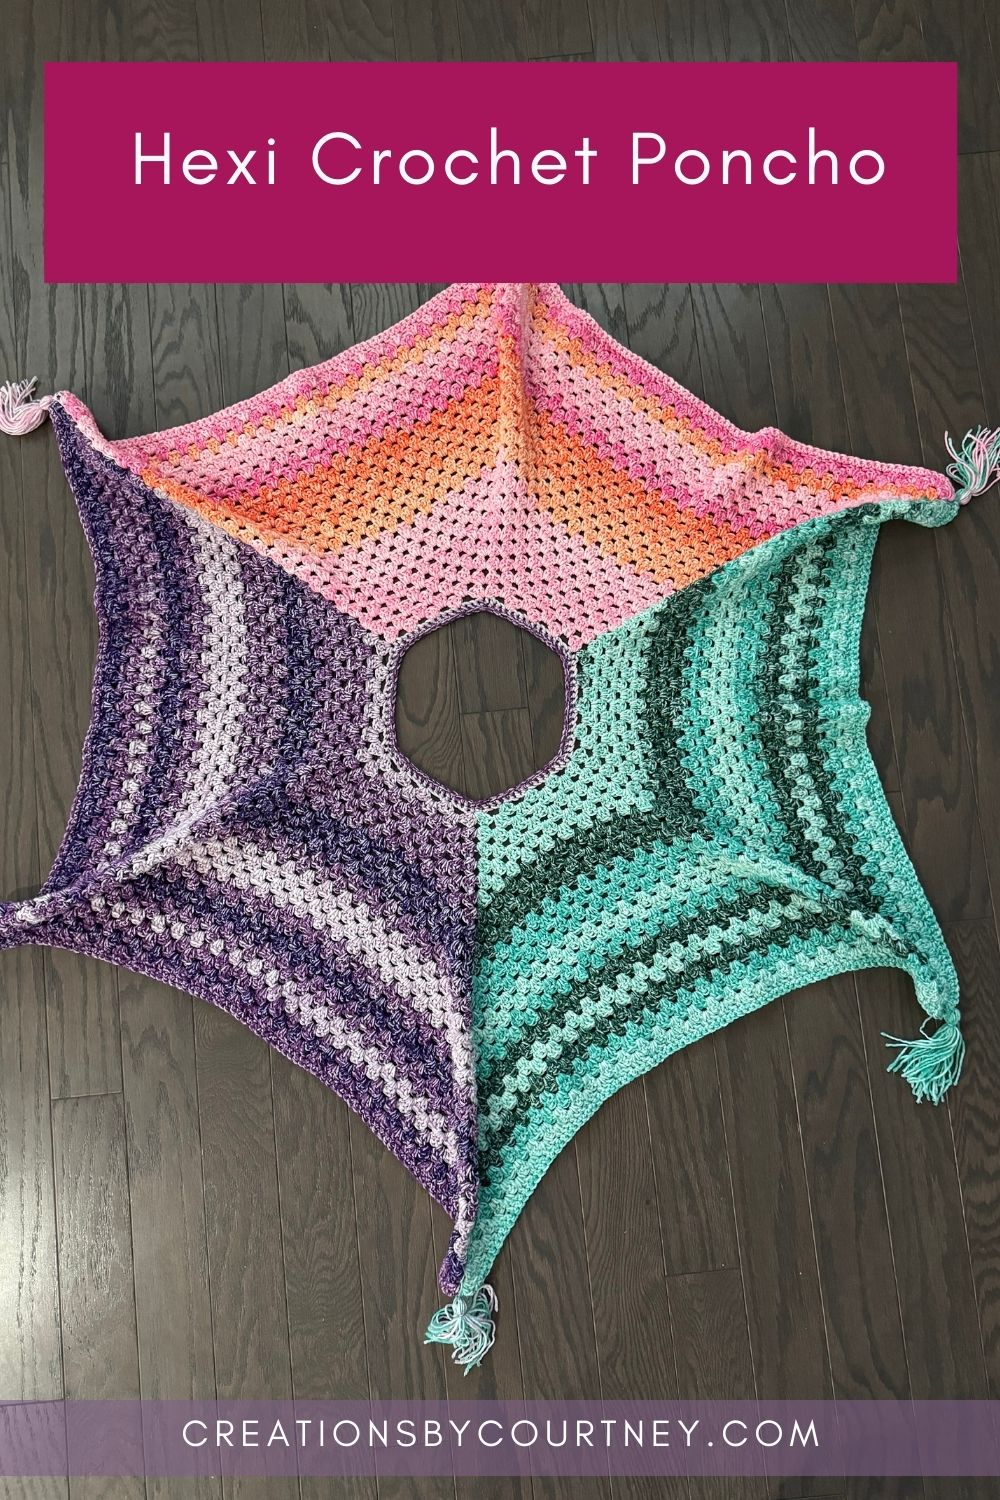
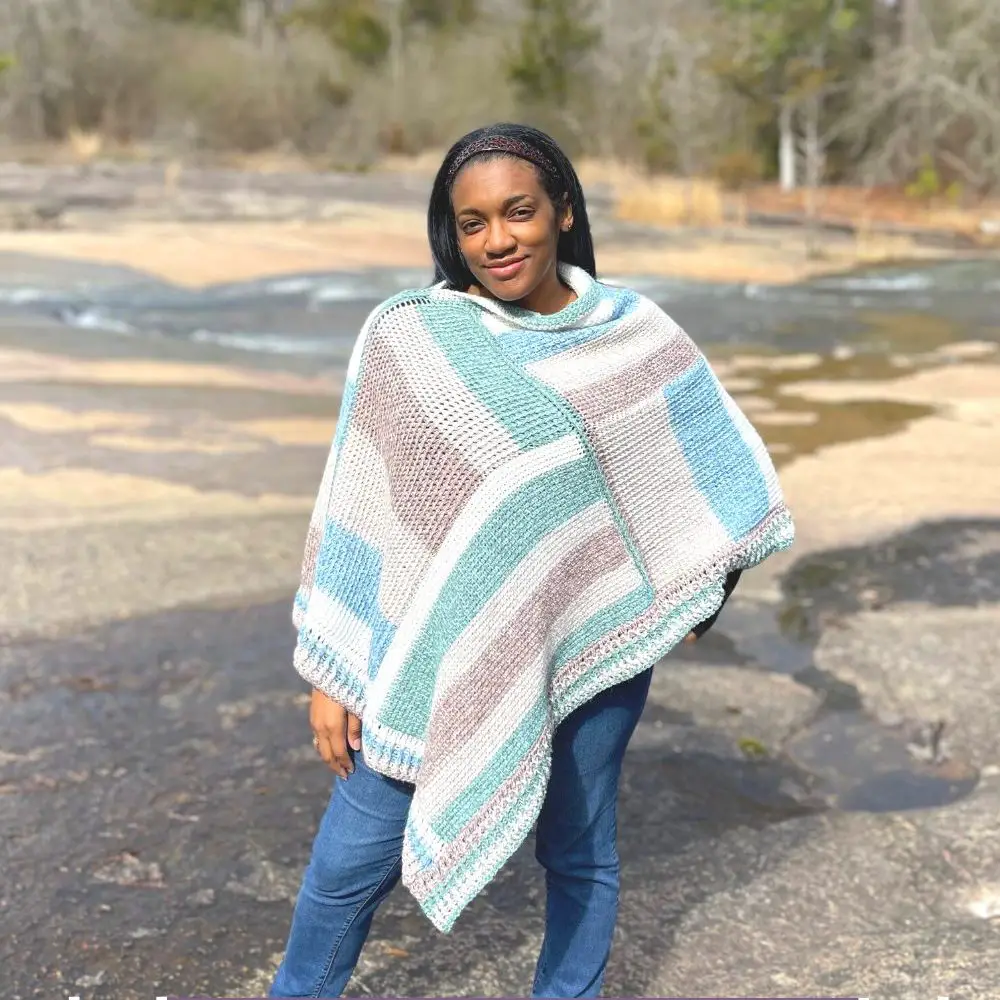
What do you get when you mix three colors, the granny stitch and a hexagon? You get the Hexi Crochet Poncho! This fun crochet poncho was inspired by the trendy crochet hexagon cardigans.
You know you love a great crochet poncho to throw on when it’s chilly outside, which includes spring too. This Hexi Crochet Poncho is meant to be short since the temperatures are rising with the sun in the sky, so it’s a breathable layer for breezy days.
Are you ready to delve into creating a hexagon shaped poncho rather than several hexagons making the poncho? Perfect for beginners and seasoned crocheters alike, this pattern features three colors that seamlessly blend together to create a stunning and modern garment. Learn how to crochet a hexagon poncho step by step and discover the versatility of the granny stitch in creating beautiful crochet wearables.
A Classic: Crochet Poncho
Ponchos have been a staple in fashion for centuries, offering both style and functionality. Crochet ponchos, in particular, have seen a resurgence in popularity due to their versatility and ease of customization. Whether you’re looking for a cozy layering piece or a statement garment, a crochet poncho is the perfect project to showcase your skills.
A crochet poncho can be short or long, lacy or dense. It’s likely one of the most popular crochet wearables to make, as a poncho can be made from one large rectangle and one seam, or more commonly two rectangles that form an L-shape and then seamed.
Not your Grandma’s Granny Stitch
The granny stitch is a classic crochet technique that consists of clusters of double crochet stitches separated by chain spaces. Known for its versatility and textured look, the granny stitch is a favorite among crocheters for creating intricate patterns and designs. Rather than the multi-colored square that always included brown from the 1970s, the granny stitch is used to create crochet poncho from a large hexagon. This means there are no seams to attach multiple hexagons, and only 4 ends to weave in if you choose three colors. 🙂
Choosing the Right Yarn and Colors
When selecting yarn for your hexagon poncho, opt for a soft and lightweight yarn that drapes beautifully. Consider using a DK or worsted weight yarn for the perfect balance of warmth and comfort. I chose Lion Brand Mandala Ombré as the colors practically jumped in my arms when I perusing a Joanns looking for the issue 139 of Simply Crochet Magazine (I was featured in that issue :-D).
Lion Brand Mandala has been wildly popular since its release years ago because it was an affordable cake yarn of long repeating color changes that made crochet color work easier. Mandala is a DK weight #3 yarn, whereas Mandala Ombré is a worsted weight that transition from a light to dark shade of a primary color and some cakes transition across a few colors, but all of them include undyed strands that makes the color pop.
As the temperatures begin to warm in spring and there are breezy days, I think a worsted weight poncho in the granny stitch creates an airy but cozy wearable that can be worn with a long sleeve top and jeans or a long skirt. Some may not like the weight of the worsted weight, as it’s a large hexagon, so a tip is included for making a Hexi Crochet Poncho in DK yarn, such as Mandala. If you use Mandala, you create a striping look, but can have fun choosing three different cakes of coordinating colors to create the same color changing looking but with 3 sections of stripes.
For the color scheme, choose three complementary colors that blend seamlessly together. The color change will happen in the corner of each hexagon, creating a visually appealing color blocking effect. If you wish to be adventurous, choose contrasting colors, or choose gradient colors for the ultimate fade.
Mandala is an acrylic yarn that creates lovely drape with a larger hook and the airiness of the granny stitch. You can choose any fiber in worsted or DK weight yarn as the size and shape will contribute it draping on the body well. I would consider skipping a 100% cotton if you have tight tension or it’s not a smooth and strong cotton. The nature of the cotton fibers will hold its shape and impact how well the Hexi Crochet Poncho drapes on the body, but is a great option if you intend to wear it during the summer or heading to a water activity.
Hexagon Crochet Poncho Construction
If you have made at least one Hexagon Granny Cardigan, you’ll be familiar with making the Hexi Crochet Poncho. This poncho is worked in the same manner as half of the cardigan, except there is a large hole for the neck opening. Or you can think of it as a missing armpit. LOL
We’ll start the Hexi Crochet Poncho with foundation single crochet stitches that will join to create a circle.
Wait, did you say join foundation stitches?
Yes, I did! Check out this video tutorial on joining foundation single crochet, which means you don’t need a longer tail at the slip knot to use for seaming the first and last stitch. The next round will be feature the granny stitch and turn the circle into a hexagon. This second round also starts the color change in every other corner. If you’re adventurous and don’t mind having a few more ends to weave in, you could consider changing the color in each corner to repeat the color pattern twice… Why create more work for yourself?? When you change the color in the corner, try to loosen the stitches a little so it won’t scrunch the corner stitches.
You’ll continue to work in turned rounds making the granny stitch and gradually increasing the size of the hexagon until you reach the desired length. I’m only 5’3″, and am comfortable wearing a shorter Hexi Crochet Poncho, but I added some length knowing that many of my crochet friends prefer wearables that reach or cover their bottom. Once you get the hang of the color changes and have adequate yarn, you can make your poncho as long as you like.
Adding Finishing Touches
Once you have reached the length listed within the pattern or your preferred length and fasten off all of the colors, we’re going to make some medium sized tassels for each corner. I chose to make one tassel in each color and then use two colors each for the remaining three tassels to match the color changing corner.
I recommend when creating the tassels to cut a length longer than usual for attaching in each corner since the granny stitch has space between each cluster. Also, you can consider weaving the ends of the tassels through the corners and tying it on the inside of the poncho, so that the tassels can be removed for a different look and when laundering. After joining all the hexagons together, add any desired finishing touches to your poncho. This could include a decorative border, fringe detail, or embellishments to personalize your creation. Take the time to block your poncho to ensure that it lays flat and retains its shape.
Styling Your Hexi Crochet Poncho
Once your hexagon poncho is complete, experiment with different ways to style and wear it. Whether you prefer a casual boho look or a chic layered ensemble, a crochet poncho is a versatile piece that can be dressed up or down for any occasion.
Here are 4 outfit ideas for a crochet hexagon poncho with three different colors and 6 tassels on each corner:
- Bohemian Chic Look:
- Pair the crochet hexagon poncho with a white flowy maxi dress, brown ankle boots, and a wide-brimmed hat. Add some wooden bangles and a fringe crossbody bag to complete the bohemian look.
- Casual Weekend Outfit:
- Wear the hexagon poncho over a simple white t-shirt, high-waisted jeans, and tan or a coordinating color sneakers. Accessorize with a long pendant necklace and sunglasses for a laid-back weekend style.
- Elegant Evening Ensemble:
- Style the poncho with a sleek black midi dress, strappy heels, and statement earrings for a more formal event. Carry a clutch bag, add handmade earrings and opt for a bold lip color to elevate the outfit.
- Beach Vacation Vibes:
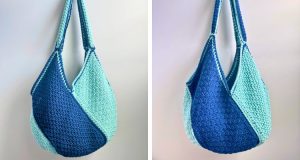
- Combine the colorful hexagon poncho with a white tank top, denim shorts, and sandals for a beach-ready look. Tie your hair in a loose bun, wear sunglasses, and carry a straw tote bag to embrace the vacation vibes. If you want to carry a tote you made yourself, check out the Miami Cotton Tote or Tunisian Cinch Bag.
Care Instructions
To prolong the life of your hexagon poncho, follow these care instructions or what is listed on the yarn band to keep it looking its best. Hand wash your poncho in cold water with mild detergent and lay it flat to dry. Avoid hanging or wringing out your poncho to prevent stretching or distortion of the fabric. Folding it will keep the shape for years of wearing. With proper care, your crochet poncho will remain a timeless wardrobe staple for years to come.
*Disclosure: This post may contain affiliate links to products that I use, and think you will enjoy using too. Should you decide to use any such link, I will earn a small commission at no cost to you. Thank you for supporting this small business.
ADD TO RAVELRY FAVORITES
MATERIALS
- Lion Brand Mandala Ombré, weight #4 (100% acrylic, 344 yds/ 315 m, 5.3 oz/ 150 g):
- C1: Chi x 2
- C2: Serene x 2
- C3: Zen x 2
- Total yardage: 1500 yards
- US I-9 / 5.50 mm You may enjoy any of these ergonomic hooks, or these ergonomic hooks.
- Yarn needle
- Measuring tape
- Scissors
GAUGE
4 3-dc clusters x 8 rows = 4” x 4” [10 cm x 10 cm]
How to make a gauge swatch:
Ch 31,
Row 1: Cluster in 7th ch from hook, *sk 3 ch, cluster in next ch, rep from * until 4 chs rem, sk 3 ch, dc in last ch, turn. 6 clusters, 2 dc
Row 2: Ch 3 (counts as dc), 2 dc (half cluster) in the sp btw the dc and cluster of the row below, [cluster btw each cluster of the row below] 5 times, 2 dc in so btw last cluster and dc of the row below, dc in 3rd st of beg chtop of dc, turn. 5 clusters, 2 dc, 2 half clusters
Row 3: Ch 3, cluster btw each cluster of the row below, dc in top of ch 3last dc, turn. 6 clusters, 2 dc
Rows 4-11: Rep Rows 2-3
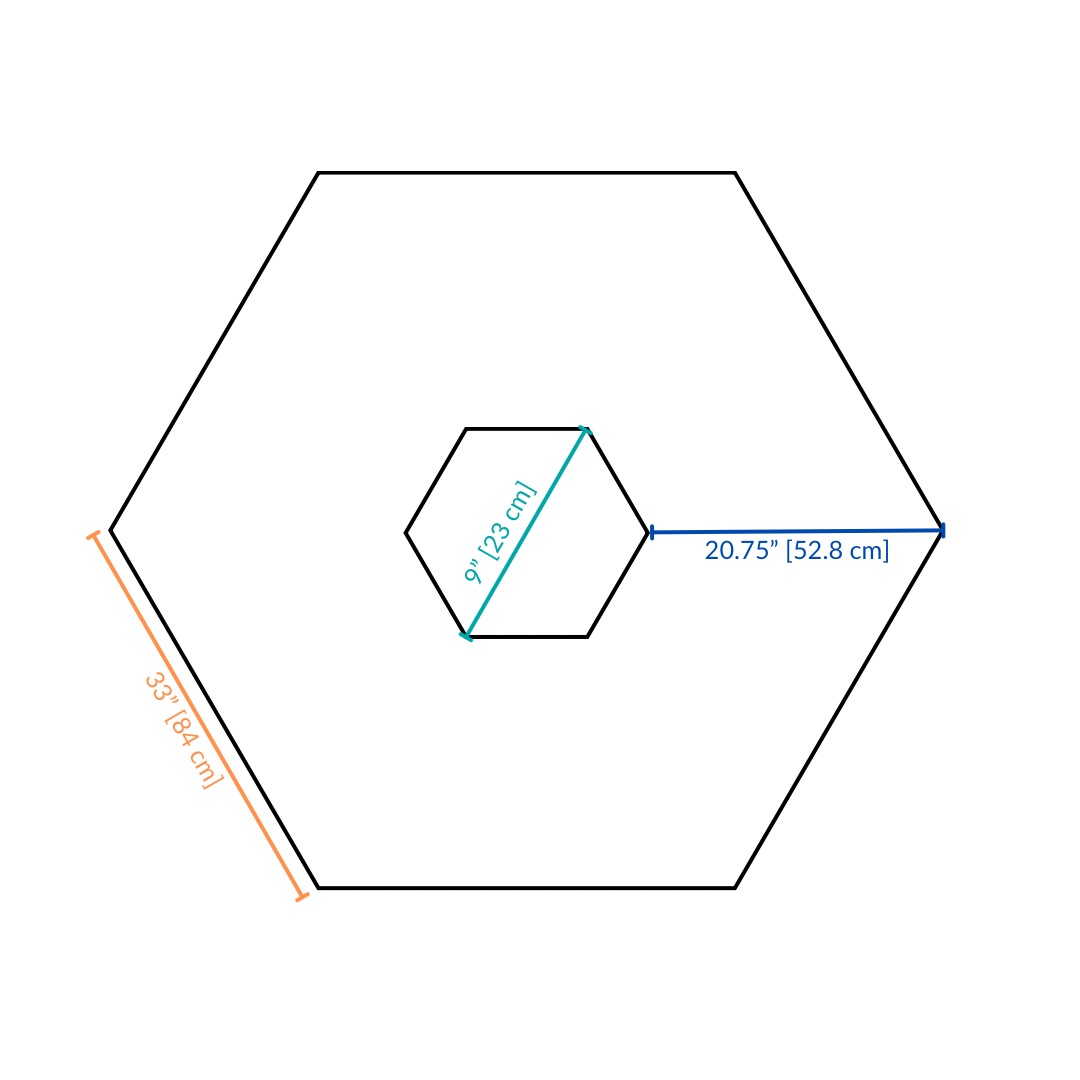
FINISHED SIZE(S)
Neck Opening Diameter: 9” [23 cm]
From Neck Opening to a point: 20.75” [52.8 cm]
Point to Point: 33” [84 cm]
PATTERN KEY
Beg: beginning
Btw: between
Ch: chain
Cnr: corner
CSDC: chainless starting double crochet
Dc: double crochet
Fsc: foundation single crochet
FO: fasten off
Prev: previous
Rem: remain(s)
Rep: repeat
Sl st: slip stitch
Sc: single crochet
Sk: skip
St(s): stitch(es)
YO: yarn over
SPECIAL STITCHES & TECHNIQUES
Cluster: 3 dc
CSDC: pull up a loop that is row height, holding loop in place and wrap yarn around hook (yarn over), insert hook in first st, YO, pull up a loop, [YO, pull through 2 loops] twice
Join fsc in the round: insert hook in prev ch made, insert hook in ch of first fsc, YO and pull through first fsc and one loop on hook, YO, pull through 2 loops
Color Change in Cnr: all worked in ch-2 sp of rnd below, with first color, 3 dc around and change to next color during last YO of 3rd dc, using the next color, ch 2, 3 dc (cluster)
EXPERIENCE LEVEL
Intermediate
NOTES
- Pattern is written in US terms.
- Read entire pattern before beginning.
- The Hexi Poncho is made in 2 parts: Body and Finishing.
- CSDC can be replaced with ch 3.
- Can use one color.
- Length can be changed to preference.
- To create a thinner fabric: use sport or DK weight yarn and create 120 fsc or a number that is a multiple of 4 and divisible by 6, follow all instructions. It will require more yarn to create the same length or longer.
Purchase the ad-free PDF from your favorite pattern shop


Don’t forget to join the Creations By Courtney Community for CALs, crochet tips, and yarnie fun.
INSTRUCTIONS
Rnd 1: With C1, 95 fsc, sl st to join following special technique, turn. 96 sc
Rnd 2: CSDC in first st, 2 dc in same st (counts as first cluster), *[sk 3 sts, cluster in next st] 3 times*, sk 3 sts, (cluster, ch 2, cluster, cnr made) in next st, rep between * and *, sk 3 sts, (cluster, change to C2, ch 2**, cluster) in next st; rep from * to ** and changing to C3, cluster, rep from * to **, sl st to join, turn. 30 cluster groups, 6 ch-2
Rnd 3: Sl st in next 2 chs, (CSDC, 2 dc) around 2nd ch, *cluster btw each cluster of the rnd below until the next cnr, (cluster, ch 2**, cluster) around ch-2 sp of cnr, rep from * 5 times stopping at ** in the last rep, and changing to C2 at 3rd cnr and C1 at 5th cnr, sl st to join, turn. 36 cluster groups, 6 ch-2
Rnd 4: Sl st in next 2 chs, (CSDC, 2 dc) around 2nd ch, *cluster btw each cluster of the rnd below until the next cnr, (cluster, ch 2**, cluster) around ch-2 sp of cnr, rep from * 5 times stopping at ** in the last rep, and changing to C2 at 3rd cnr and C3 at 5th cnr, sl st to join, turn. 42 3-dc groups, 6 ch-2
Next Rnds: Rep Rnds 3-4 until desired length, turn. Sample shown is 20.75 “[52.8 cm] when measured along a point.
Note: Sample was made with 28 rnds
Last Rnd: Sl st in next 2 chs, ch 1, sc around first ch, *sc in each st to next cnr, 2 sc around ch-2 sp, rep from * and changing colors as needed, until 1 ch rem, sc around last ch, sl st to join, FO all colors.
Neck Opening
If you would like a smaller Neck Opening, follow the instructions below. You can complete more rounds, if desired.
Rnd 1: Attach yarn (any color can be used) in any stitch, ch 1, *sc in next 6 sts, sc2tog, rep from * around, sl st to join. 84 sc
Rnd 2: Ch 1, *sc in next 5 sts, sc2tog, rep from * around, sl st to join. 72 sc
Finishing
Weave in ends.
Make 6 tassels and attach to each point.
To make tassel:
- Get a flat object (piece of cardboard, small book, flattened paper towel rolls) that is 6” /15 cm.
- Take one yarn and hold along the bottom, carrying the yarn up and around down the back, continue wrapping at least 18 times; cut the yarn and hold ends in place.
- Cut a piece of yarn at least 18” / 45.8 cm. Place under the center of the wraps and knot twice. This will be used to attach the tassel.
- Cut the opposite end to separate the strands, and remove from the flat object.
- Cut a piece of yarn at least 14” /35.5 cm. Place around all strands about 1” / 2.5 cm down from top knot, and knot twice.
- Trim all ends to the same length.
You’re finished with your Hexi Crochet Poncho!
Crocheting a hexagon crochet poncho with the granny stitch is a rewarding and fulfilling project that allows you to showcase your creativity and skills. Whether you’re a beginner crocheter or an experienced crafter, this pattern offers endless possibilities for customization and personalization. Embrace the beauty of the granny stitch and create a one-of-a-kind poncho that is sure to become a warm weather wardrobe favorite.
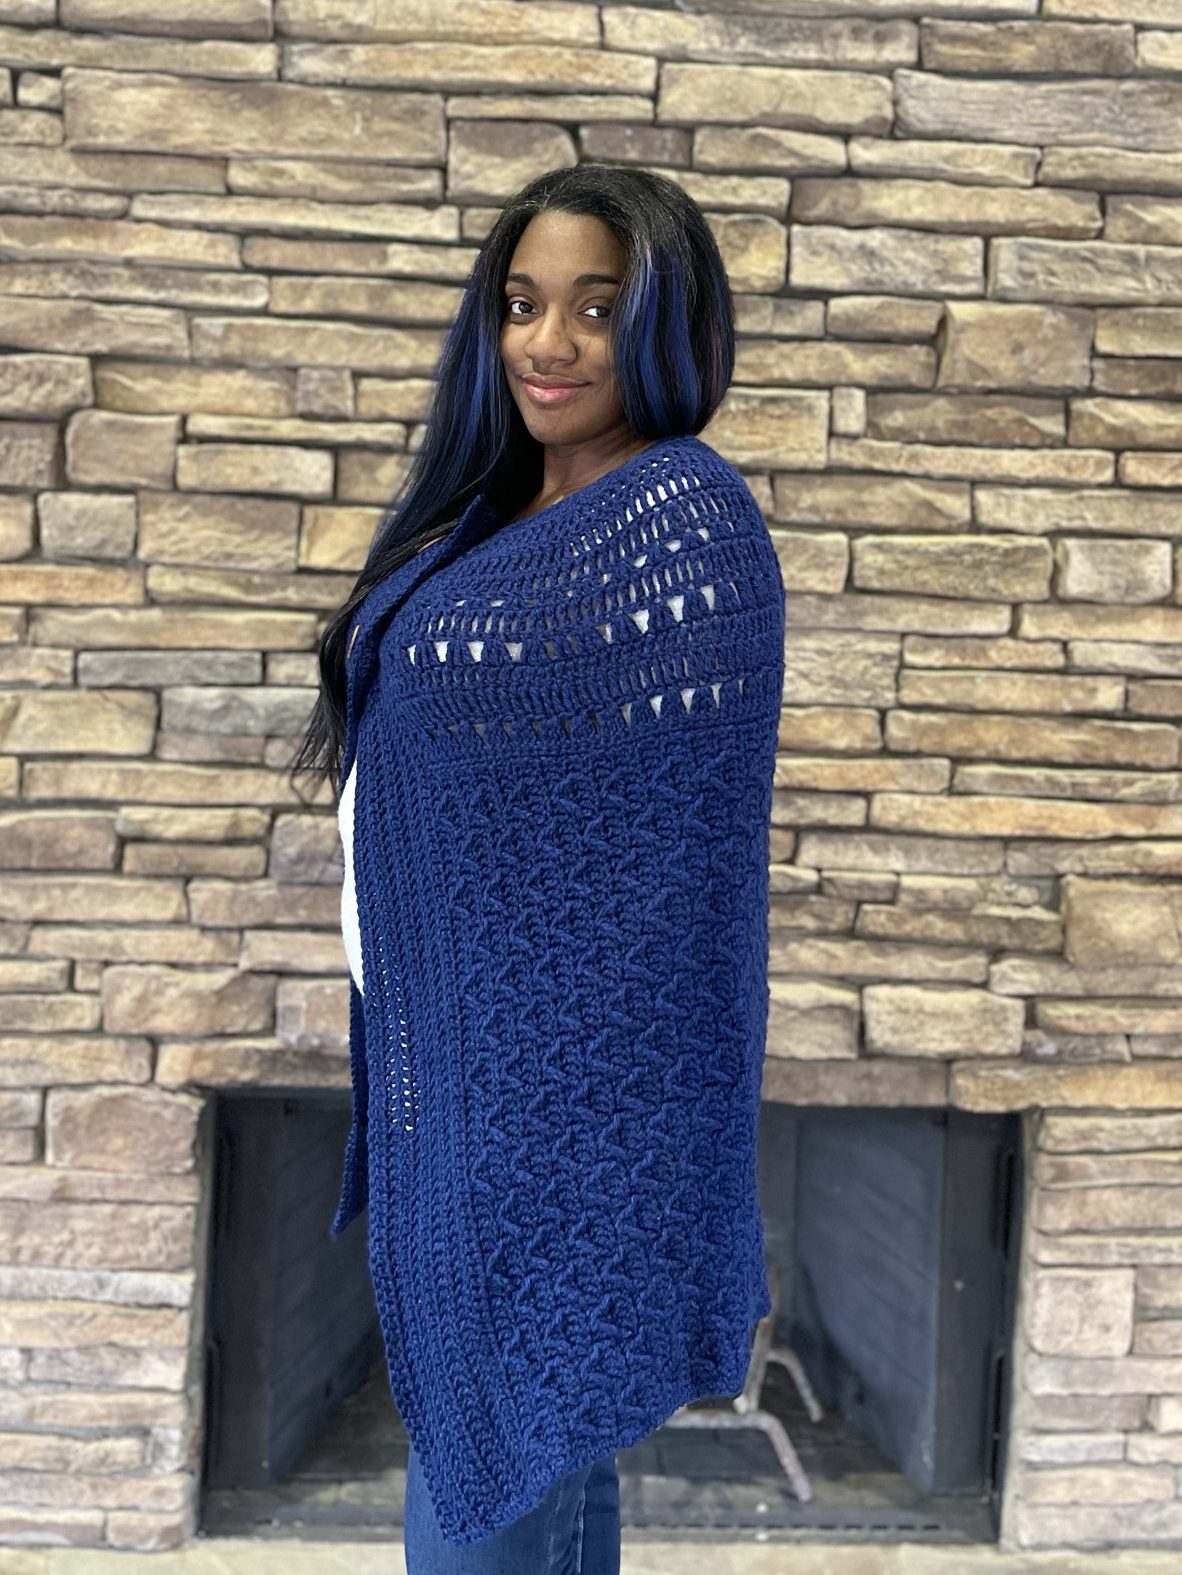
You may enjoy these patterns too
Pin it for Later

Want to talk about yarn goodness, crochet tips, and exclusive weekly deals? Join my Facebook Group, Creations By Courtney Community.
If we’re not hanging out on social media yet, come check me out on Facebook, Instagram and Pinterest.
Join my newsletter for sneak peeks, crochet tips, and more.
Use #CreationsByCourtney on social media when sharing your projects.
This pattern is not to be duplicated or resold, and not to be reproduced commercially. You may sell finished products on Etsy, at farmers markets, and craft fairs, but please credit Creations By Courtney as the pattern’s author.

3 Responses
This hexi crochet poncho looks like a fun make with the granny stitch…love the short version with the light weight yarn
It is a fun make! I hope you decide to make one for yourself or as a gift.
I did sport weight 2 yarn with a 4mm hook. i did the 120 foundation sc and it came out to the right size. if you do this, for row 2, you have to start with 2 clusters, then a *(cluster, ch2, cluster), 4 clusters* rep 5x, then (cluster, ch2, cluster), 2 clusters. sk3 between like the pattern. you get 36 clusters and 6 ch2 sps. hope this helps