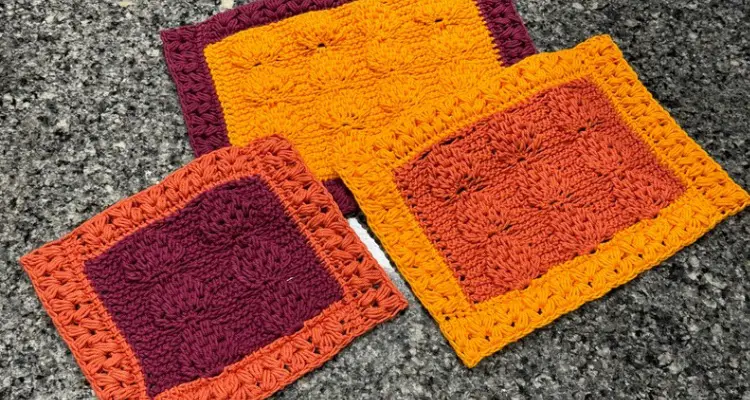
Are you ready to elevate your crochet game with something fun and unique? Let me introduce you to the eye-catching Harvest Splendor Tunisian Crochet Trivet design featuring two special stitches — the Tunisian Leaf Stitch and the Tunisian Heart Stitch.
In case you’’re not familiar with a trivet, it is just another word for a hot pad, which is a plate or other heat resistant surface placed under a hot serving dish to protect a table.
In usual Creations by Courtney style, texture and color takes center stage of this tunisian crochet project, as each Harvest Splendor Tunisian Crochet Trivet is made with two colors, one for the main section and the second color for the edging. Elevate the texture with purl stitches, simple stitches, a tunisian fan stitch, and two types of tunisian puff stitches. Now, if you’re not familiar with making puff stitches in tunisian crochet, it is very similar to making puff stitches in standard crochet, except the puff stitches are not closed until the return pass. Lastly, the entire crochet trivet is made seamlessly!
Yes, you’re going to be able to make a Harvest Splendor Tunisian Crochet Trivet in one piece. After making the main section, you will move onto the edging along the top and after binding off, you’ll move to the side, make a short row along the bottom before completing the bottom edge, and then move to the second side.
Don’t be intimidated by their intricate look or the short row! With a bit of patience, these stitches are totally doable, even if you’re new to Tunisian crochet. To add to your Harvest Splendor Tunisian Crochet Trivets, you can make a mug rug with Courtney, by following the video tutorial that you’ll find below.
Why a Crochet Trivet?
As it’s fall in the US, that means it’s holiday season, which means that many will be gathering for friend and family dinners. You can make a set of crochet trivets so everyone can enjoy a hot meal any night of the week, and definitely at Thanksgiving and Christmas.
Additionally, the Crochet Guild of America is supporting the Craft Yarn Council’s Yarnsgiving that is featuring 7 knitting patterns, 7 crochet pattern, and 6 general craft projects. For the knit and crochet projects, the focus is to make with yarn and give to others.
By choosing one to three coordinating colors to match one’s home decor, you can make as many crochet trivets will be needed for a beautiful place setting at each dinner. These make wonderful gifts too that are easy to care for, and a great stash busting project for you.
What yarn can be used for a crochet trivet?
Since a crochet trivet is meant to protect a surface or table from a hit object, you want to choose a yarn that can handle the heat and not melt. You may consider using acrylic yarn, as it’s a sturdy yarn that works for just about everything, but there’s the possibility of it melting if a pan or dish is placed right after being in the oven. I also suggest to not use a polyester yarn that may melt as well. Instead use a natural fiber.
- Cotton: 100% cotton yarn is a top choice for trivets because it’s durable, heat-resistant, and won’t melt. It’s great for absorbing heat and maintaining its shape even under hot pans.
- Wool: While wool is naturally heat-resistant, it’s less commonly used for trivets than cotton because it can felt or shrink when exposed to moisture or extreme heat over time. However, wool can still be an option for projects not exposed to moisture.
- Linen: Linen is another excellent natural fiber for trivets. It’s extremely strong, durable, and heat-resistant, making it a great alternative to cotton.
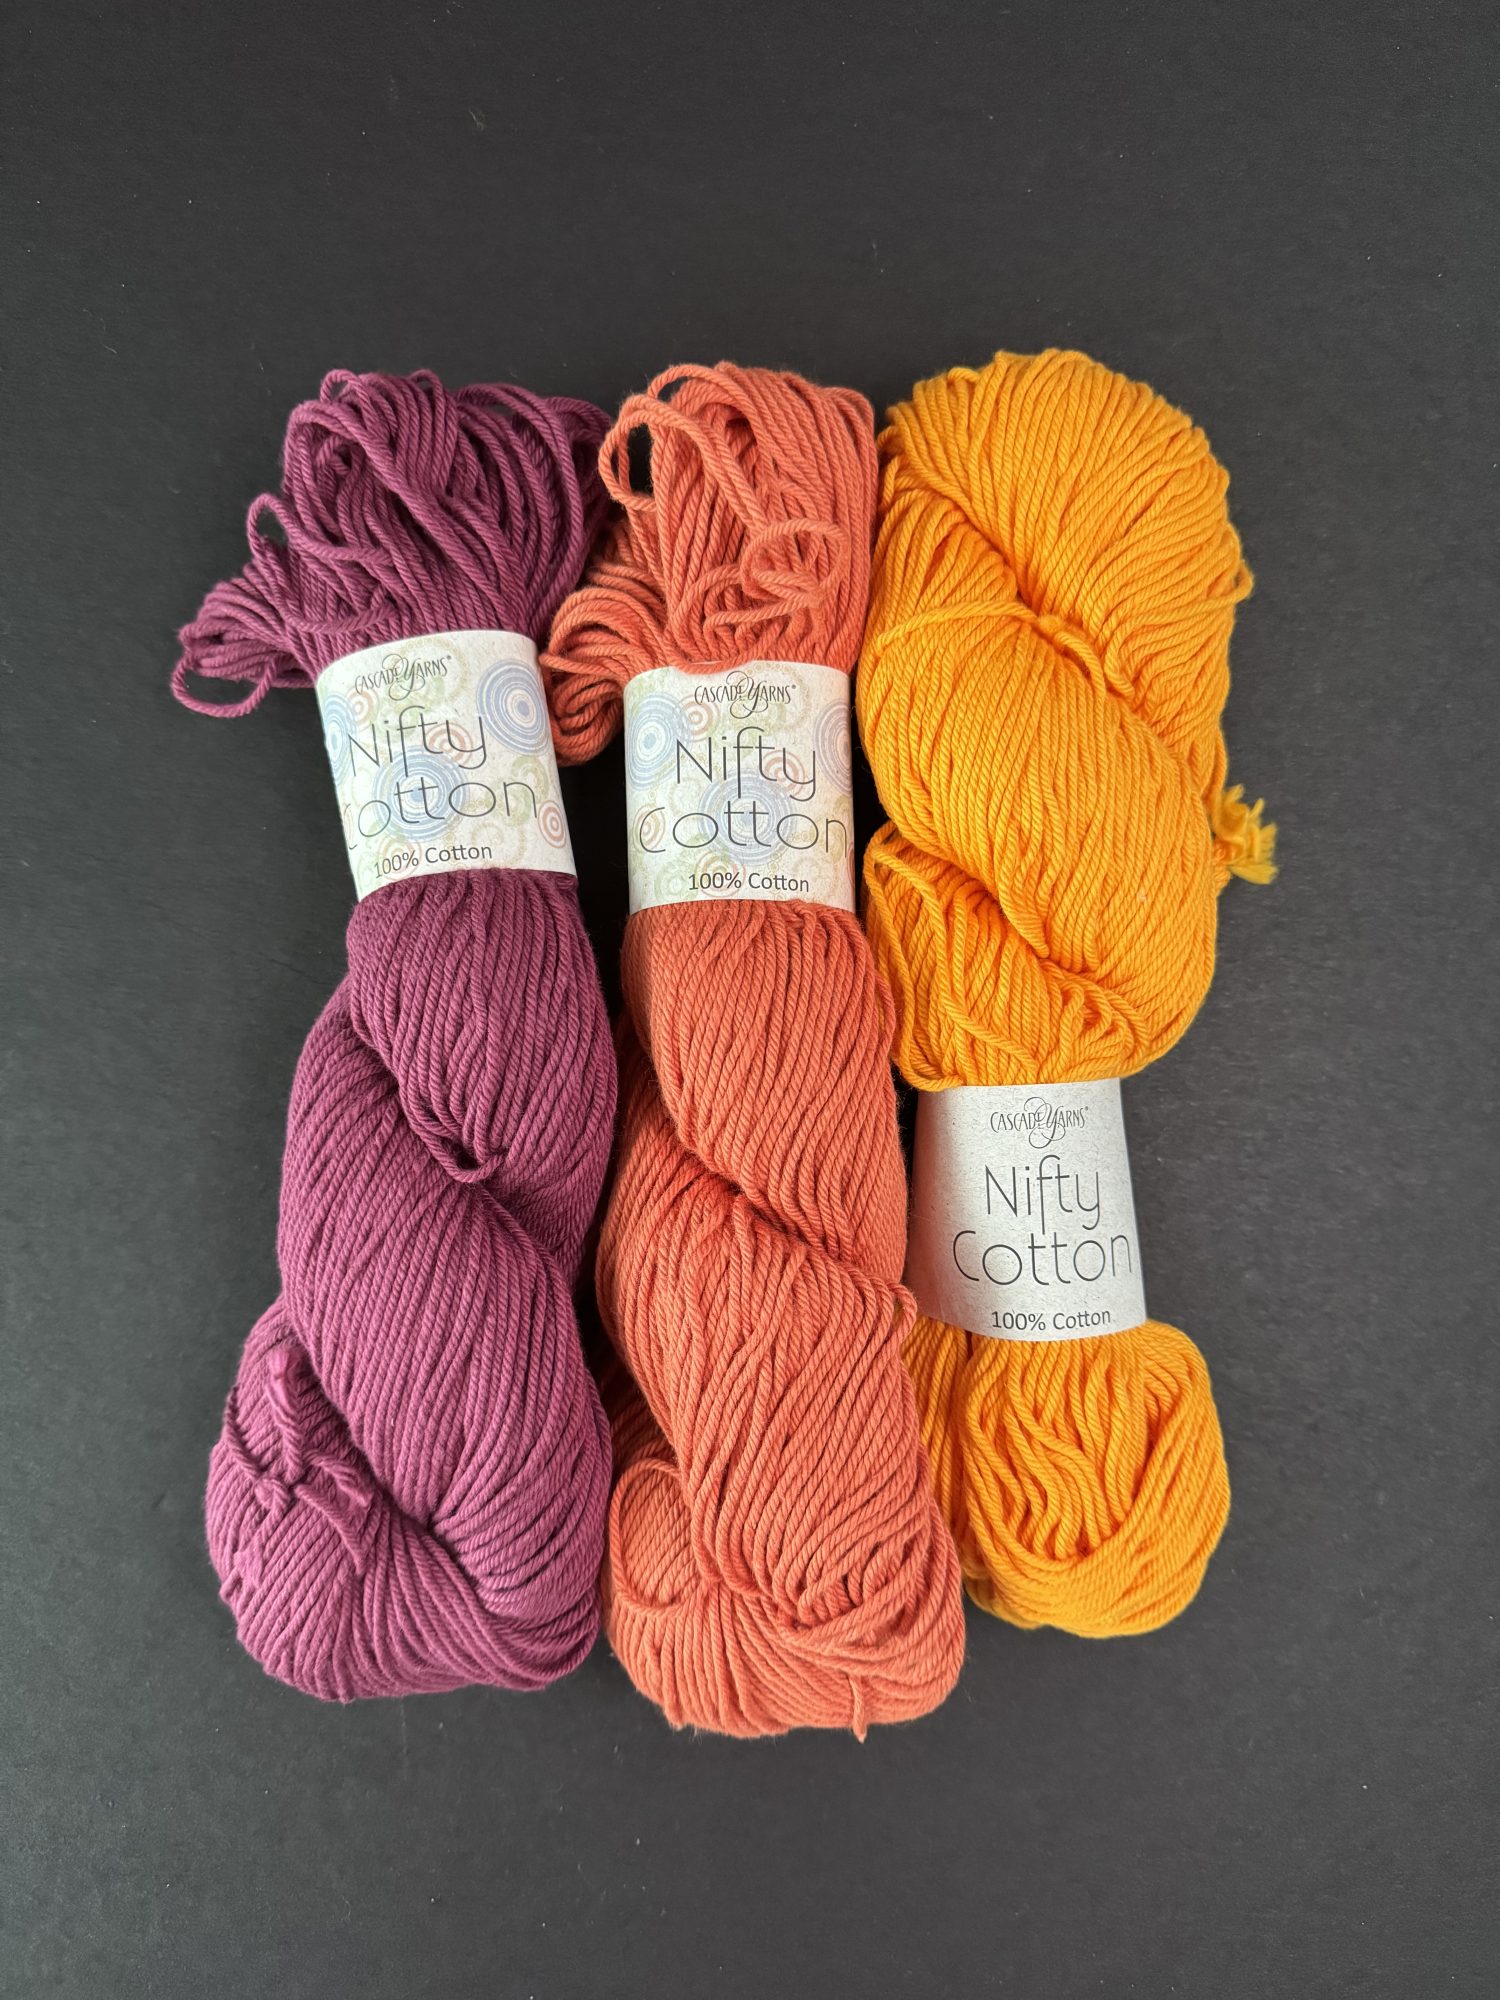
For this sample, I was provided with Cascade Yarns Nifty Cotton, a soft and versatile 100% cotton yarn that is perfect for kitchen items and accessories. With 61 color options, I chose three striking colors—Berry, Marigold and Terracotta—to create a vibrant fall-inspired palette. Not only does the cotton hold up well to heat, but it also adds beautiful stitch definition, which is essential for showing off the intricate Tunisian Leaf and Heart Stitches. These colors work wonderfully together to make a bold statement piece that’s not just functional but also a beautiful addition to any table setting.
There are lots of options for cotton yarn, and Nifty Cotton is at the top of my list for quality, worsted weight cotton yarn. As mentioned above, there are 61 color options (that is A LOT), and comes in hanks of 185 yards / 169.5 meters pers 3.5 ounces / 100 g. This is similar in length to many of the other cotton yarns, so I’ll hope you’ll consider giving a try, and can find what local yarn stores has it in stock.
*Disclosure: This post may contain affiliate links to products that I use, and think you will enjoy using too. Should you decide to use any such link, I will earn a small commission at no cost to you. Thank you for supporting this small business.
ADD TO RAVELRY FAVORITES
MATERIALS
- Nifty Cotton, worsted weight #4 (100% cotton, 185 yds/169.5 m, 3.5 oz /100g):
- Color A: #25 Berry
- Color B: #23 Marigold
- Color C: #35 Terracotta
- Alternative Yarns
- US 6.50mm tunisian hook with cable or hook to meet gauge
- Scissors
- Yarn Needle
- Tape measure
- Blocking mat and pins
SPECIFIC YARN AMOUNTS FOR EACH CROCHET TRIVET
| Size | Total Yards | Total Meters | Total Skeins (one color) | Yards Color 1 | Yards Color 2 | Meters Color 1 | Meters Color 2 | Skeins per color |
| 9 x 5 (loaf pan) | 138 | 127 | 1 | 63 | 79 | 58 | 73 | 1 |
| 9 x 9 (square dish) | 104 | 95 | 1 | 43 | 49 | 39 | 45 | 1 |
| 9 x 13 (rectangle dish) | 193 | 177 | 2 | 81 | 91 | 75 | 84 | 1 |
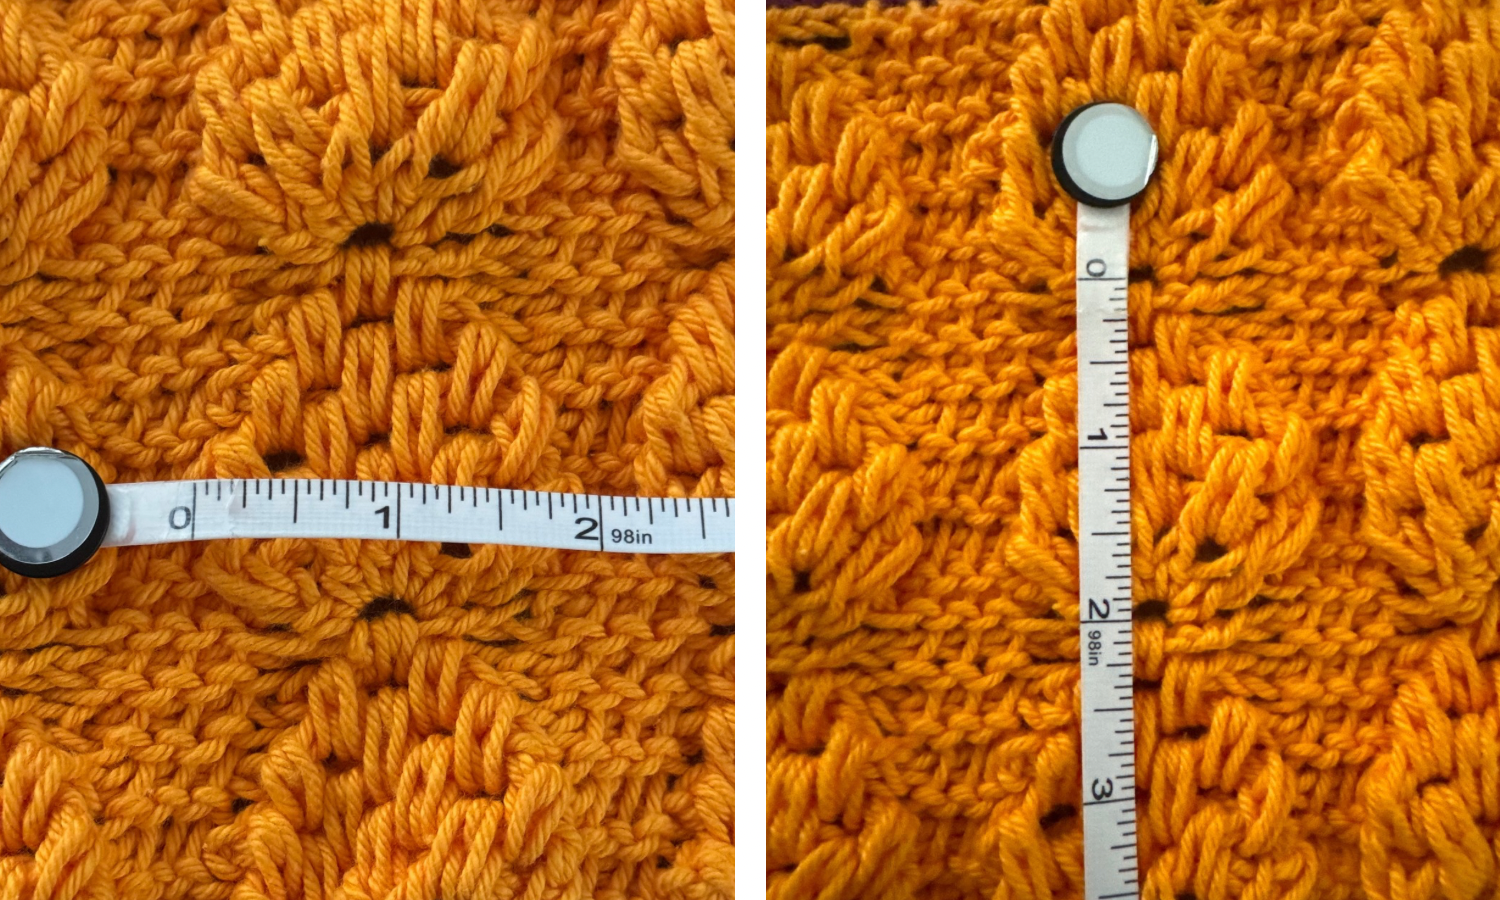
GAUGE
From widest point of leaf to edge of next leaf: 2.5” [ 6 cm]
From top to bottom of leaf: 2” [5 cm]
FINISHED SIZE(S)
Loaf Pan 9.5” w x 8.75” l [24.5 cm w x 22 cm l]; Before Edging: 6.5” w x 6” l [17 cm w x 15.2 cm l]
Circle Pans/ Dishes 11.75” w x 9.25” l [30 cm w x 23 cm l]; Before Edging: 8.75” w x 6.125” l [22.3 cm w x 15.5 cm l]
Rectangle Baking Dish 13.5” w x 10.5” l [34 cm w x 26.5 cm l]; Before Edging: 10.635” w x 7.5” l [27 cm w x 19 cm l]
PATTERN KEY
Ch: chain
Ch-sp: chain space
FwdP: forward pass
FO: fasten off
M: stitch marker(s)
OP: open puff stitch
OPv2: open puff stitch, version 2
Prev: previous
Rem: remain(s)(ing)
Rep: repeat
RetP: return pass
Sk: skip
Sl st: slip stitch
St(s): stitch(es)
Tdc: tunisian double stitch
Tfs: tunisian full stitch
Tks: tunisian knit stitch
Tps: tunisian purl stitch
Tss: tunisian simple stitch
YO: yarn over
SPECIAL STITCHES & TECHNIQUES
End St: insert hook under both loops of the last st, YO and pull up a loop.
Fan: insert hook as for tks, 5 tdc in indicated st or back loop at top of OP
OP: insert hook as for tfs in ch-sp or insert hook as for tks in indicated st, YO and pull up a loop, YO, insert hook in same st or space, YO and pull up a loop (3 loops made)
OPv2: working loosely, [YO, insert hook in ch-sp as for tfs or in st as for tks, YO and pull up a loop] 3 times in the same st (6 loops made)
Tdc: YO, insert hook right to left under next vertical bar, YO and pull up a loop, YO, pull through 2 loops
Tfs: insert hook between two vertical bars, YO and pull up a loop
Tks: insert hook in next vertical bar front to back, YO and pull up a loop
EXPERIENCE LEVEL
Intermediate
NOTES
- Pattern is written in US terms.
- Read entire pattern before beginning.
- The Splendor Harvest Tunisian Trivets is made in 3 parts: Main Section, Edging, and Finishing.
- The first loop on the hook counts as the first st.
- Always skip the first vertical bar.
- Each return pass will be written out due to the special stitches, OP and Fan.
- If a single stitch count is listed, each size has the same number of that stitch.
- It helps to use stitch markers to indicate where the OPv2 will be made for the Edging.
- Each Edging will be written separately after completing the rows of the Edging along the Top. The Edging instructions will continue with the Side Edging, Bottom Edging and then Second Side.
Purchase the ad-free PDF from your favorite pattern shop


Don’t forget to join the Confidently Crochet with Creations By Courtney for CALs, crochet tips, and yarnie fun.
INSTRUCTIONS
A table of contents is provided below for ease of following this free crochet pattern, as the instructions to complete the Edging is written separately for each tunisian crochet trivet.
Main Section
Starting with the Edging color, ch 25 (35, 45)
Row 1: starting in 2nd ch from hook, insert hook in next st, YO and pull up a loop. RetP, change to Main Color and FO Edging Color. 25 (35, 45) tss
Row 2 FwdP: Using the Main Color, Tss in next 3 sts, *sk next 3 sts, Fan in next st, sk next 3 sts, tss in next 3 sts, rep from * to last st, work end st.
Row 2 RetP: Ch 1, [YO and pull through 2 loops] 3 times, *[ch 1, YO and pull through 2 loops] 6 times, [YO and pull through 2 loops] 2 times, rep from *until 2 loops rem, YO and pull through 2 loops. 2 (3, 4) fans, 11 (14, 17) tss, 12 (18, 24) ch
Row 3 FwdP: Tps in next 3 sts, *sk next ch, [OP in next st, sk next ch] 5 times,
tps in next 3 sts, rep from * to end, work end st.
Row 3 RetP: Ch 1, [YO and pull through 2 loops] 3 times, *ch 1 [YO and pull through 4 loops, ch 1] 5 times, [YO and pull through 2 loops] 3 times, rep from * until 2 loops left, YO and pull through 2 loops. 10 (15, 20) OP, 9 (12, 15) tps, 2 tss, 12 (18, 24) ch
Row 4 FwdP: Tps in next 3 sts, *sk next ch and st, [OP in next ch-sp, sk next st] 4 times, sk next ch, tps in next 3 sts, rep from * to end, work end st.
Row 4 RetP: Ch 1, [YO and pull through 2 loops] 3 times, *ch 1, [YO and pull through 4 loops, ch 1] 4 times, [YO and pull through 2 loops] 3 times, rep from * until 2 loops rem, YO and pull through 2 loops. 8 (12, 16) OP, 9 (12, 15) tps, 2 tss, 10 (15, 20) chs
Row 5 FwdP: Tps in next 3 sts, *sk next ch and st, [OP in next ch-sp, sk next st] 3 times, sk next ch, tps in next 3 sts, rep from * to end, work end st.
Row 5 RetP: Ch 1, [YO and pull through 2 loops] 3 times, *ch 1, [YO and pull through 4 loops, ch 1] 3 times, [YO and pull through 2 loops] 3 times, rep from * until 2 loops rem, YO and pull through 2 loops. 6 (9, 12) OP, 9 (12, 15) tps, 2 tss, 8 (12, 16) ch
Row 6 FwdP: Tps in next 3 sts, *sk next ch and st, [OP in next ch-sp, sk next st] 2 times, sk next ch, tps in next 3 sts, rep from * to end, work end st.
Row 6 RetP: Ch 1, [YO and pull through 2 loops] 3 times, *ch 2, YO and pull through 4 loops, ch 1, YO and pull through 4 loops, ch 2, [YO and pull through 2 loops] 3 times, rep from * until 2 loops rem, YO and pull through 2 loops. 4 (6, 8) OP, 9 (12, 15) tps, 2 tss, 10 (15, 20) ch
Row 7 FwdP: Tps in next 3 sts, *sk next ch-2 and st, OP in next ch-sp, sk next st and ch-2, tps in next 3 sts, rep from * to end, work end st.
Row 7 RetP: Ch 1, [YO and pull through 2 loops] 3 times, *ch 3, YO and pull through 4 loops, ch 3, [YO and pull through 2 loops] 3 times, rep from * until 2 loops rem, YO and pull through 2 loops. 2 (3, 4) OP, 9 (12, 15) tps, 2 tss, 12 (18, 24) ch
Row 8 FwdP: Tps in next 3 sts, *sk next ch-3 sp, Fan in next OP, sk next ch-3 sp, tps in next 3 sts, rep from * to end, work end st.
Row 8 RetP: Ch 1, [YO and pull through 2 loops] 3 times, *[ch 1, YO and pull through 2 loops] 6 times, [YO and pull through 2 loops] 2 times, rep from *until 2 loops rem, YO and pull through 2 loops. 2 (3, 4) fans, 9 (12, 15) tps, 2 tss, 12 (18, 24) ch
Rows 9-19 (19, 25): Rep [Rows 3-8] 1 (1, 2) times, then rep Rows 3-7. Change to the first color and FO second color.
Row 20 (20, 26): TSS in each st, back bar of OP and back bar of ch to end, work end st. RetP. 25 (35, 45) tss
Row 21 (21, 27): TSS in each st. RetP.
Continue to Edging for the size that you are making
Are these tunisian stitches new to you?
Don’t fret because I have a full length video tutorial walking you through the foundation row to make the leaves, and on to making the edging continuously. Just click the image below to make your crochet trivet alongside Creations by Courtney.

EDGING INSTRUCTIONS
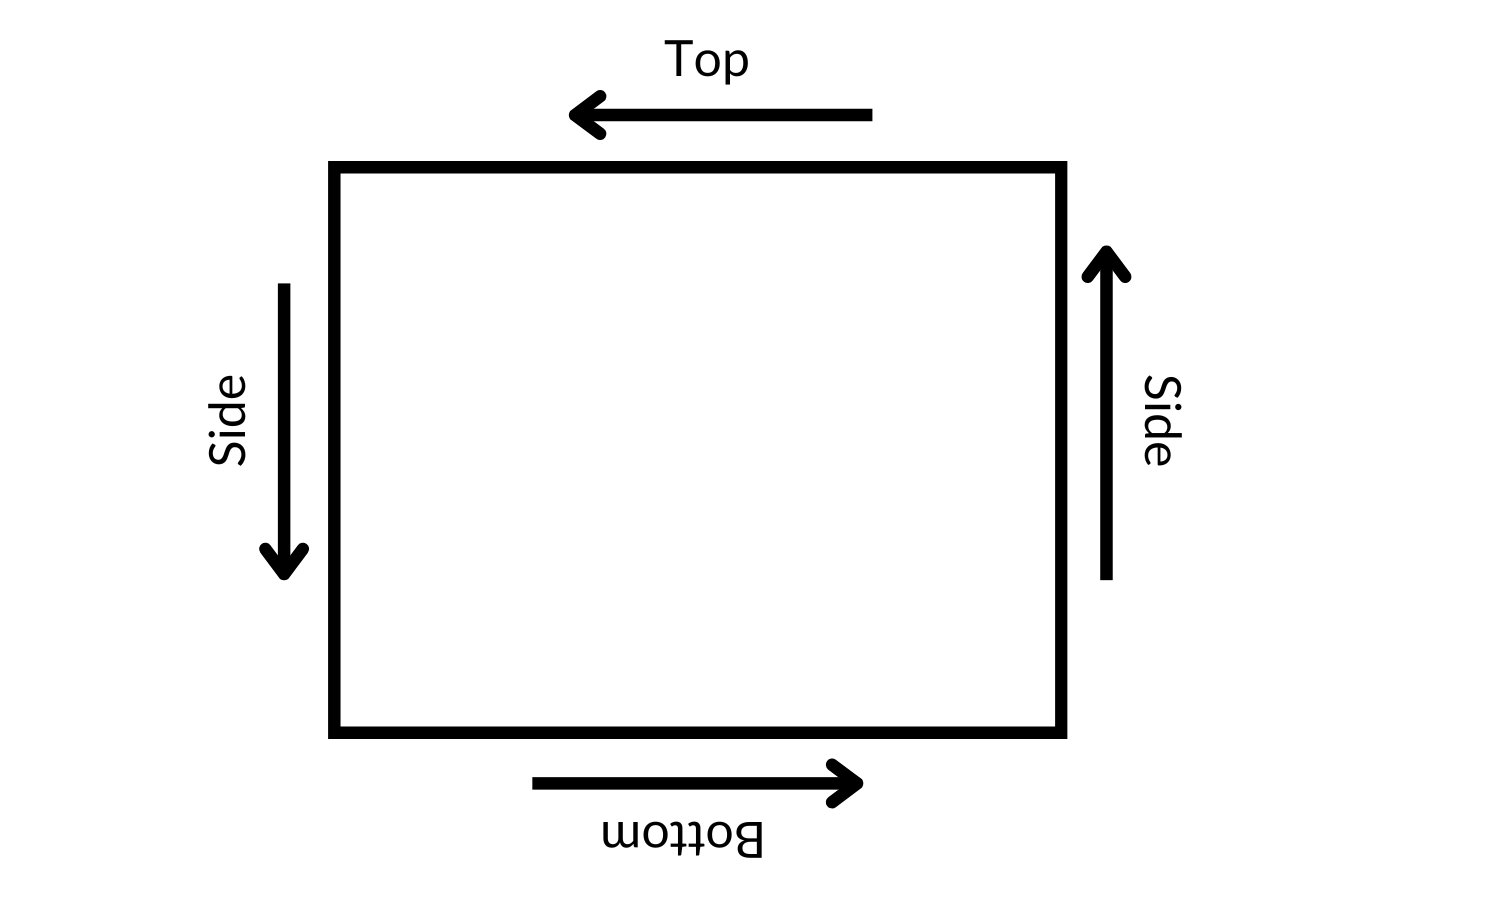
Loaf Pan
Top Edging
Row 22 FwdP: *[Sk 2 sts, OPv2 in next 2 sts] 2 times**, [sk next st, OPv2 in next 2 sts] 2 times, sk next ss, [OPv2 in next 2 sts, sk next 2 sts] 2 times, work end st.
Row 22 RetP: Ch 1, *[YO and pull through 7 loops, ch 1, YO and pull through 7 loops], rep from * until 2 loops rem, YO and pull through 2 loops. 12 OPv2, 6 ch, 2 tss
Row 23 FwdP: *Sk next OPv2, 2 OPv2 in next ch-sp, sk next OPv2, rep from * to end, work end st.
Row 23 RetP: Ch 1, *[YO and pull through 7 loops, ch 1, YO and pull through 7 loops], rep from * until 2 loops rem, YO and pull through 2 loops. 20 OPv2, 10 ch, 2 tss
Bind Off: Ch 1, sl st in back bar of each OPv2 and around each ch-1 sp until the end, sl st in end st. Do not FO.
Side Edging
Turn the piece to work along the side.
Row 1: Pull up a loop in each end st. RetP. 24 tss
Row 2: Tss in each st, work end st. RetP.
Row 3 FwdP: Sk first st, *OPv2 in next 2 sts, sk next 2 sts, OPv2 in next 2 sts, sk next st, rep from *, work end st. 12 OPv2, 6 ch, 2 tss
Row 3 RetP: Ch 1, *[YO and pull through 7 loops, ch 1, YO and pull through 7 loops], rep from * until 2 loops rem, YO and pull through 2 loops.
Row 4 FwdP: *Sk next OPv2, 2 OPv2 in next ch-sp, sk next OPv2, rep from * to end, work end st.
Row 4 RetP: Ch 1, *[YO and pull through 7 loops, ch 1, YO and pull through 7 loops], rep from * until 2 loops rem, YO and pull through 2 loops.
Bind Off: Ch 1, sl st in back bar of each OPv2 and around each ch-1 sp until the end, sl st in end st. Do not FO.
Bottom Edge
Turn the piece to work along the bottom.
Short Row FwdP: pull up a loop in each st of prev Edging (4 loops).
Short Row RetP: Insert hook first st of Row 1 of piece, YO and pull through 2 loops (first st and last vertical bar), *YO and pull through 2 loops, rep from * to end.
Row 1: Pull up loop in each st. RetP. 30 tss
Row 2 FwdP: Sk first 2 sts, *OPv2 in next 2 sts, [sk next 2 sts, OPv2 in next 2 sts] 2 times**, sk next st, 2 OPv2 in next st, sk next st, rep from * to **, sk next 2 sts, work end st.
Row 2 RetP: Ch 1, *[YO and pull through 7 loops, ch 1, YO and pull through 7 loops], rep from * until 2 loops rem, YO and pull through 2 loops. 14 OPv2, 7 ch, 2 tss
Row 3 FwdP: *Sk next OPv2, 2 OPv2 in next ch-sp, sk next OPv2, rep from * to end, work end st.
Row 3 RetP: Ch 1, *[YO and pull through 7 loops, ch 1, YO and pull through 7 loops], rep from * until 2 loops rem, YO and pull through 2 loops.
Bind Off: Ch 1, sl st in back bar of each OPv2 and around each ch-1 sp until the end, sl st in end st. Do not FO.
Second Side Edging
Turn the piece to work along the side.
Row 1: Pull up a loop in each end st and ch 1 of the bind off row. RetP. 28 tss
Row 2: Tss in each st, work end st. RetP.
Row 3 FwdP: Sk first st, *OPv2 in next 2 sts, [sk next 2 sts, OPv2 in next 2 sts] 2 times, sk next st, OPv2 in next 2 sts, sk next st, sk next st, work end st. 14 OPv2, 7 ch, 2 tss
Row 3 RetP: Ch 1, *[YO and pull through 7 loops, ch 1, YO and pull through 7 loops], rep from * until 2 loops rem, YO and pull through 2 loops.
Row 4 FwdP: *Sk next OPv2, 2 OPv2 in next ch-sp, sk next OPv2, rep from * to end, work end st.
Row 4 RetP: Ch 1, *[YO and pull through 7 loops, ch 1, YO and pull through 7 loops], rep from * until 2 loops rem, YO and pull through 2 loops.
Bind Off: Ch 1, sl st in back bar of each OPv2 and around each ch-1 sp until the end, sl st in end st. FO.
Square Baking Dish
Top Edging
Row 22 FwdP: *[Sk next st, OPv2 in next 2 sts] 5 times**, sk next 3 sts, rep from * to **, sk next st, work end st.
Row 22 RetP: Ch 1, *[YO and pull through 7 loops, ch 1, YO and pull through 7 loops], rep from * until 2 loops rem, YO and pull through 2 loops. 20 OPv2, 10 ch, 2 tss
Row 23 FwdP: *Sk next OPv2, 2 OPv2 in next ch-sp, sk next OPv2, rep from * to end, work end st.
Row 23 RetP: Ch 1, *[YO and pull through 7 loops, ch 1, YO and pull through 7 loops], rep from * until 2 loops rem, YO and pull through 2 loops.
Bind Off: Ch 1, sl st in back bar of each OPv2 and around each ch-1 sp until the end, sl st in end st.
Side Edging
Row 1: Pull up a loop in each end st. RetP. 24 tss
Row 2: Tss in each st, work end st. RetP. 24 tss
Row 3 FwdP: *Sk next st, OPv2 in next 2 sts, rep from * across, sk next st, work end st.
Row 3 RetP: Ch 1, *[YO and pull through 7 loops, ch 1, YO and pull through 7 loops], rep from * until 2 loops rem, YO and pull through 2 loops. 14 OPv2, 7 ch, 2 tss
Row 4 FwdP: *Sk next OPv2, 2 OPv2 in next ch-sp, sk next OPv2, rep from * to end, work end st.
Row 4 RetP: Ch 1, *[YO and pull through 7 loops, ch 1, YO and pull through 7 loops], rep from * until 2 loops rem, YO and pull through 2 loops.
Bind Off: Ch 1, sl st in back bar of each OPv2 and around each ch-1 sp until the end, sl st in end st.
Bottom Edging
Turn the piece to work along the bottom.
Short Row FwdP: pull up a loop in each st of prev Edging (5 loops on hook).
Short Row RetP: Insert hook in first st of Row 1 of piece, YO and pull through 2 loops (first st and last vertical bar), *YO and pull through 2 loops, rep from * to end. 5 tss
Row 1: Pull up a loop in each st and ch of starting Row 1 (main section) . RetP. 40 tss
Row 2 FwdP: Sk next st, *OPv2 in next 2 sts, [sk next 2 sts, OPv2 in next 2 sts] 3 times, sk next st**, OPv2 in next 2 sts, sk next 2 sts, OPv2 in next 2 sts, sk next st, rep between * to **, work end st.
Row 2 RetP: Ch 1, *[YO and pull through 7 loops, ch 1, YO and pull through 7 loops], rep from * until 2 loops rem, YO and pull through 2 loops. 20 OPv2, 10 ch, 2 tss
Row 3 FwdP: *Sk next OPv2, 2 OPv2 in next ch-sp, sk next OPv2, rep from * to end, work end st.
Row 3 RetP: Ch 1, *[YO and pull through 7 loops, ch 1, YO and pull through 7 loops], rep from * until 2 loops rem, YO and pull through 2 loops.
Bind Off: Ch 1, sl st in back bar of each OPv2 and around each ch-1 sp until the end, sl st in end st.
Second Side Edging
Turn the piece to work along the side.
Row 1: Pull up a loop in each st and ch 1 of Bind Off row. RetP. 28 tss
Row 2: Tss in each st. RetP. 28 tss
Row 3 FwdP: *[Sk next st, OPv2 in next 2 sts] 4 times, sk next 2 sts, [OPv2 in next 2 sts, sk next st] 4 times, work end st.
Row3 RetP: Ch 1, *[YO and pull through 7 loops, ch 1, YO and pull through 7 loops], rep from * until 2 loops rem, YO and pull through 2 loops. 16 OPv2, 8 ch, 2 tss
Row 4 FwdP: *Sk next OPv2, 2 OPv2 in next ch-sp, sk next OPv2, rep from * to end, work end st.
Row 4 RetP: Ch 1, *[YO and pull through 7 loops, ch 1, YO and pull through 7 loops], rep from * until 2 loops rem, YO and pull through 2 loops.
Bind Off: Ch 1, sl st in back bar of each OPv2 and around each ch-1 sp until the end, sl st in end st.
Rectangle Baking Dish
Top Edging
Row 28 FwdP: Sk 2 sts, OPv2 in next 2 sts, *sk next 2 sts, **OPv2 in next 2 sts, rep from * 3 more times, sk next 3 sts, starting at **, rep from * until 3 sts rem, work end st.
Row 28 RetP: Ch 1, *[YO and pull through 7 loops, ch 1, YO and pull through 7 loops], rep from * until 2 loops rem, YO and pull through 2 loops. 20 OPv2, 10 ch, 2 tss
Row 29 FwdP: *Sk next OPv2, 2 OPv2 in next ch-sp, sk next OPv2, rep from * to end, work end st.
Row 29 RetP: Ch 1, *[YO and pull through 7 loops, ch 1, YO and pull through 7 loops], rep from * until 2 loops rem, YO and pull through 2 loops.
Bind Off: Ch 1, sl st in back bar of each OPv2 and around each ch-1 sp until the end, sl st in end st. Do not FO
Side Edging
Turn the piece to work along the side.
Row 1: Pull up a loop in each end st. RetP. 31 tss
Row 2: Tss in each st, work end st. RetP.
Row 3 FwdP: Sk 2 sts, OPv2 in next 2 sts, [sk next 2 sts, OPv2 in next 2 sts] 2 times, sk next 2 sts, 2 OPv2 in next st, [sk next 2 sts, OPv2 in next 2 sts] 3 times, sk next 2 st, work end st.
Row 3 RetP: Ch 1, *[YO and pull through 7 loops, ch 1, YO and pull through 7 loops], rep from * until 2 loops rem, YO and pull through 2 loops. 14 OPv2, 7 ch, 2 tss
Row 4 FwdP: *Sk next OPv2, 2 OPv2 in next ch-sp, sk next OPv2, rep from * to end, work end st.
Row 4 RetP: Ch 1, *[YO and pull through 7 loops, ch 1, YO and pull through 7 loops], rep from * until 2 loops rem, YO and pull through 2 loops.
Bind Off: Ch 1, sl st in back bar of each OPv2 and around each ch-1 sp until the end, sl st in end st. Do not FO.
Bottom Edge
Turn the piece to work along the bottom.
Short Row FwdP: pull up a loop in each st of prev Edging (5 loops on hook).
Short Row RetP: Insert hook in first st of Row 1 of piece, YO and pull through 2 loops (first st and last vertical bar), *YO and pull through 2 loops, rep from * to end.
Row 1: Pull up loop in each st. RetP. 50 tss
Row 2 FwdP: Sk 2 sts, *OPv2 in next 2 sts, [sk next 2 sts, OPv2 in next 2 sts] 4 times**, sk next 3 sts, 2 OPv2 in next st, sk next 3 sts, rep from * to ** sk next 2 sts, work end st.
Row 2 RetP: Ch 1, *[YO and pull through 7 loops, ch 1, YO and pull through 7 loops], rep from * until 2 loops rem, YO and pull through 2 loops. 22 OPv2, 11 ch, 2 tss
Row 3: *Sk next OPv2, 2 OPv2 in next ch-sp, sk next OPv2, rep from * to end, work end st.
Row 3 RetP: Ch 1, *[YO and pull through 7 loops, ch 1, YO and pull through 7 loops], rep from * until 2 loops rem, YO and pull through 2 loops.
Bind Off: Ch 1, sl st in back bar of each OPv2 and around each ch-1 sp until the end, sl st in end st. Do not FO.
Second Side Edging
Turn the piece to work along the side.
Row 1: Pull up a loop in each end st and ch 1 of the bind off row. RetP. 34 tss
Row 2: Tss in each st, work end st. RetP.
Row 3 FwdP: Sk first 3 sts, OPv2 in next 2 sts, [sk next 2 sts, OPv2 in next 2 sts] 2 times, sk next st, OPv2 in next 2 sts, sk next st, OPv2 in next 2 sts, [sk next 2 sts, OPv2 in next 2 sts] 2 times, sk next 2 st, work end st.
Row 3 RetP: Ch 1, *[YO and pull through 7 loops, ch 1, YO and pull through 7 loops], rep from * until 2 loops rem, YO and pull through 2 loops. 14 OPv2, 7 ch, 2 tss
Row 4 FwdP: *Sk next OPv2, 2 OPv2 in next ch-sp, sk next OPv2, rep from * to end, work end st.
Row 4 RetP: Ch 1, *[YO and pull through 7 loops, ch 1, YO and pull through 7 loops], rep from * until 2 loops rem, YO and pull through 2 loops.
Bind Off: Ch 1, sl st in back bar of each OPv2 and around each ch-1 sp until the end, sl st in end st. FO.
Finishing
Weave in ends.
Wet or spray block your Splendid Harvest crochet trivets to final measurements.
You may enjoy these patterns too
Pin it for Later

Want to talk about yarn goodness, crochet tips, and exclusive weekly deals? Join my Facebook Group, Confidently Crochet with Creations By Courtney.
If we’re not hanging out on social media yet, come check me out on Facebook, Instagram and Pinterest.
Join my newsletter for sneak peeks, crochet tips, and more.
Use #CreationsByCourtney on social media when sharing your projects.
This pattern is not to be duplicated or resold, and not to be reproduced commercially. You may sell finished products on Etsy, at farmers markets, and craft fairs, but please credit Creations By Courtney as the pattern’s author.


