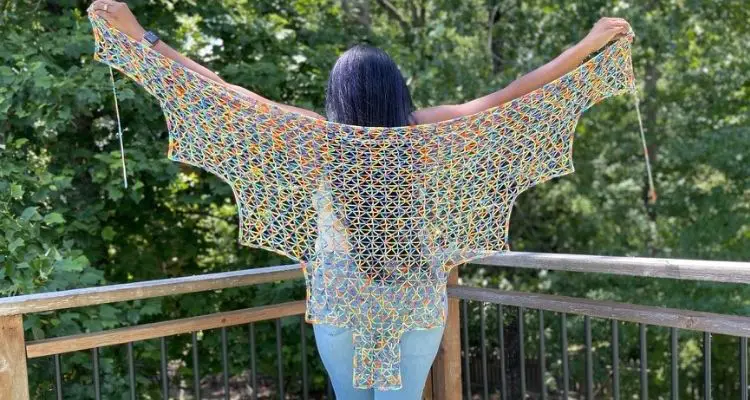
Wrap yourself in a touch of summer with the Kaleidoscope Wrap!
The Kaleidoscope Wrap offers a unique multistep shape and ties. Rather than just wearing it as a shawl, the ties allow for multiple looks to be created from a cowl to a cocoon to a cardi look.
Have you ever seen a yarn and instantly knew what you would make with it?
That’s exactly how the Kaleidoscope Wrap kind of came to be.
I was visiting The Traveling Yarn Yogi and her bus, Purl, the mobile LYS last fall to get a shawl cuff to pair with the X-capade Shawl, and of course I was distracted by all of the gorgeous yarns. When the Olive & Two Ewe Twain caught my eye, one skein jumped in my hand and I had a clear vision for the shape of a shawl. As usual, I have a ton of ideas, and I attempt to work on one crochet design at a time, so this idea had to slowly bake until now. As a true crocheter/yarn hoarder, I grabbed a second skein to be on the safe side, and I’m so glad that I did.
The Kaleidoscope Wrap works up quickly, even when made with fingering weight yarn, because of the Fractal Lace, which came to me one night as I was falling asleep. I almost stuck to one skein for this project, but decided to make it longer for added drama, as I really envisioned wearing it as a sarong to the pool or over jeans for a night out.
*Disclosure: This post may contain affiliate links to products that I use, and think you will enjoy using too. Should you decide to use any such link, I will earn a small commission at no cost to you. Thank you for supporting this small business.
Yarn
Like I mentioned above, the Olive & Two Ewe Twain jumped in may hands as I was shopping for a Birdie Parker shawl cuff. It also helped that the color way is called South Beach, and I knew it was destiny for that yarn and I to meet. My dear husband is from Miami, and we’ve had many days of cruising South Beach taking in the sun, sand and wind.
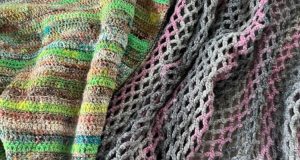
Twain is a super wash merino and nylon sock blend that creates a lovely stitch definition, as well as a fair amount of stretch (check out the before and after measurements below). The South Beach color way was like working with a rainbow. It was almost too pretty to wind up and crochet with.
If you have yet to try a hand-dyed fingering weight yarn, I strongly encourage giving it a try. If you’re sensitive to wool, Lion Brand Summer Nights Bonus Bundle is a great alternative, and only requires one skein. ?
Add to Ravelry Queue
MATERIALS
- Olive & Two Ewe Twain (75% SW merino/ 25% nylon sock, 463 yards /423 meters, 3.5 ounces / 100 grams): South Beach x 2 or 621 yds/567.8 m, 4.8 oz/ 134g total
- Hook US F / 3.75 mm or size needed to match gauge. I used my black Odyssey.
- Stitch Markers x 2
- Scissors
- Measuring tape
- Yarn Needle
- Scissors
GAUGE
5 repeats = 6” [15.2 cm], 9 rows = 6” [15.2 cm]
SIZES
- Prior to blocking: 50” [127 cm] wingspan x 24” [61 cm] length
- After blocking: 64.5” [163.8 cm] wingspan x 35” [88.9 cm] length
PATTERN KEY
Beg: beginning
Btw: between
Ch: chain
Cnr: corner
CSTR: chainless starting treble crochet
Dtr: double treble crochet
Dtr2tog: double treble 2 together
DTDtog: double treble crochet, treble crochet, double treble crochet together
FO: fasten off
Fsc: foundation single crochet
M: stitch marker(s)
Prev: previous
Rep: repeat
Sl st: slip stitch
Sc: single crochet
Sc2tog: single crochet 2 together
St(s): stitch(es)
Sk: skip
Tr: treble crochet
WS: wrong side
YO: yarn over
SPECIAL STITCHES & TECHNIQUES
CSTR: Pull up a loop, wrap around hook 2 times (counts as YO 2 times), insert hook in first st, YO, pull up a loop, [YO, pull through 2 loops] 3 times
Dtr2tog: *YO 3 times, insert hook in indicated st, YO, pull up a loop (5 loops on hook), [YO, pull through 2 loops] 3 times**, sk 7 ch, rep from * to **, YO, pull through 3 loops
DTDtog: *YO 3 times, insert hook in indicated st, YO, pull up a loop (5 loops on hook), [YO, pull through 2 loops] 3 times**, YO 2 times, sk 3 ch, insert hook in next st, YO, pull up a loop (5 loops on hook), [YO, pull through 2 loops] 2 times (3 loops on hook), sk 3 ch, rep from * to **, YO, pull through 4 loops
Check out the tutorial
EXPERIENCE LEVEL
Intermediate
NOTES
- Pattern is written US terms.
- Read the entire pattern before beginning.
- Pattern is written in 4 parts: Wrap, Edging & Ties, Blocking, and Finishing.
- The foundation ch can be substituted with a standard ch.
- CSTR can be substituted with ch 4.
- The stitch of the first and last leg of each DTDtog will be used by the prev and following DTDtog, except for the first and last one.
- 7 sts are always sk btw the legs of each dtr2tog.
- 3 sts are always sk btw the legs of each DTDtog.
- It helps to insert the hook under 2 sets of loops of the DTDtog of the row below to reduce the natural lean of the sts.
- The ties are created when completing the Edging.
- Each step of Rnd 1 of the Edging is written on a separate line for clarity.
- A stitch chart is included at the end of the PDF for reference.

Want to make crochet garments that fit?
Receive the Crochet Garment Cheat Sheet Today by signing up below.
Thank you!
You have successfully joined our subscriber list.
Fashion Styling
If you are following me on IG, I like to share a #fiberfashionfriday post or video for inspiration. These are particularly fun with versatile pieces like the Kaleidoscope Wrap and Lacy Tranfsformation Top.
Check out these options, and comments which is your favorite. Let me know if there are other Creations by Courtney crochet patterns you would like to see in a Fashion Styling video.
Innovative Crochet Stitches Blog Hop
This event is over but definitely check out all of the great stitches that will offer endless possibilities in your crochet work!
To see all the fabulous crochet patterns, click HERE.
Purchase the ad-free PDF from your favorite pattern shop.
INSTRUCTIONS
INSTRUCTIONS:
Row 1: 339 fsc, turn
Row 2: CSTR in first st, ch 4, DTDtog beg in next st, *ch 7, DTDtog beg in same st as the 3rd leg of the prev DTDtog; rep from * until 9 sts remain, ch 7, DTDtog beg in same st as 3rd leg of prev DTDtog, ch 4, tr in last st, turn – 2 tr; 2 ch-4 groups; 41 ch-7 groups; 42 DTDtog; 339 total sts
Row 3: CSTR in first st, sk 4 ch, (dtr, ch 3, tr, ch 3) in next st; starting in last st used, dtr2tog (sk 7 ch btw the legs), *(ch 3, tr, ch 3)** in same st as the 2nd leg of the prev dtr2tog; starting in the last st used, dtr2tog; rep from * to ** on last rep and 5 sts remain, dtr in the same st as the 2nd leg of the last dtr2tog made, sk 4 ch, tr in last st, turn – 2 tr; 42 groups; 339 total sts
Rows 4-10: Rep [Rows 2-3] 3 times, then rep Row 2, FO, turn
Row 11: Place M in 42nd st from each end; attach with sl st at first M, CSTR in first st, sk 3 ch, (dtr, ch 3, tr, ch 3) in next st; starting in last st used, dtr2tog (sk 7 ch btw the legs), *(ch 3, tr, ch 3)** in same st as the 2nd leg of the prev dtr2tog; starting in the last st used, dtr2tog; rep from * to ** on last rep and 5 sts remain, dtr in the same st as the 2nd leg of the last dtr2tog made, sk 3 ch, tr in next st (2nd M); remove M; turn – 2 tr; 32 repeats; 259 total sts
Row 12: Rep Row 2 – 2 tr, 2 ch-4 groups, 31 ch-7 groups, 32 DTDtog; 257 total sts
Rows 13-19: Rep Row 3, then rep [Rows 2-3] 3 times, FO , turn
Note: The next row will place the first and last tr in the same st as the first and last DTDtog to maintain the pattern.
Row 20: Place M in 42nd st from each end; attach with sl at at first M, CSTR in same st, ch 4, DTDtog beg in same st as CSTR, *ch 7, DTDtog beg in same st as the 3rd leg of the prev DTDtog; rep from * until 9 sts remain, ch 7, DTDtog beg in same st as 3rd leg of prev DTDtog, ch 4, tr in same st as 3rd leg of prev DTDtog; remove M, turn – 2 tr; 2 ch-4 groups; 21 ch-7 groups; 22 DTDtog; 179 total sts
Row 21: CSTR in first st, sk 4 ch, (dtr, ch 3, tr, ch 3) in next st; starting in last st used, dtr2tog (sk 7 ch btw the legs), *(ch 3, tr, ch 3) in same st as the 2nd leg of the prev dtr2tog; starting in the last st used, dtr2tog**; rep from * to ** on last rep and 4 sts remain, dtr in the same st as the 2nd leg of the last dtr2tog made, sk 4 ch, tr in last st, turn – 2 tr; 22 groups; 179 total sts
Rows 22-28: Rep [Rows 2-3] 3 times, then rep Row 2, FO, turn – 179 total sts
Note: the next row will place the first and last tr in the same st as the first and last DTDtog to maintain the pattern
Row 29: Place M in 42nd st from each end; attach yarn in st at first M with sl st, CSTR in same st, sk 3 ch, (dtr, ch 3, tr, ch 3) in next st; starting in last st used, dtr2tog (sk 7 ch btw the legs), *(ch 3, tr, ch 3) in same st as the 2nd leg of the prev dtr2tog; starting in the last st used, dtr2tog**; rep from * to ** on last rep and 4 sts remain, dtr in the same st as the 2nd leg of the last dtr2tog made, sk 3 ch, tr in next st; remove M; turn – 2 tr; 12 groups; 99 total sts
Row 30: Rep Row 2, turn – 2 tr, 2 ch-4 groups, 12 DTDtog, 99 total sts
Rows 31-37: Rep Row 3, then Rep [Rows 2-3] 3 times, FO, turn
Row 38: Place M in 34th st from each end; attach yarn with sl st at first M; CSTR in same st, ch 4, DTDtog beg in same st as CSTR, *ch 7, DTDtog beg in same st as the 3rd leg of the prev DTDtog; rep from * until 9 sts remain, ch 7, DTDtog beg in same st as 3rd leg of prev DTDtog, ch 4, tr in same st as 3rd leg of the prev DTDtog, remove M; turn – 2 tr; 2 ch-4 groups; 3 ch-7 groups; 4 DTDtog; 35 total sts
Row 39: Rep Row 3, turn – 2 tr; 4 groups; 35 total sts
Rows 40-46: Rep [Rows 2-3] 3 times, then rep Row 2, FO.
Edging & Ties
Rnd 1: Attach yarn in cnr of Row 1;
- ch 1, [4 sc around next tr] 9 times,
- ch 1, turn cnr, sc in next st, 4 sc around next ch-4, [sc in next st, 7 sc around next ch-7] 4 times, sc in next st, 2 sc around next ch group, sc2tog around inner cnr,
- 3 sc around next tr, [4 sc around next tr] 8 times,
- ch 1, turn cnr, sc in next st, [sc in next st, 3 sc around next ch-3] 9 times, sc in next st, 2 sc around next ch-3, sc2tog around inner cnr,
- 3 sc around next tr, [4 sc around next tr] 8 times,
- ch 1, turn cnr, sc in next st, 4 sc around next ch-4, [sc in next st, 7 sc around next ch-7] 4 times, sc in next st, 2 sc around next ch group, sc2tog around inner cnr,
- 3 sc around next tr, [4 sc around next tr] 8 times,
- ch 1, turn cnr, sc in next st, [sc in next st, 3 sc around next ch-3] 9 times, sc in next st, 2 sc around next ch-3, sc2tog around inner cnr,
- 3 sc around next tr, [4 sc around next tr] 8 times, ch 1, turn cnr,
- sc in first st, 4 sc around next ch group, [sc in next st, 7 sc around next ch group] 3 times, 4 sc around next ch group, sc in next st,
- ch 1, turn cnr, [4 sc around next tr] 8 times, 3 sc around next tr, sc2tog around inner cnr,
- 2 sc around ch group, [sc in next st, 3 sc around next ch-3] 7 times, sc in next 2 sts,
- ch 1, turn cnr, [4 sc around next tr] 8 times, 3 sc around next tr, sc2tog around inner cnr,
- 3 sc around next ch group, [sc in next st, 7 sc around next ch group] 4 times, sc in next st, sc around next ch-4,
- ch 1, turn cnr, [4 sc around next tr] 8 times, 3 sc around next tr, sc2tog around inner cnr,
- 2 sc around ch group, [sc in next st, 3 sc around next ch-3] 9 times, sc in next 2 sts,
- ch 1, turn cnr, [4 sc around next tr] 8 times, 3 sc around next tr, sc2tog around inner cnr,
- 3 sc around next ch group, [sc in next st, 7 sc around next ch group] 4 times, sc in next st, sc around next ch-4,
- ch 1, turn cnr, [4 sc around next tr] 8 times, ch 1, sl st to join
Rnd 2: Ch 100, turn; sl st in each ch (1st tie made), sc in ch-1 cnr of Rnd 1, sc in each st to cnr, sc in ch-1, ch 100, turn and sl st in each ch (2nd tie made), sc in same cnr; continue to sc in each st making (sc, ch 1, sc) in a ch-1 sp for outer cnrs and sc2tog by using the sts before and after the prev sc2tog for inner cnrs; sl st to join, FO
Blocking & Finishing
- Weave in all ends.
- Soak in lukewarm water for up to 10 mins.
- Gently squeeze out water; lay on towel; roll in towel to remove excess water.
- Lay out flat on blocking mats; pin to final shape with straight edges.
- Allow to dry completely.
You may enjoy these patterns too
Pin it for Later

If we’re not hanging out on social media yet, come check me out on Facebook, Instagram and Pinterest.
Want to talk about yarn goodness, crochet tips, and exclusive weekly deals? Join my Facebook Group, Creations By Courtney Community.
Join my newsletter for sneak peeks, crochet tips, and more. HERE
Please use #CreationsByCourtney on social media when sharing your projects.
This pattern is not to be duplicated or resold, and not to be reproduced commercially. You may sell finished products on Etsy, at farmers markets, and craft fairs, but please credit Creations By Courtney as the pattern’s author.




14 Responses
What an amazing shape for a wrap! That’s lovely! So light and airy but still dreamy and cozy.
Thank you for the kind words! It’s so much fun to come up with different shapes for classic crochet styles, like a wrap or shawl.
Thank you for a unique shawl pattern and it’s free! Much appreciated.
Please check your Ravelry pattern page. Fractal lace is spelled Factal.
You’re welcome, Debbie! Thanks for catching the spelling error.
Hello. This is a very gorgeous wrap. But I don’t see the actual pattern. Is it still available? Thanks.
Hi Mary,
Thank you for letting me know that the purchase buttons were missing. I’m not sure where they went to. This pattern is available in all of my pattern shops, and I will get the buttons added. Please check back this evening.
Great last name, by the way! ?
Awesome. Thank you. I will check back later today.
Thanks. I think it’s a great name as well. The man behind it is even better. Almost 28 years and still feels like our honeymoon???
Looks amazing I’m definitely going to try it soon
Thank you, Anuayo! It’s a great pattern for using two hanks of fingering weight yarn.
Great looking shawl. Can’t wait to start this one.