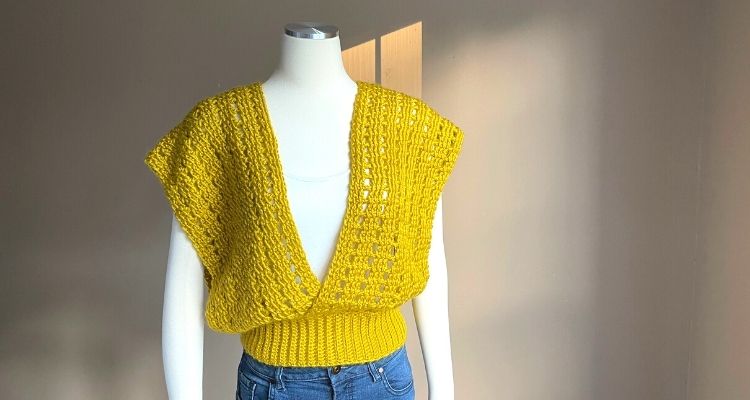
The Tunisian Crochet Lattice Top was pure spontaneous inspiration based on the the tunisian double crochet lace stitch! I was going for an easy, breezy garment that’s perfect for summer.
You’re going to love making this top because the stitches work up quickly, and it’s not a yarn eating tunisian project. That means that you can finally use that yarn sitting in the stash that has been waiting for a fabulous project.
You’ll also love that you can make two pieces at the same time with a straight or cabled tunisian hook! Is that a squeal of joy I hear? I was super hyped when I learned that the hook only needs to be one third of the total width of a project.
The Tunisian Lattice Top is great for layering over tanks, dresses, short sleeves, and even long sleeve when the weather cools. And it’s easy to customize the length of each side if you want more drape or something shorter for a more fitted look. Also, the ribbing is slow to make but soooo worth the effort to bring the whole piece together, and customize the fit.

I’m soooo excited to be a Furls Featured Designer in the Furls Crochet Blog Hop 2021! I truly love their hooks and yarn, and I’m always talking about them if you have poked around my site. I almost exclusively use Furls Crochet hooks, and I hope you try each style of hook, if you haven’t already started your collection. Keep reading to learn about the yarn and tunisian hook I used for the Tunisian Lattice Top.
And if you didn’t know, I was a Furls Featured Designer in 2020 too! You can check out design for last year HERE and all of the 2020 designs HERE.
*Disclosure: This post may contain affiliate links to products that I use, and think you will enjoy using too. Should you decide to use any such link, I will earn a small commission at no cost to you. Thank you for supporting this small business.
Yarn
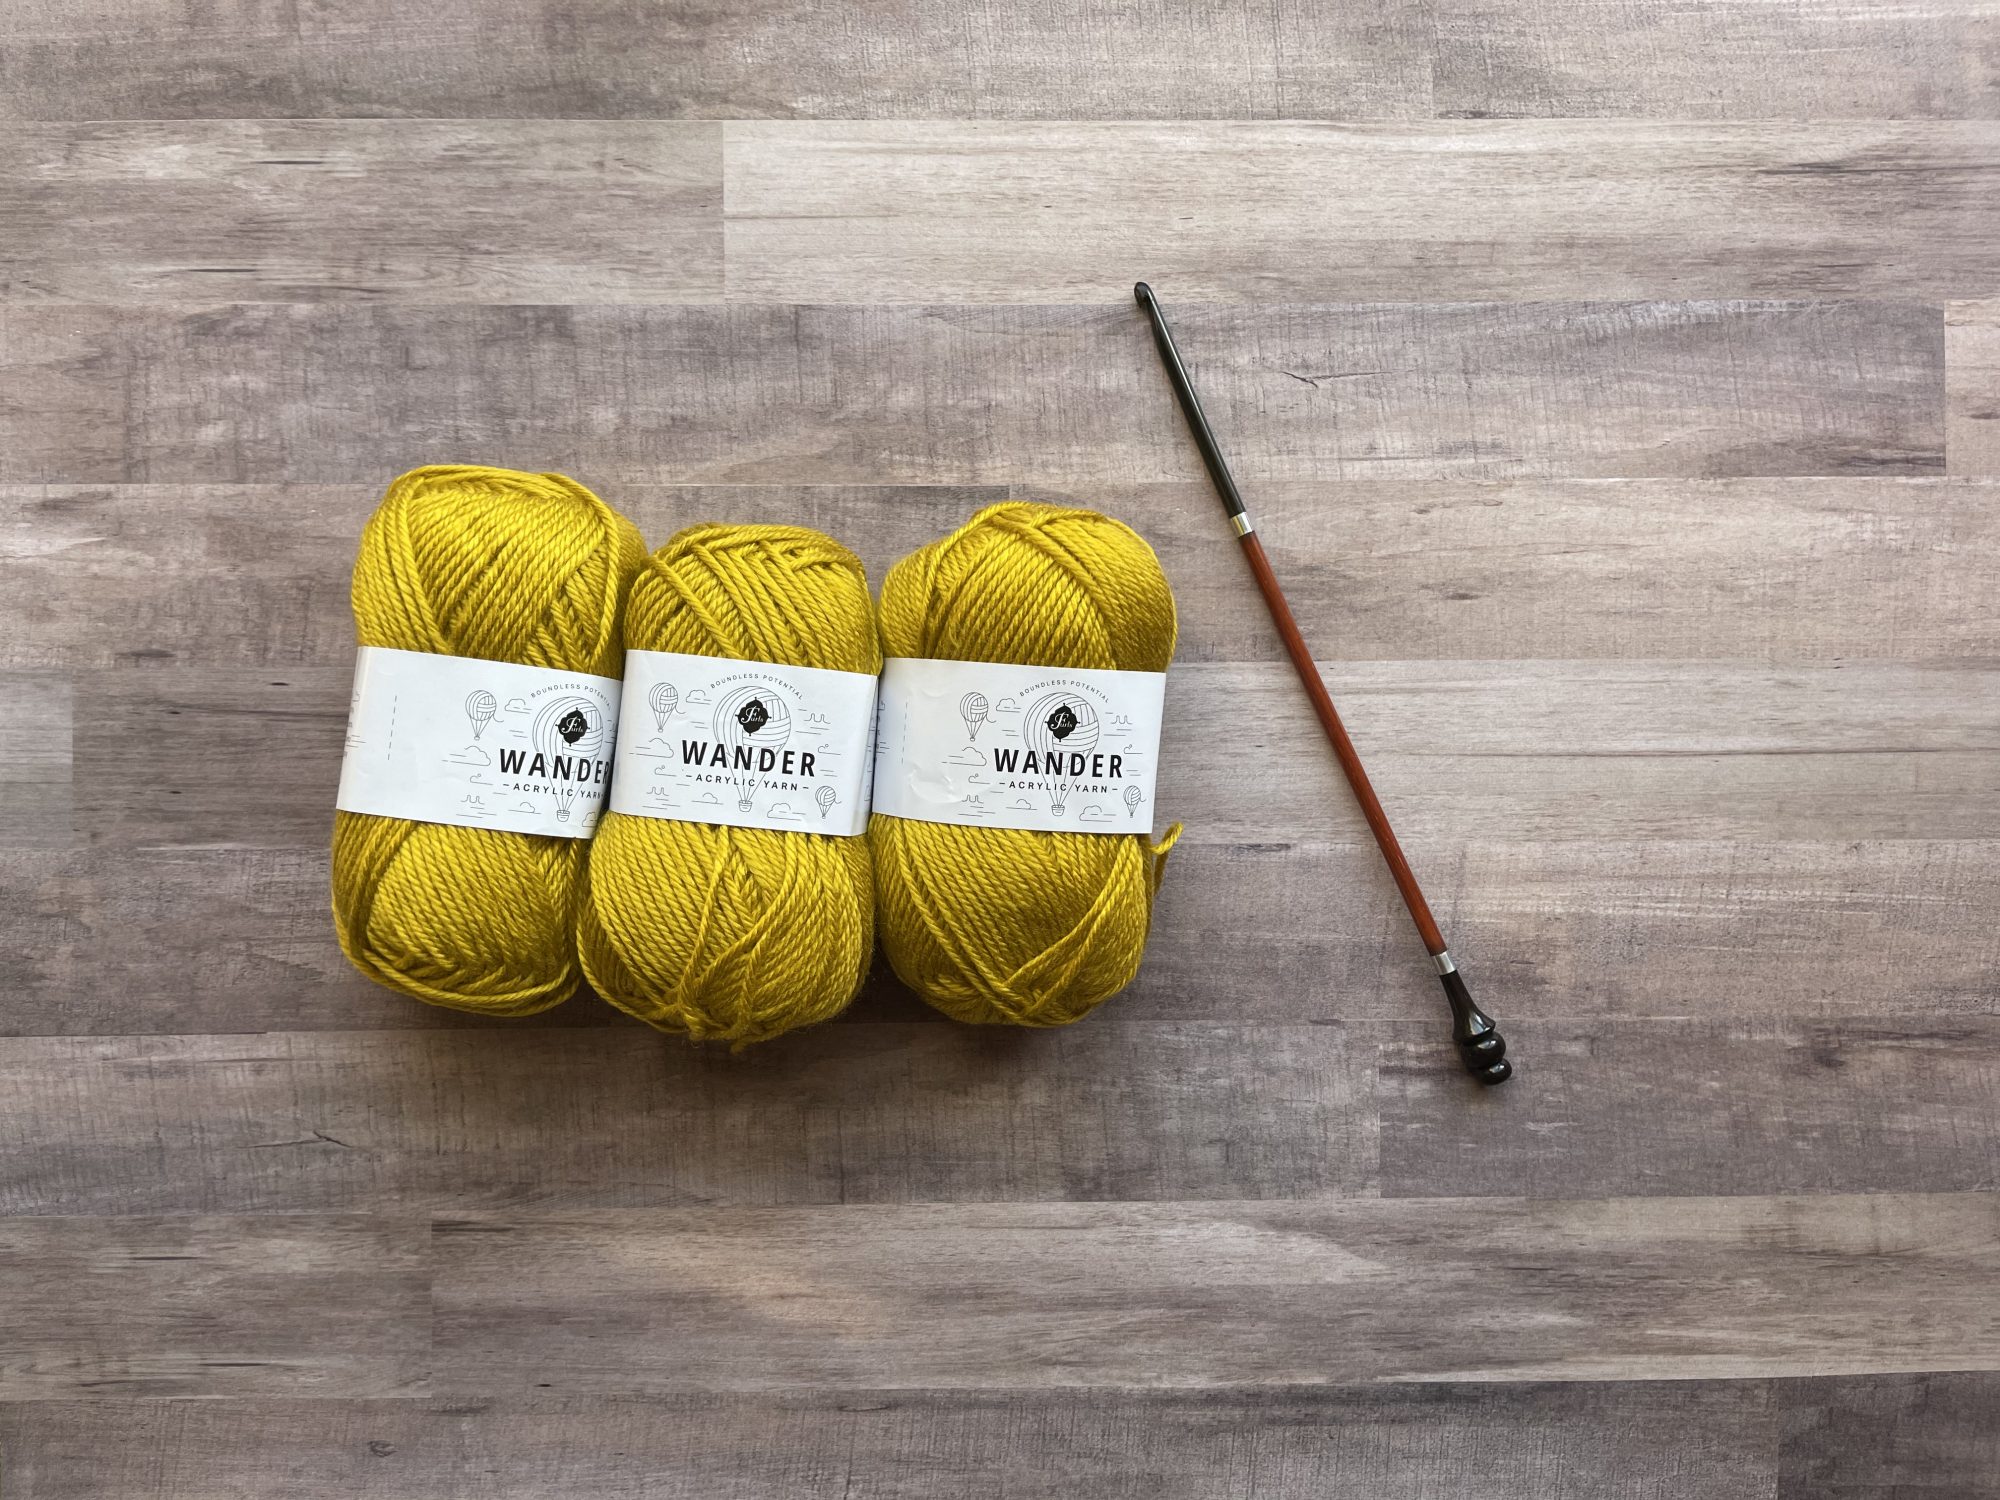
The yarn for this project was provided by Furls Crochet. I chose Canary in the new Wander yarn because yellow is fun and it says “Summer is here!”
I was excited to make a complete project with Wander, as I had two Wander Palettes in my stash, but I actually was struggling to come up with something. *insert sad face I love color, and the lack of ideas with multiple colors meant choosing one color was the yarn to go.
If you haven’t grabbed any Wander Yarn yet, you really should try a few (by making this tunisian top *wink wink). It’s super soft, smooth, shiny and super rich in color. There were very few knots in the skeins I used, but it can be challenging to frog due to a very slight halo around the yarn.
Hook
The straight tunisian crochet I used for the Tunisian Lattie Top was also provided by Furls Crochet. I chose the Padauk + Ebony tunisian hook to work with. Each one is a true piece of art, and I almost placed it in a glass vase like a beautiful single stem flower for admiration. LOL
I love the smoothness of the wood of this hook, and the weight end is a nice decorative touch. The end only becomes noticeable when there are a lot loops on the hook, such as working on both pieces at the same time.
If you’re not a fan of a straight hook, or the weight of the fabric may aggravate your wrist, consider treating yourself to a a single tunisian crochet hook with a a few cable lengths, or a set of tunisian crochet hooks. If you’re in love with tunisian crochet like I am, then a set is totally worth the cost, which can range from just a few dollars on Amazon to over $100 for a set of Clover tunisian crochet hooks. If you’re interested in a beautiful set that is reasonably priced, consider treating yourself to the Radiant Wood Interchangeable Tunisian Crochet Hook Set.
Add to Ravelry Queue
Materials
- Furls Wander Acrylic Yarn, (100% acrylic, 120 yds/ 109 m, 3.5 oz/ 100 g): 3 (3, 3, 4, 4, 5, 5, 6, 6) in Canary
- US Size K (6.50mm) tunisian hook or hook to meet gauge
- US Size I (5.50mm) crochet hook or hook to meet gauge
- Stitch marker, 6
- Scissors
- Yarn needle
- Measuring tape
GAUGE
12 sts in pattern x 5 rows = 4” x 4” [10 cm x 10 cm]
SIZES
| To Fit Bust | Width of each side | Length w/o Ribbing | Ribbing Width | |
| X-Small | 28-31” [71 -78.7 cm] | 7” [17.8 cm] | 34” [86.4 cm] | 4” [10.2 cm] |
| Small | 32-35” [81.3-88.9 cm] | 8” [20.3 cm] | 34” [86.4 cm] | 4” [10.2 cm] |
| Medium | 36-39” [91.4-99 cm] | 9.3” [23.7 cm] | 34” [86.4 cm] | 4” [10.2 cm] |
| Large | 40-43” [101.6-109.2 cm] | 10.7” [27.1 cm] | 35” [88.9 cm] | 4” [10.2 cm] |
| X-Large | 44-47” [111.8-119.4 cm] | 10.7” [27.1 cm] | 36” [91.4 cm] | 5” [12.7 cm] |
| 2X-Large | 48-51” [121.9-129.5 cm] | 12” [30.5 cm] | 36” [91.4 cm] | 5” [12.7 cm] |
| 3X-Large | 52-55” [132.1-139.7 cm] | 13.3” [33.9 cm] | 36” [91.4 cm] | 5” [12.7 cm] |
| 4X-Large | 56-59” [142.2-149.9 cm] | 13.3” [33.9 cm] | 37” [94 cm] | 5” [12.7 cm] |
| 5X-Large | 60-64” [152.4-162.6 cm] | 14.7” [37.3 cm] | 37” [94 cm] | 5” [12.7 cm] |
PATTERN KEY
Beg: beginning
Btw: between
Ch: chain
FO: fasten off
Fsc: foundation single crochet
FwdP: forward pass
M: stitch marker
Prev: previous
Rep: repeat
RetP: return pass
Sl st: slip stitch
Sc: single crochet
Scblo: single crochet back loop only
St(s): stitch(es)
Sk: skip
Tdc: tunisian double crochet
WS: wrong side
YO: yarn over
SPECIAL STITCHES & TECHNIQUES
Fsc: insert hook in indicated st, YO, pull up a loop (2 loops on hook), YO, pull thru 1 loop (ch made; 2 loops on hook), YO, pull through 2 loops
Scblo attach: insert hook in back loop of indicated st, YO, pull up a loop, insert hook in next st along side, YO, pull through st and 2 loops in hook
Tdc: YO, insert hook in indicated ch or under the next vertical bar, YO, pull up a loop (3 loops on hook), YO, pull through 2 loops
RetP: YO, pull through 1 loop (ch 1 made), *YO, pull through 2 loops; rep from * across the row
Check out this stitch tutorial
EXPERIENCE LEVEL
Easy
SIGN UP TODAY!
YAY! ON THE WAY TO BECOMING CROCHET BESTIES!
Hey there! 🌟
Guess what? You’re just one small step away from joining our awesome crochet newsletter community! 💌 But don’t worry, it’s super easy and quick. All you have to do is hop over to your email inbox and confirm your subscription.
Why should you do it? Well, by confirming your subscription, you’ll ensure that you never miss exclusive content, exciting updates, and fantastic deals that you won’t want to miss out on. Trust me, you’ll be the first to know about all the latest news and happenings in our amazing crochet community!
So, what are you waiting for? Grab that cup of coffee, put on your favorite tunes, and let’s make your inbox a little brighter. Go ahead and find that confirmation email we just sent you. Once you click that magical “Confirm” button, you’ll officially become part of our fantastic newsletter family!
Join us now and prepare for a whole new level of awesomeness. We can’t wait to have you on board! 💪
See you in your inbox! 📩
NOTES
- Pattern is written US terms.
- Read the entire pattern before beginning.
- Pattern is written in 3 parts: Right and Left Side, Ribbing, and Finishing.
- The Right and Left Side can be made at the same time to maintain gauge.
- There is a natural lean to fabric.
- This garment is meant to have positive ease and fit loosely, except for the Ribbing.
- Never turn the tunisian rows.
- Two YO will be made when sk a st; one YO is the ch space and the second YO is part of the next tdc.
- The width can be adjusted by following the instructions of a different size, and use the overlap and Ribbing to adjust the fit around the waist.
- The length of each side can be adjusted by adding or subtracting rows.
- Each Row includes instructions for the FwdP and RetP.
- Each row uses a standard RetP.
- Always work under 2 loops with the last st of the FwdP.
- To maintain gauge and tension, it may help to create the Left and Right Side at the same time by using 2 skeins of yarn and completing at least one row per side. If using a straight tunisian hook or one with a cable, one can complete the FwdP of one piece and then complete the FwdP of the second piece, and then complete the RetP of both pieces.
Grab an ad-free, color-coded PDF of the Tunisian Lattice Top with a stitch chart from your favorite pattern shop.
INSTRUCTIONS
Right and Left Side
Row 1: With tunisian hook, Ch 23 (27, 31, 35, 35, 39, 43, 43, 47)
Row 2: Ch 1(tunisian extended st), tdc in next 2 sts, *YO, sk next ch, 3 tdc; rep from * to end. RetP – 18 (21, 24, 27, 27, 30, 33, 33, 36) tdc, 5 (6, 7, 8, 8, 9, 10, 10, 11) ch
Rows 3-42 (42, 42, 44, 45, 45, 45, 46, 46): Rep Row 2
Row 43 (43, 43, 45, 46, 46, 46, 47, 47): Ch 1, working under Vertical bar and top loop of horizontal bar, sl st across to end, FO
Rep all instructions for second side.
Ribbing
Fold each side in half with RS facing out, and lay next to each other. Starting with the top side, overlap 7 sts and place M to hold in place. Flip the pieces over and rep on the other side. Use a M to connect the corners. 6 M placed
Rnd 1: Use smaller hook, overlap 1 corner st of each side and attach yarn through both fabrics, ch 1, sc in same st, sc in each st to first M; *working through both fabrics, sc in next 7 sts, remove M**; sc in each st to corner, overlap corner sts, sc through both fabrics; sc in each st to next M; rep from * to **; sc in remaining sts, sl st to join- 76 (92, 108, 124, 124, 140, 156, 156, 172) sc
Note: It’s best to try on piece to check for fit around waist. If loose, the ribbing will make it snug. If tight, pull out Rnd 1 and add more sts. Make note of total sc in order to make the same number of scblo rows
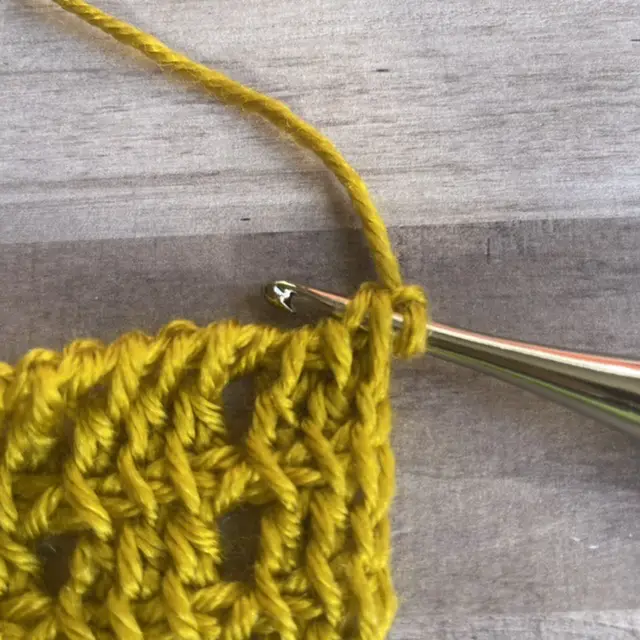
Row 2: Starting in first st, ch 16 (16, 16, 16, 20, 20, 20, 20, 20) fsc (this row will hang downward from the Sides; refer to picture, if needed), turn – 15 (15, 15, 15, 19, 19, 19, 19, 19) fsc
Row 3: Ch 1, sc in first st, scblo in each st until 1 st remains, scblo and attach, sl st in next st (counts as ch 1 for next row), turn
Row 4: Scblo in each st until 1 remains, sc in last st, turn
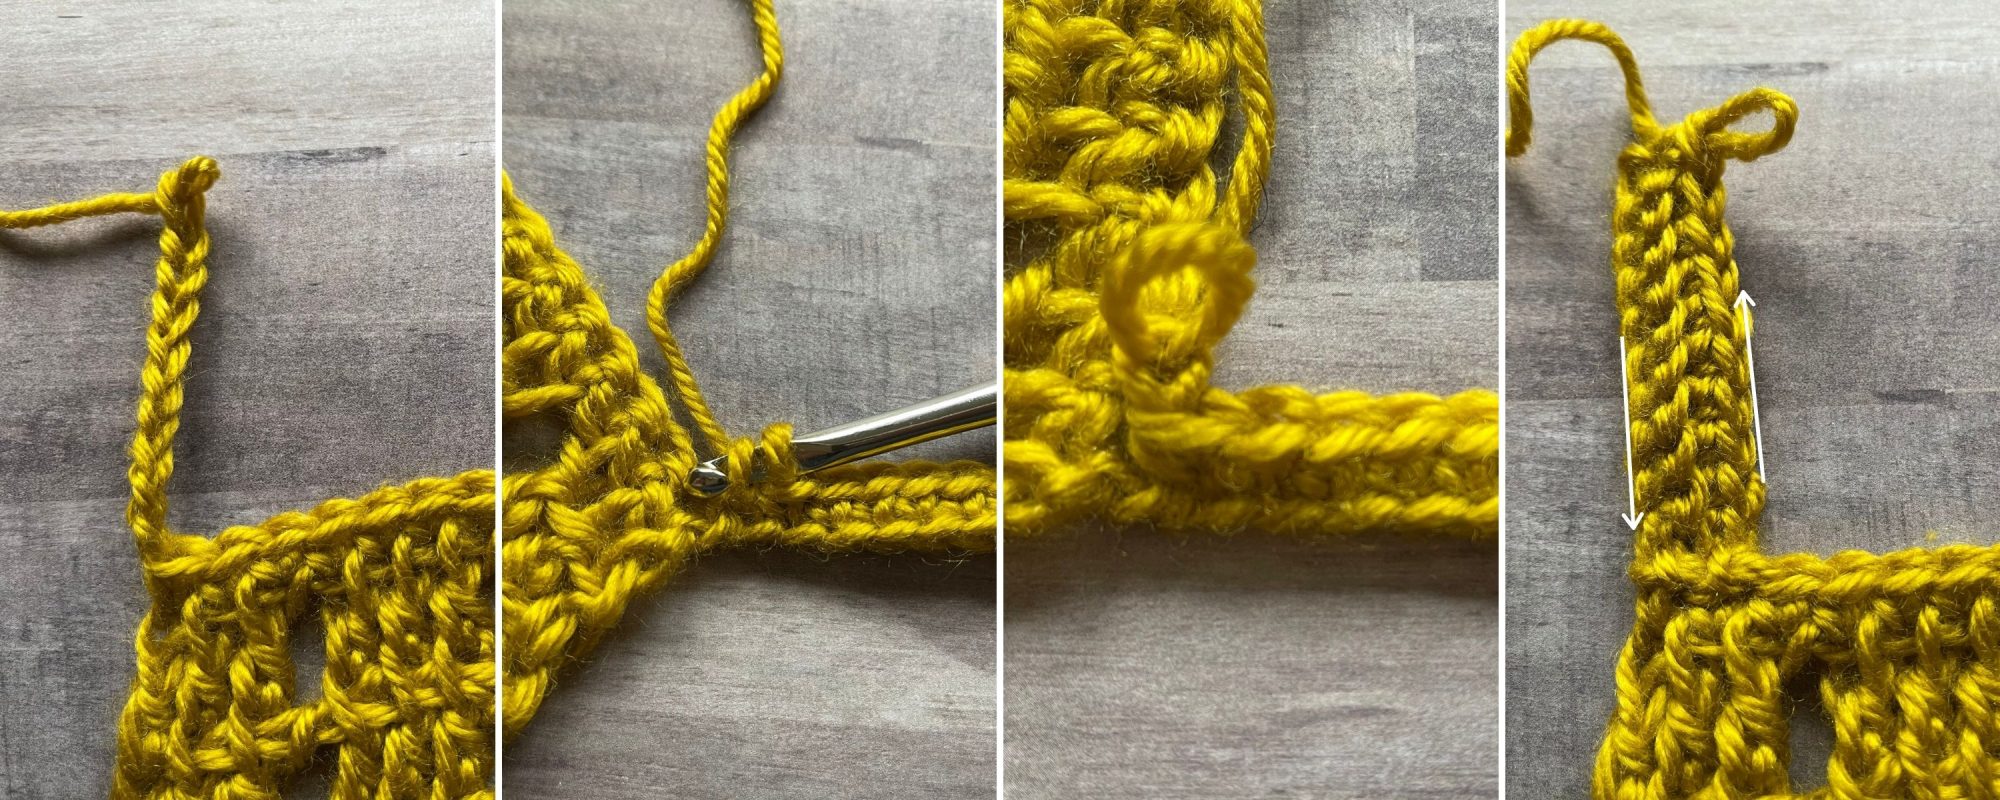
Rows 5-77 (93, 109, 125, 125, 141, 157, 157, 173): Rep Rows 3-4; FO with long tail to seam
Finishing
- Use long tail to seam the first and last row of the Ribbing.
- Weave in all ends.
- Optional: Make beaded charms, or create a crochet chain for a closure.
Pin it for Later

If we’re not hanging out on social media yet, come check me out on Facebook, Instagram and Pinterest.
Want to talk about yarn goodness, crochet tips, and exclusive weekly deals? Join my Facebook Group, Confidently Crochet with Creations By Courtney.
Join my newsletter for sneak peeks, crochet tips, and more. HERE
Please use #CreationsByCourtney on social media when sharing your projects.
This pattern is not to be duplicated or resold, and not to be reproduced commercially. You may sell finished products on Etsy, at farmers markets, and craft fairs, but please credit Creations By Courtney as the pattern’s author.



14 Responses
Tunisian wear looks so pretty but it kinda scares me to give it a go. I’m still very much comfortable with crocheting only.
Don’t be scared of tunisian. Many of the most common stitches are similar to standard crochet. You just hold all of the loops on the hook. I’ll be glad to answer any questions you have, when you decide to try tunisian crochet.
this top is absolutely stunning!! I love the color as well! This will definitely be my selfish make!
Thank you, Ellen! You’ll be amazed at how quickly this works up. What color are you choosing?
This tunisian lattice top is amazing….a great layering piece and completely unique
Love the color Courney
What a great design! I do not do Tunisian crochet, but the look is gorgeous. I envy your creativity (in a good way, wishing you only the best). Perhaps “I admire your creativity” is a better way to phrase it. I would never think to shape a garment like this, and I haven’t seen others like it.
I hope you decide to try tunisian crochet one day. It’s such a fun technique, and the tunisian double crochet is super fast to make. Most of us crocheters enjoy occasional quick projects. 🙂
Once upon a time, I really wanted to dive into Tunisian crochet, but I didn’t really like the hooks I had. I got a really nice set for Christmas from my parents. This looks like something I would totally wear! It’s on my list. 🙂
I’m so glad that you got a new set of tunisian hooks for Christmas! I think this would be a great tunisian garment to start with. I’m excited to see it once you have finished! Happy Holidays, Jen!
Now this Vest/Top is adorable. I’m very much a beginner at making garments. Is it hard to learn the stitches for this Tunisian Lattice Top? Being a beginner, do I stand a chance to be able to master this? This will look awesome on my granddaughter if I can master the technique.
Yes, you can master these stitches! The first step is to use a larger hook than the label suggests. Specifically, the tunisian double crochet is just like making a standard double crochet, except you wait to make the last yarn over and pull through two until the return pass.