Imagine hooking up a light, airy cardigan that drapes just right over your favorite outfits. That’s the magic of our tunisian crochet lace cardigan crochet along, or CAL. This project pulls crocheters from all over into one big, friendly group to build this stunning piece stitch by stitch. You’ll learn fresh tunisian crochet tricks while chatting with others who share your passion for handmade treasures.
Tunisian crochet stands out with its unique forward and return passes that create a fabric full of texture and is perfect for lace designs. In this CAL, we focus on a cardigan that mixes simple shapes with lacy patterns to make something stylish yet easy to wear. Picture wrapping yourself in cozy style that works any season. The best part? You do it all with a supportive crew cheering you on.
Grab your hook and some yarn, and jump in. Most of us craft solo, but it’s time to craft with others. You’ll end up with a one-of-a-kind tunisian crochet lace cardigan plus new friends who get the thrill of seeing a project come alive. It’s not just about the stitches; it’s about the connections that make crocheting even better. Let’s get started and create something beautiful together.
Why Dive into This Tunisian Crochet Lace Cardigan CAL?
This CAL offers a chance to connect with crocheters who crave special projects like you do. You’ll swap tips, share photos of your progress, and celebrate small wins in a friendly group setting. There’s no lost crojo to worry about, as an answer to your question is just “around the corner,” and seeing everyone’s progress will keep you going.
Building skills in tunisian crochet feels rewarding here. If you’re new, the videos build your confidence from basic simple stitches to a lacy simple stitch. Seasoned makers will enjoy this lace stitch and playing with color. By the end, you’ll sport a tunisian crochet lace cardigan that’s both comfy and chic, ready for any day.
Group support shines when challenges pop up, like mastering a new lace stitch. Members offer advice and encouragement that sparks your creativity. You might tweak the pattern for a better fit or look to fit your closet. It’s a space where ideas flow freely, and everyone roots for each other.
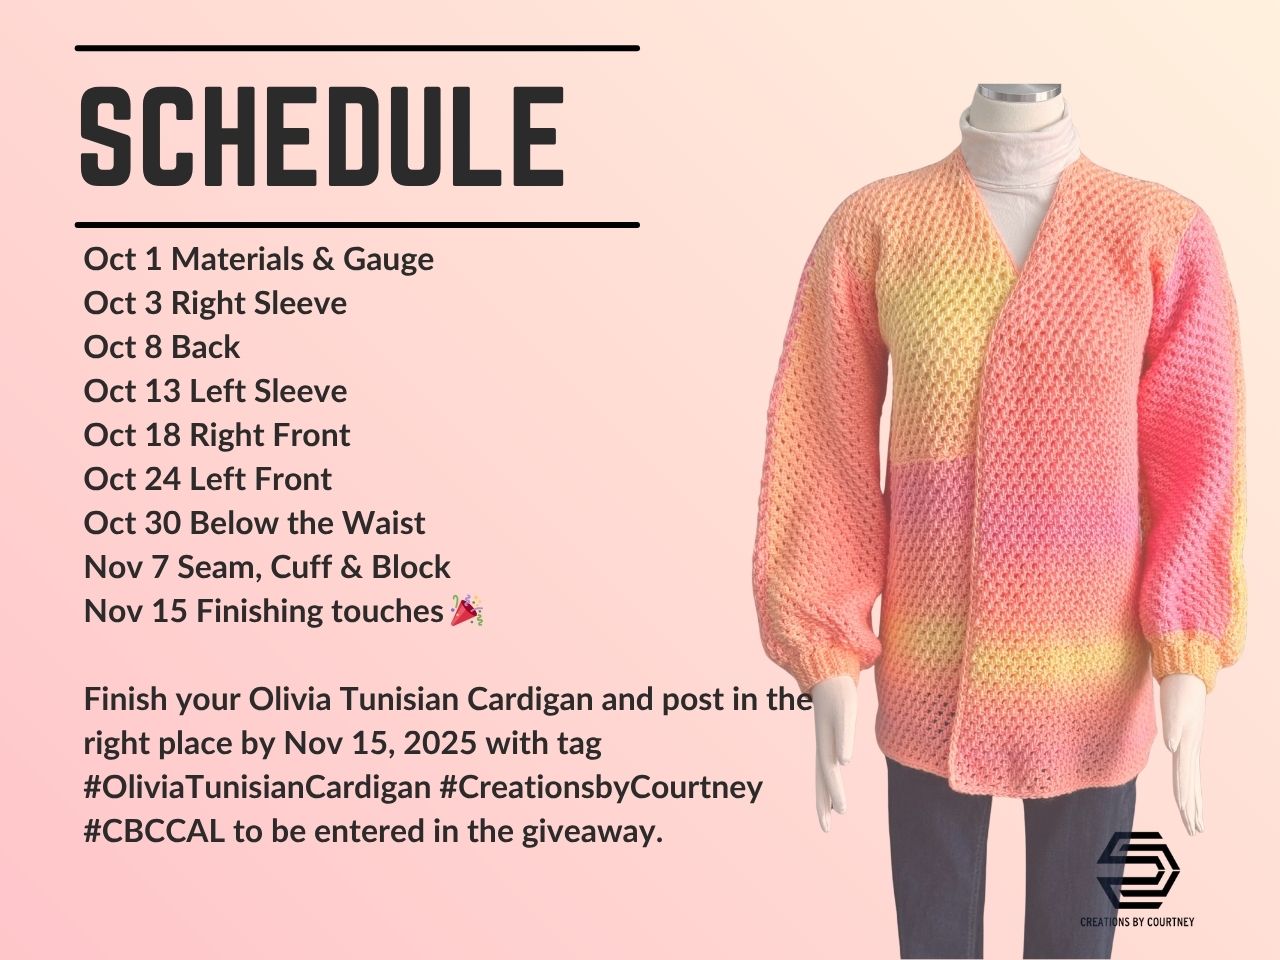
The schedule keeps things steady and fun. We release each section every 5-8 days over six weeks. To kick of the CAL, we’ll cover gauge, which is crucial when making a garment, and then moving onto to the first sleeve. Next up will be the Back of your cardigan followed by the second sleeve, all done seamlessly with techniques that you may not have tried. 😉 From there, we’ll move onto to creating the front panels. This is where the fun really begins, as the fronts will involve a join-as-you-go method, and increases to create a shaped front. Before finishing off the sleeve seams, we’ll move on to the skirt section of the cardigan. With two lengths provided, you can choose one of these or do something different as long as you have enough yarn. We’ll finish up with a simple edge, seam the sleeves, add cuffs, and then block. If you choose to make a buttoned version, you’ll do that last.
Not sure if you’ll have enough yarn to change the length? Check out the Project Yarn Calculator.
Short, easy to follow YouTube videos accompany each part. We know that you’re busy and don’t have the time to watch for 30 minutes hoping to see the one part you’re stuck at. Each video is an average of 10 -11 mins that can be easily watched so you can get back to stitching.
The Confidently Crochet with Creations by Courtney Facebook community will be the hub for sharing your progress pictures. No worries if you don’t use Facebook, as you can still submit your progress pictures, as there may be an awesome surprise at the end of the CAL for those that finish on time.
Pick the Best Yarn for Your Dream Cardigan
Yarn choice makes your tunisian crochet lace cardigan pop. Go for soft, drapey fibers that let lace stitches shine. Cotton blends work great for summer lightness, while wools add warmth for cooler days. Worsted weight is recommended, but a DK weight can work as long you CHECK GAUGE.
Match your yarn to your vibe. Pick neutrals for easy layering or bold hues for a statement piece. Test a swatch first to see if you love it or feel “ehh” about it. You’ll need about 800 to 2200 yards total, based on size and length. You really want to love the color you choose, whether it’s a solid, ombre, variegated or a mix.
A fuzzy yarn is not recommended as the halo will take away from the stitch texture, and become a pain to frog if there are any mistakes to correct.
If you want to learn more about choosing the “right” yarn for garments, read this article.
Sirdar Jewelspun Ombre in Rainbow Glow was selected for this tunisian lace cardigan, as the yarn told Courtney that it needed to become a cardigan. LOL
Jewelspun Ombre is a single ply aran weight that comes in a large ball. It’s a full 400 grams with 1093 yards / 1000 meters, which is enough to make a hip length tunisian cardigan for three of the eleven sizes.
Keeping reading for a list of alternative yarns that will offer great drape for this handmade cardigan.
Follow the Easy Schedule and YouTube Tutorials
Stick to the timeline, and you’ll see your cardigan grow fast.
This schedule is a guideline, and if you fall behind, that’s okay as there is some catch up time before the end of the CAL.
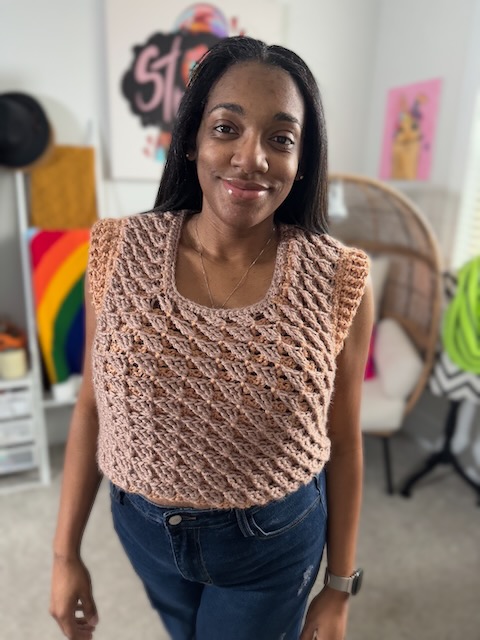
Style Your Tunisian Crochet Lace Cardigan in Four Cool Ways
Your tunisian crochet lace cardigan shines in multiple looks, thanks to a classic silhouette. First, try the open, hip-length style. It hits at your hips for a cropped feel, perfect for layering over tanks or dresses. It’s also just long enough to be paired with a blouse and trousers for the office. You won’t have to worry about stretching out the back from sitting on it when working.
Next, go for open and tunic-length. This version drops lower, grazing your thighs for a relaxed, boho touch. The extra length creates a flowy silhouette that sways with you. Ideal for breezy days when you want coverage without bulk.
For a buttoned, hip-length option, add a few closures along the front. Buttons pull it together for a fitted, polished shape. It works well tucked into high-waisted pants, giving a smart casual edge.
Last, a buttoned tunic-length cardigan is for full coziness. This wraps around like a light jacket, great for chillier weather. Secure the first few buttons when sitting, or button all the way for added warmth along your legs.
These variations mean one project fits many moods. If you love the idea of a 2-in-1 cardigan, consider choosing the buttoned style, but skip adding buttons. By not permanently adding buttons, you can wear it open, and if you want a different look considering grabbing some stud buttons by Jūl Designs. The pattern adapts easily, so you craft exactly what you envision. Wear it open for airiness or closed for warmth; either way, it feels custom-made.
Enthusiasm builds as you style it your way. Mix in accessories like a belt to cinch the waist on tunic versions. This cardigan becomes a staple you’ll reach for often, proving the need to make more handmade garments.
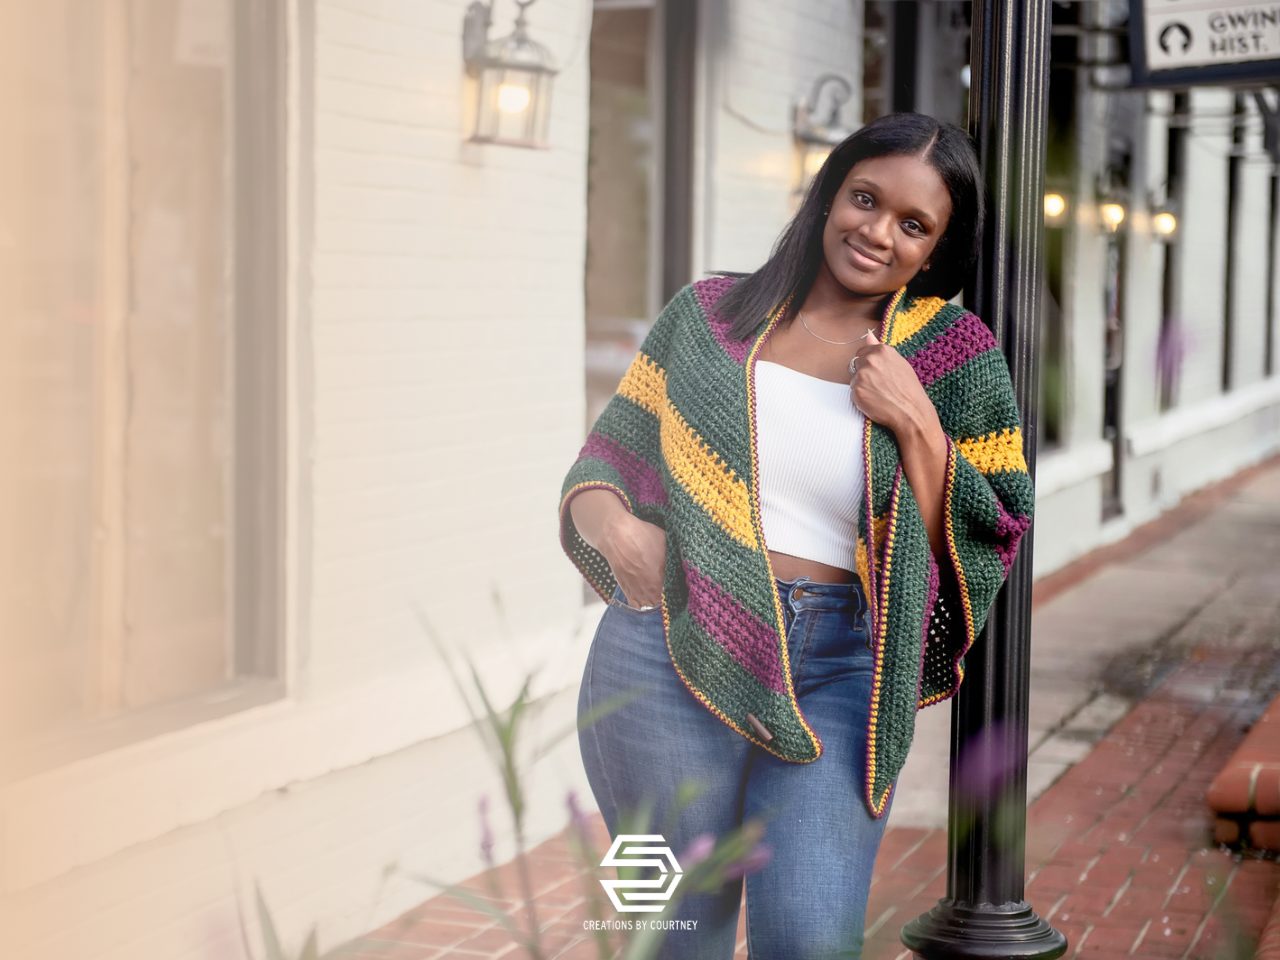
Outfit Ideas to Rock Your New Olivia Tunisian Crochet Lace Cardigan
- Start with the open hip-length over a graphic tee and denim shorts for summer hangs. The lace adds a feminine pop to the casual base. Pair it with sandals for easy comfort.
- For the open tunic, layer it atop leggings and a long top on cool mornings. Add sneakers for a walk in the park. In fall, toss on a scarf that echoes the cardigan’s colors for extra warmth.
- Button the hip-length with chinos and a blouse for work meetings. It keeps things neat yet creative. Evenings call for the buttoned tunic over black pants and heels; the length covers nicely while the lace softens the outfit.
- Blend it with your closet favorites. If you love florals, match the cardigan’s yarn shade to skirt patterns. These ideas spark your own spins, turning the piece into daily joy.
- Picture the open hip-length with slim jeans and ankle boots for weekend errands. Chic but casual.
- Slip into the buttoned tunic over a simple sheath dress for date night. The lace details elevate the look, making your handmade piece the star.
- For a pulled together but ultra comfy look, pair the open tunic length with wide leg pants, a fitted long sleeve and sneakers. Add a belt to define your waist and elevate the look for dinner out or a working lunch.
- Maybe choose to make your buttoned Olivia Tunisian Cardigan shorter that can pair beautifully with a button blouse, an a-line skirt and knee high boots for an chic look.
Upgrade to VIP for Exclusive Perks
Want more from the CAL?
For the first time ever, Creations by Courtney is offering a VIP experience that includes the following:
- ad-free PDF with color-coded tables and schematics to make it easier to choose the right size to follow while you’re making.
- The pattern in sections for ease of following.
- Early access to the videos with no ad interruptions.
- Unlimited access to the above.
- Exclusive discount on the price during the CAL only (just $17 through Nov 15, 2025)
The VIP experience is ideal if you prefer everything in one place and working ahead of the schedule, or to work on your cardigan after the event ends (because life happens).
*Disclosure: This post may contain affiliate links to products that I use, and think you will enjoy using too. Should you decide to use any such link, I will earn a small commission at no cost to you. Thank you for supporting this small business.
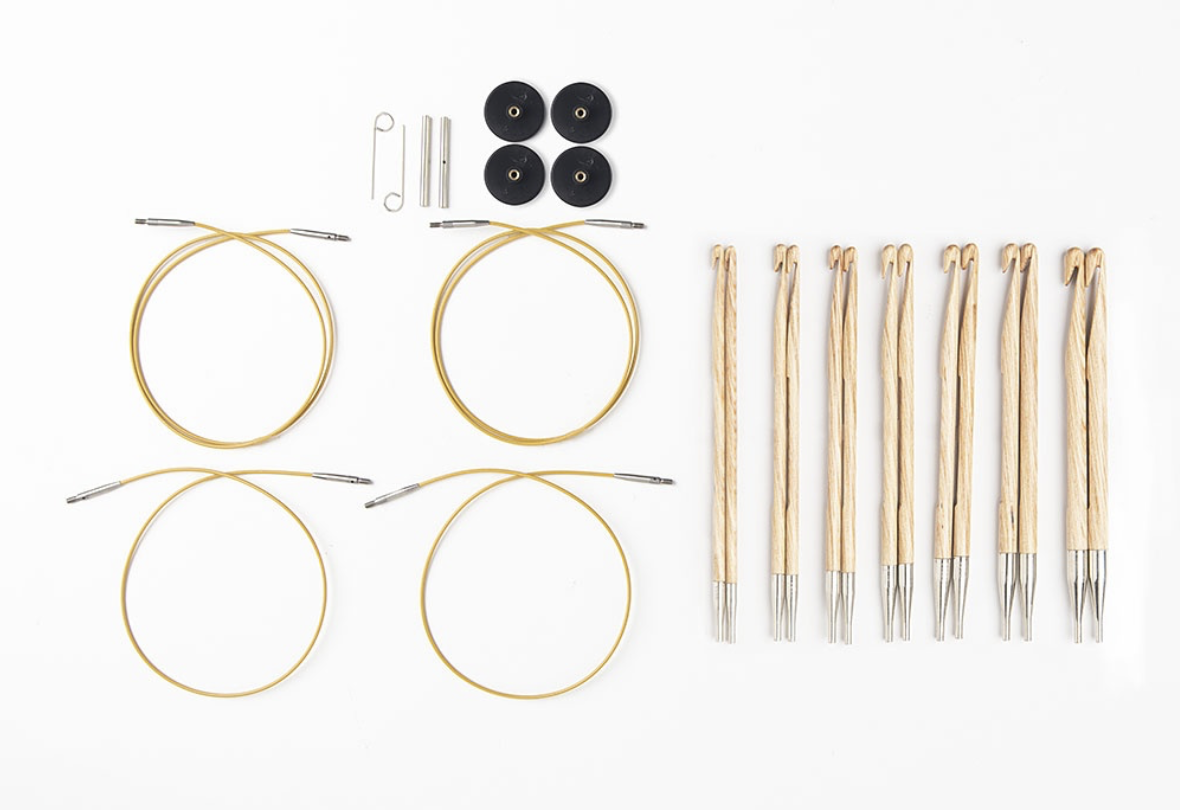
MATERIALS
- Sirdar Jewelspun Ombre (100% acrylic, 1903 yds/ 1000m, 400 g) in Rainbow Glow
- Alternative yarns
- 6.5 mm Tunisian crochet hook with 24” (56 cm) cable or hook size to match gauge
- 8 x 20 mm buttons (for buttoned version)
- tapestry needle
- stitch markers x 24
- Scissors
- Tape measure
Yarn Amounts per style
| Style: Open — Length: Hip | |||||||||||
| Size | 1 | 2 | 3 | 4 | 5 | 6 | 7 | 8 | 9 | 10 | 11 |
| Yards | 795 | 864 | 1013 | 1100 | 1202 | 1317 | 1386 | 1530 | 1608 | 1692 | 1740 |
| Meters | 727 | 790 | 926 | 1006 | 1099 | 1204 | 1267 | 1399 | 1470 | 1547 | 1591 |
| Skeins | 1 | 1 | 1 | 2 | 2 | 2 | 2 | 2 | 2 | 2 | 2 |
| Style: Open — Length: Tunic | |||||||||||
| Yards | 894 | 975 | 1141 | 1237 | 1450 | 1518 | 1651 | 1787 | 1870 | 1995 | 2083 |
| Meters | 817 | 892 | 1043 | 1131 | 1326 | 1388 | 1510 | 1634 | 1710 | 1824 | 1905 |
| Skeins | 1 | 1 | 2 | 2 | 2 | 2 | 2 | 2 | 2 | 2 | 2 |
| Style: Buttoned — Length: Hip | |||||||||||
| Yards | 837 | 904 | 1061 | 1147 | 1248 | 1361 | 1432 | 1613 | 1657 | 1729 | 1784 |
| Meters | 765 | 827 | 970 | 1049 | 1141 | 1244 | 1309 | 1475 | 1515 | 1581 | 1631 |
| Skeins | 1 | 1 | 1 | 2 | 2 | 2 | 2 | 2 | 2 | 2 | 2 |
| Style: Buttoned — Length: Tunic | |||||||||||
| Yards | 948 | 1028 | 1198 | 1293 | 1452 | 1584 | 1669 | 1860 | 1926 | 2081 | 2154 |
| Meters | 867 | 940 | 1095 | 1182 | 1328 | 1448 | 1526 | 1701 | 1761 | 1903 | 1970 |
| Skeins | 1 | 1 | 2 | 2 | 2 | 2 | 2 | 2 | 2 | 2 | 2 |
GAUGE
Pre- block: 15 sts x 11.5 rows = 4” x 4” [10 cm x 10 cm]
Post-block: 14 sts x 10.5 rows = 4” x 4” [10 cm x 10 cm]
FINISHED SIZES
| Size | Chest Circum. | Hip Circum. | Finished Circum. – Open | Finished Circum. – Buttoned | Sleeve Length | Sleeve Circum. | Finished Length, in. (Hip/ Tunic) | Finished Length, cm. (Hip/ Tunic) |
| 1 | 30 in. (76 cm) | 32 in (81 cm) | 30 in. (76 cm) | 34 in. (86 cm) | 18 in. (45.7 cm) | 15 in. (38 cm) | 20 / 24 in. | 51 / 61 cm |
| 2 | 34 in. (86cm) | 36 in. (91 cm) | 34 in. (86 cm) | 38 in. (96.5 cm) | 16.5 in. (42 cm) | 16 in. (40.6 cm) | 20 / 24 in. | 51 /61 cm |
| 3 | 38 in. (96.5 cm) | 42 in. (107 cm) | 38 in. (96.5 cm) | 42 in. (107 cm) | 18.5 in. (47 cm) | 17.5 in. (44.5 cm) | 22 / 26 in. | 56 / 66 cm |
| 4 | 42 in. (107 cm) | 45 in. (114 cm) | 42 in. (107 cm) | 46 in. (117 cm) | 18.5 in. (47 cm) | 19 in. (48.3 cm) | 22 / 26 in. | 56 / 66 cm |
| 5 | 46 in. (117 cm) | 49 in. (124.5 cm) | 46 in. (117 cm) | 50 in. (127 cm) | 18.5 in. (47 cm) | 19.5 in. (49.5 cm) | 23 / 28in. | 58 / 71 cm |
| 6 | 50 in. (127 cm) | 53 in. (135 cm) | 50 in. (127 cm) | 54 in. (137 cm) | 19 in. (48.3 cm) | 21 in. (53.3 cm) | 23 / 28 in. | 58 / 71 cm |
| 7 | 54 in. (137 cm) | 58 in.(147 cm) | 54 in. (137 cm) | 58 in. (147 cm) | 19 in. (48.3 cm) | 22 in. (56 cm) | 23 / 28 in. | 58 / 71 cm |
| 8 | 58 in. (147 cm) | 61 in. (155 cm) | 58 in. (147 cm) | 62 in. (157.5 cm) | 19.5 in. (49.5 cm) | 24 in. (61 cm) | 24 / 29 in. | 61 / 74 cm |
| 9 | 62 in. (157.5 cm) | 66 in. (168 cm) | 62 in. (157.5 cm) | 66 in. (168 cm) | 19.5 in. (49.5 cm) | 24 in. (61 cm) | 24 / 29 in. | 61 / 74 cm |
| 10 | 66 in. (168 cm) | 69 in. (175 cm) | 66 in. (168 cm) | 70 in. (178 cm) | 20 in. (50.8 cm) | 24 in. (61 cm) | 24 /30 in. | 61 / 76 cm |
| 11 | 70 in. (178 cm) | 75 in. (190.5 cm) | 70 in. (178 cm) | 74 in. (188 cm) | 20 in. (50.8 cm) | 24 in. (61 cm) | 24 / 30 in. | 61 / 76 cm |
PATTERN KEY
ch: chain
cnr: corner
BL: back loop
BO: bind off
btw: between
End st: end stitch
FO: fasten off
FwdP: forward pass
inc: increase
M: stitch marker
mod tss: modified tunisian simple stitch
PM: place stitch marker
RetP: return pass
sc2tog: single crochet 2 together
sc: single crochet
sk: skip
sl st: slip stitch (bind-off)
sp: space
tfs: tunisian full stitch
tss: tunisian simple stitch
yo: yarn over
SPECIAL STITCHES & TECHNIQUES
Attach for Cuff: sl st in coordinating st along the prev rnd.
End st: Insert hook under both loops at the last st, YO, pull up a loop.
inc: (TFS, YO) in the space between the last mod tss and the next YO.
Inc Width on left: TURN your work to see the WS,move the yarn to the back, take second hook and insert into the end st, YO and pull through st, YO and pull through loop on hook (ch made), *move yarn to the back, ch, rep from * until 1 less then pattern instructions
Join-as-you-go on the left: this replaces the ch 1 for the RetP. Insert hook in the BL of the edge st of the other piece (Left Sleeve or Back) and the 3rd loop (immediately below the BL), YO and pull through the edge st, then continue RetP without ch 1
Join-as-you-go on the right: Remove hook from loop, insert hook from back to front, grab loop and pull to the back, tss in first st, continue in pattern
Mod tss: Insert hook under the YO (leaning bar) of the row below and the top chain, YO, pull up a loop.
Yo-slst: YO, insert hook in indicated st, YO and pull through all loops
EXPERIENCE LEVEL
Intermediate
ADD TO RAVELRY FAVORITES
NOTES
- Pattern is written in US terms.
- Read entire pattern before beginning.
- Construction: Right Sleeve, Back, Left Sleeve, Right Front, Left Front, Skirt, Edging, Seaming and Sleeve Cuffs, Finishing
- Schematics for sizing and construction are included in the ad-free PDF.
- Each size include 4” of positive ease.
- The Right Sleeve, Back and Left Sleeve are made seamlessly, by binding off and widening the pieces following Special Techniques.
- The Right and Left Front will joined as created.
- The only seams are the Sleeves and Sleeve Cuffs.
- 4 styling options: Open – Hip length, Open – Tunic length, Buttoned – Hip length, Buttoned – Tunic length
Purchase the ad-free PDF from your favorite pattern shop


Don’t forget to join the Confidently Crochet with Creations By Courtney for CALs, crochet tips, and yarnie fun.
INSTRUCTIONS
Let’s start with Gauge
This is a crucial step to ensuring that the desired fit is achieved. You will need to block your gauge swatch to ensure that your finished cardigan will be the size you chose.
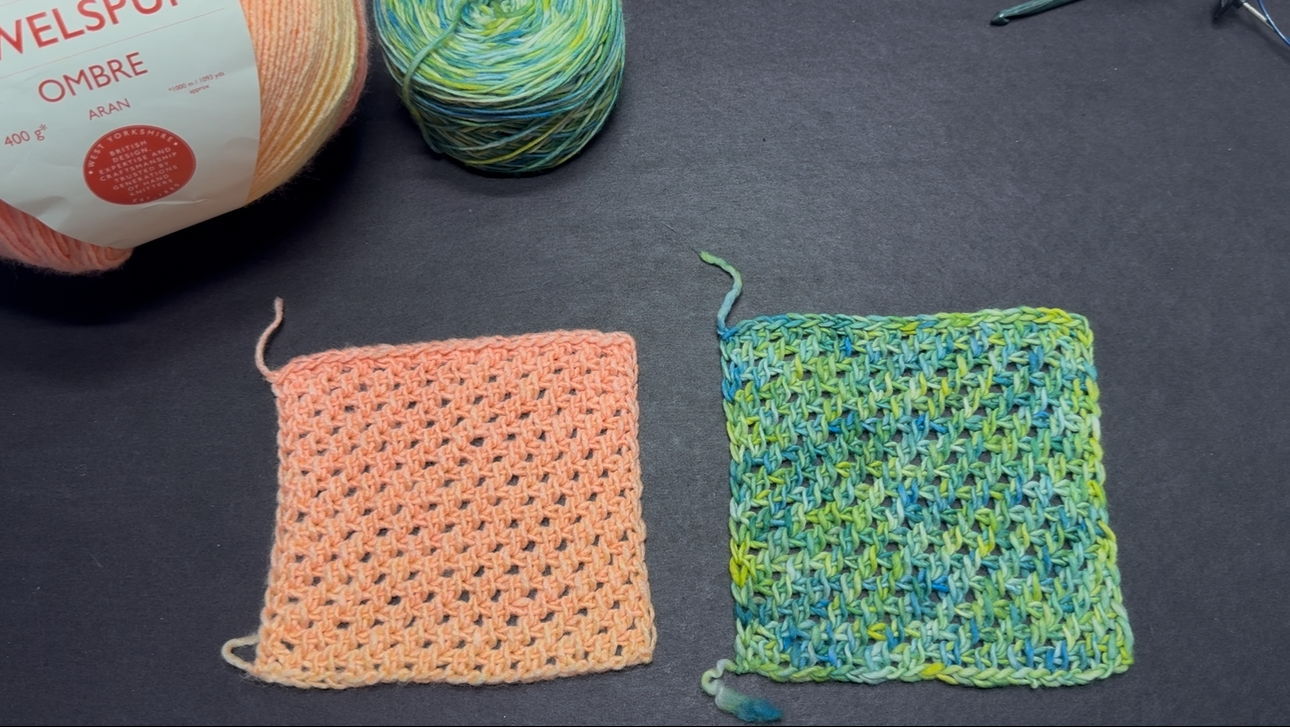
As always you want a swatch that is at least 6″ [15 cm] square to avoid measuring along the edges.
Measure and record your gauge before blocking to see if it matches, 15 sts x 11.5 rows = 4” x 4” [10 cm x 10 cm]. This is what you want to use while crocheting.
If it is different, frog the swatch and grab a different sized hook. You can use this free calculator to know whether to increase or decrease your hook size.
If your pre-block gauge matches, then block your swatch. Allow it to completely dry, then measure again. Hopefully, it matches, 14 sts x 10.5 rows = 4” x 4” [10 cm x 10 cm].
How to make gauge swatch before starting your cardigan
Ch 23 or larger odd number (needs to 6”/ 15 cm or larger)
Row 1: Starting in 2nd ch, insert hook in back bump, YO and pull up a loop, *YO, sk next ch, insert hook in next ch, YO and pull up a loop, rep from * until 1 ch rem, end st. RetP.
Row 2: *YO, sk next st, insert hook under the YO the row below and top ch, YO and pull up a loop, rep from * to end. RetP
Row 3: *insert hook under the YO the row below and top ch, YO and pull up a loop, YO, sk next st, rep from * until 1 st rem, end st. RetP.
Rep Rows 2-3 until at least 6”(15 cm) in length
Record how many stitches and rows in a 4″ x 4″ [10 cm x 10 cm] area.
- This is the gauge you want to match while crocheting
Wet block the swatch and allow to dry completely
- This gauge should match what is listed above. This ensures that the size you choose will be the desired finished size.
Right Sleeve
| Size | 1 | 2 | 3 | 4 | 5 | 6 | 7 | 8 | 9 | 10 | 11 |
| Ch | 55 | 61 | 67 | 71 | 73 | 79 | 81 | 89 | 89 | 89 | 89 |
| Row 1: | Starting in 2nd ch, insert hook in back bump, YO and pull up a loop, *YO, sk next ch, insert hook in next ch, YO and pull up a loop, rep from * until 1 ch rem, end st. RetP. | ||||||||||
| Row 2: | *YO, sk next st, mod tss, rep from * until 2 sts rem, YO, end st. RetP. | ||||||||||
| Row 3: | *Mod tss, YO, sk next st, rep from * until 1 st rem, end st. RetP. | ||||||||||
| Rep Rows 2-3 until total rows are reached | |||||||||||
| Total Rows | 42 | 42 | 43 | 43 | 43 | 45 | 45 | 46 | 46 | 47 | 47 |
Back
I hope you have completed the Right Sleeve and are ready to begin the Back section. It’s a seamless step that is not commonly used, but it’s time to grab that second hook.
| Size | 1 | 2 | 3 | 4 | 5 | 6 | 7 | 8 | 9 | 10 | 11 |
| BO # sts on Right Sleeve | 27 | 31 | 34 | 35 | 37 | 39 | 41 | 45 | 45 | 45 | 45 |
| Row 1: | Continue in pattern to end of row for ♠︎ sts, add ♦︎ sts following Special Stitches & Techniques, Inc. Width on left side. | ||||||||||
| ♠︎: sts in pattern | 28 | 30 | 33 | 36 | 36 | 40 | 40 | 44 | 44 | 44 | 44 |
| ♦︎: # sts to add | 25 | 27 | 30 | 31 | 29 | 25 | 27 | 23 | 23 | 23 | 23 |
| Total Sts for Back | 53 | 57 | 63 | 67 | 65 | 65 | 67 | 67 | 67 | 67 | 67 |
| Next Rows: | Continue in pattern until total rows are reached. Do not FO. | ||||||||||
| Total Rows | 33 | 36 | 38 | 42 | 43 | 46 | 46 | 49 | 49 | 51 | 57 |
NOTE: Make note of whether you stopped on Row 2 or Row 3.
It will help to watch the video at least once to see how to Inc. Width on left side, which is also explained above in the Special Stitches & Techniques.
Left Sleeve
You will ch the number listed in the table to extend the fabric for the start of the Left Sleeve.
| Size | 1 | 2 | 3 | 4 | 5 | 6 | 7 | 8 | 9 | 10 | 11 |
| Ch | 27 | 31 | 34 | 35 | 37 | 39 | 41 | 45 | 45 | 45 | 45 |
| Row 1: | [follow if last row of Back was Row 2] Starting in 2nd ch, tss, *YO, sk next ch, tss in next st, rep from * until ♦︎ sts rem. RetP. OR [follow if last row of Back was Row 3] *YO, sk next st, mod tss, rep from * until ♦︎ -2 sts rem, YO, end st. RetP. Leave rem sts unworked; these will be closed when making Left Front. | ||||||||||
| Sts in pattern | 28 | 30 | 33 | 36 | 36 | 40 | 40 | 44 | 44 | 44 | 44 |
| ♦︎ sts unworked | 25 | 27 | 30 | 31 | 29 | 25 | 27 | 23 | 23 | 23 | 23 |
| Next Rows: | Continue in pattern until totals rows reached. | ||||||||||
| Total Rows | 42 | 42 | 43 | 43 | 43 | 45 | 45 | 46 | 46 | 47 | 47 |
| BO | Ch 1, sl st in each st and mod tss to end, FO. | ||||||||||
Does the shape seem weird?
Watch how to start the Left Sleeve, which is a mirror of the Right Sleeve. Definitely trust the process with this tunisian crochet pattern. You’ll be pleasantly surprised by how it comes together.
Right Front – Open
Fold Right Sleeve in half.
Attach yarn in cnr of Right Sleeve and Back by pulling loop to the front through the end st of Right Sleeve.
Note: All rows will be joined to the Right Sleeve and Back during the FwdP following Special Techniques, Join-as-you-go on right side using the Right Sleeve then the Back.
| Size | 1 | 2 | 3 | 4 | 5 | 6 | 7 | 8 | 9 | 10 | 11 |
| Mark center sts for Neck Opening | 6 | 6 | 8 | 8 | 9 | 12 | 12 | 11 | 11 | 9 | 11 |
| Row 1: | Tss in first st, *YO, sk next st, tss in next st, rep from * until 1 st before M, tss in last st. RetP. | ||||||||||
| Total sts | 15 | 15 | 15 | 17 | 17 | 17 | 17 | 19 | 19 | 21 | 23 |
| Row 2: | YO, sk first st, mod tss, *YO, sk next st, mod tss, rep from * until 2 sts rem, YO, end st. RetP. | ||||||||||
| Row 3: | *Mod tss, YO, sk next st, rep from * until 1 st rem, end st. RetP. | ||||||||||
| Rows 4-10: | Rep [Rows 2-3] 3 times, then Row 2 | ||||||||||
| Row 11: | Continue in pattern and evenly space ♠︎ inc (inc after a mod tss). | ||||||||||
| ♠︎: # of inc | 1 | 1 | 1 | 1 | 1 | 1 | 1 | 1 | 1 | 2 | 2 |
| Total sts | 17 | 17 | 17 | 19 | 19 | 19 | 19 | 21 | 21 | 25 | 27 |
Starting with row 12 using the instructions below. Always make inc after a mod tss following Special Stitches and Techniques. Each Inc adds 2 sts. Work the other rows without an increase between a row with an inc and all rows after the total sts has been reached.
| Size | Increase Instructions | Row # with inc after Row 11 | Total sts after all inc | |
| 1 | [inc every 4th row] 2 times, then [inc every 3rd row] 5 times | [15, 19], [23, 26, 29, 32, 35] | 31 | |
| 2 | [inc every 3rd row] 7 times, then [inc every 2nd row] 3 times | [14, 17, 20, 23, 26, 29, 32], [34, 36, 38] | 37 | |
| 3 | [inc every 3rd row] 6 times, [inc every 2nd row] 6 times | [14, 17, 20, 23, 26, 29], [31, 33, 35, 37, 39, 41] | 41 | |
| 4 | [inc every 3rd row] 3 times, [inc every 2nd row] 12 times | [14, 17, 20], [22, 24, 26, 28, 30, 32, 34, 36, 38, 40 [42, 44] | 49 | |
| 5 | [inc every 2nd row] 17 times | 13, 15, 17, 19, 21, 23, 25, 27, 29, 31, 33, 35, 37, 39, 41, 43, 45 | 53 | |
| 6 | [inc every 2nd row] 9 times, [make 2 inc every 2nd row] 6 times | [13, 15, 17, 19, 21, 23, 25, 27, 29], [31, 33, 35, 37, 39, 41] | 61 | |
| 7 | [make 2 inc every 3rd row] 4 times, [make 2 inc every 2nd row] 8 times | [14, 17, 20, 23], [25, 27, 29, 31, 33, 35, 37, 39] | 67 | |
| 8 | [make 2 inc every 3rd row] 3 times, [make 2 inc every 2nd row] 10 times | [14, 17, 20], [22, 24, 26, 28, 30, 32, 34, 36, 38, 40] | 73 | |
| 9 | [make 2 inc every 2nd row] 15 times | 13, 15, 17, 19, 21, 23, 25, 27, 29, 31, 33, 35, 37, 39, 41 | 81 | |
| 10 | [make 2 inc every 2nd row] 15 times | 13, 15, 17, 19, 21, 23, 25, 27, 29, 31, 33, 35, 37, 39, 41 | 85 | |
| 11 | [make 2 inc every 2nd row] 10 times, [make 3 inc every 2nd row] 4 times | [13, 15, 17, 19, 21, 23, 25, 27, 29, 31], [33, 35, 37, 39] | 91 | |
*This is a great opportunity to use stitch markers to fold the sleeves over and try on. If you would like your Front wider for the buttoned version, do so before following the instructions below.*
Continue in pattern until Right Front is the same length as the Back. DO NOT BO. FO with generous tail.
Need a visual to make the front portion of your tunisian lace cardigan?
Don’t forget to share your CAL progress in the FB community or this form, if you don’t use social media.
Right Front – Buttoned
Fold Right Sleeve in half.
Attach yarn in cnr of Right Sleeve and Back by pulling loop to the front through the end st of Right Sleeve.
Note: All rows will be joined to the Right Sleeve and Back during the FwdP following Special Techniques, Join-as-you-go on right side using the Right Sleeve then the Back.
| Size | 1 | 2 | 3 | 4 | 5 | 6 | 7 | 8 | 9 | 10 | 11 |
| Mark center sts for Neck Opening | 6 | 6 | 8 | 8 | 9 | 12 | 12 | 11 | 11 | 9 | 11 |
| Row 1: | Tss in first st, *YO, sk next st, tss in next st, rep from * until 1 st before M, tss in last st. RetP. | ||||||||||
| Total sts | 15 | 15 | 15 | 17 | 17 | 17 | 17 | 19 | 19 | 21 | 23 |
| Row 2: | YO, sk first st, mod tss, *YO, sk next st, mod tss, rep from * until 2 sts rem, YO, end st. RetP. | ||||||||||
| Row 3: | *Mod tss, YO, sk next st, rep from * until 1 st rem, end st. RetP. | ||||||||||
| Rows 4-10: | Rep [Rows 2-3] 3 times, then Row 2 | ||||||||||
| Row 11: | Continue in pattern and evenly space ♠︎ inc (inc after a mod tss). | ||||||||||
| ♠︎: # of inc | 1 | 1 | 1 | 1 | 1 | 1 | 1 | 2 | 2 | 2 | 2 |
| Total sts | 17 | 17 | 17 | 19 | 19 | 19 | 21 | 23 | 23 | 25 | 27 |
Starting with row 12 using the instructions below. Always make inc after a mod tss following Special Stitches and Techniques. Each Inc adds 2 sts. Work the other rows without an increase between a row with an inc and all rows after the total sts has been reached.
| Size | Increase Instructions | Row # with inc after Row 11 | Total sts after all inc | |
| 1 | [inc every 3rd row] 3 times, [inc every 2nd row] 8 times | [14, 17, 20], [22, 24, 26, 28, 30, 32, 34, 36] | 39 | |
| 2 | [inc every 2nd row] 14 times | 13, 15, 17, 19, 21, 23, 25, 27, 29, 31, 33, 35, 37, 39 | 45 | |
| 3 | [inc every 2nd row] 14 times, [make 2 inc every 2nd row] 1 times | [13, 15, 17, 19, 21, 23, 25, 27, 29, 31, 33, 35, 37, 39], [41] | 49 | |
| 4 | [inc every 2nd row] 12 times, [make 2 inc every 2nd row] 3 times | [13, 15, 17, 19, 21, 23, 25, 27, 29, 31, 33, 35], [37, 39, 41] | 55 | |
| 5 | [inc every 2nd row] 9 times, [make 2 inc every 2nd row] 6 times | [13, 15, 17, 19, 21, 23, 25, 27, 29], [31, 33, 35, 37, 39, 41] | 61 | |
| 6 | [inc every 2nd row] 8 times, [make 2 inc every 2nd row] 8 times | [13, 15, 17, 19, 21, 23, 25, 27], [29, 31, 33, 35, 37, 39, 41, 43] | 67 | |
| 7 | [make 2 inc every 3rd row] 1 time, [make 2 inc every 2nd row] 13 times | [14], [16, 18, 20, 22, 24, 26, 28, 30, 32, 34, 36, 38, 40] | 75 | |
| 8 | [make 2 inc every 2nd row] 14 times, [inc every 2nd row] 1 time | [13, 15, 17, 19, 21, 23, 25, 27, 29, 31, 33, 35, 37, 39], [41] | 81 | |
| 9 | [make 2 inc every 2nd row] 13 times, [make 3 inc every 2nd row] 2 times | [13, 15, 17, 19, 21, 23, 25, 27, 29, 31, 33, 35, 37], [39, 41] | 87 | |
| 10 | [make 2 inc every 2nd row] 9 times, [make 3 inc every 2nd row] 3 times, [make 4 inc every 2nd row] 2 times | [13, 15, 17, 19, 21, 23, 25, 27, 29], [31, 33, 35], [37, 39] | 95 | |
| 11 | [make 2 inc every 2nd row] 8 times, [make 3 inc every 2nd row] 4 times, [make 4 inc every 2nd row] 2 times | [13, 15, 17, 19, 21, 23, 25, 27], [29, 31, 33, 35], [37, 39] | 99 | |
*This is a great opportunity to use stitch markers to fold the sleeves over and try on. If you would like your Front wider for the buttoned version, do so before following the instructions below.*
Continue in pattern until Right Front is the same length as the Back. DO NOT BO. FO with generous tail.
Left Front – Open
Fold Left Sleeve in half.
Attach yarn in marked st along Back.
Note: All rows will be joined to the Left Sleeve and Back before starting the RetP following Special Stitches & Techniques, Join-as-you-go on left side.
Complete in the same manner as the Right Front – Open. DO NOT FO.
Left Front – Buttoned
Fold Left Sleeve in half.
Attach yarn in marked st along Back.
Note: All row of Left Front will be joined to the Left Sleeve and then the Back following Special Stitches & Techniques, Join-as-you-go on left side.
Complete in the same manner as the Right Front – Buttoned. DO NOT FO.
End of CAL Giveaway
I think this is a great time to share the details of the giveaway!
WeCrochet is all about us crocheters, and they have sponsored the giveaway for the Olivia Tunisian Lace Cardigan Crochet Along!
To enter the giveaway, you just need to do the following steps
- Post at least one picture of each section under the section post in the Facebook Group or submit it via THIS FORM (this is for Crochet Besties that don’t use FB).
- Post a picture of your finished Olivia Tunisian Lace Cardigan (preferably modeled so your amazing stitching can be fully appreciated) by November 15, 2025. This can be posted in the Facebook Group, Confidently Crochet with Creations by Courtney or other social platform and tag me @creationsbycourtneyllc on FB and IG or @creationsbycourtney on TT with #CreationsbyCourtney #OliviaTCAL, or submitted via the form
- Live in the United States, Canada, Australia or United Kingdom
- There has to be progress pictures and a finished cardigan for your entry to count.
One lucky winner will receive a set of Sunstruck Tunisian in the Round hooks, valued at $89.99, and a $30 gift card to use in my pattern shop.
Below the Waist – Hip or Tunic
Open cardigan
NOTE: Several increases will be made for the first row to ensure that the Below the Waist of the cardigan is the same width of the Fronts and Back. It will help to PM for the # of increases to evenly space them after a mod tss.
| Size | 1 | 2 | 3 | 4 | 5 | 6 | 7 | 8 | 9 | 10 | 11 |
| Evenly PM | 15 | 17 | 21 | 15 | 20 | 20 | 19 | 18 | 18 | 22 | 20 |
| Inc: YO, do not sk next st | |||||||||||
| Row 1: | Continue in pattern making sure to inc at or near M along Left Front and Back until M at Right Front. Remove M from loop and place loop over last tss made and tighten; continue in pattern until 1 st rem, end st. RetP. | ||||||||||
| Total sts | 110 | 127 | 141 | 155 | 169 | 184 | 199 | 213 | 229 | 243 | 259 |
| Next Rows: | Continue in pattern until total rows or desired length is reached. DO NOT FO after last row. | ||||||||||
| Total Rows – Hip | 15 | 12 | 14 | 11 | 14 | 14 | 13 | 15 | 15 | 22 | 22 |
| Total Rows – Tunic | 25 | 22 | 24 | 22 | 27 | 27 | 26 | 28 | 28 | 31 | 31 |
Buttoned cardigan
| Size | 1 | 2 | 3 | 4 | 5 | 6 | 7 | 8 | 9 | 10 | 11 |
| Evenly PM | 16 | 15 | 19 | 19 | 19 | 19 | 17 | 18 | 20 | 22 | 20 |
| Inc: YO, do not sk next st | |||||||||||
| Row 1: | Continue in pattern making sure to inc at or near M along Left Front and Back until M at Right Front. Remove M from loop and place loop over last tss made and tighten; continue in pattern until 1 st end st. RetP. | ||||||||||
| Total sts | 127 | 141 | 155 | 171 | 184 | 199 | 213 | 229 | 243 | 259 | 275 |
| Next Rows: | Continue in pattern until total rows or desired length is reached. DO NOT FO after last row. | ||||||||||
| Total Rows – Hip | 15 | 12 | 14 | 11 | 14 | 14 | 13 | 15 | 15 | 22 | 22 |
| Total Rows – Tunic | 25 | 22 | 24 | 22 | 27 | 27 | 26 | 28 | 28 | 31 | 31 |
Check out this video before starting row 1
Edging
Rnd 1: Ch 1, BO with sl st in each st to cnr, ch 1 and turn cnr, sc in each st up Left Front to Neck Opening, sc2tog in cnr at neck, sc in each st across Back to next cnr, sc2tog in cnr, sc in each st down Right Front until next cnr, ch 1, sl st to join. FO.
Seam Sleeves and Cuff
- Turn cardigan inside out, and PM in last st to hold in place.
- Attach yarn in underarm, ch 1, working through both layers, sc in each st to end.
Rnd 1: Working along end, ch 1, sc in each st around, sl st to join, turn.
Rnd 2: Ch 1, sc2tog around, sc in rem st, if needed, sl st to join.
Note: You can complete another rnd of deceases, if you desire a tighter cuff.
Ch 11,
Row 1: Starting in 2nd ch from hook, yo-slst in each ch, attach to first st of Rnd 2, sl st in next st, turn. 10 yo-slst
Row 2: YO-slst in 3rd loop (back back loop) of each st to end, turn. 10 yo-slst
Row 3: Ch 1, yo-slst in 3rd loop of each st, attach to 3rd st of Rnd 2, sl st in next st, turn.
Next Rows: Rep Rows 2-3 around ensuring that each row aligns with one st of Rnd 2.
Cuff Seam: Working through both layers, sl st through the closest loops of each layer, FO.
Rep for second Sleeve, then flip cardigan right side out.
Finishing
- Weave in all ends.
- Wet block and allow to dry.
- Add buttons to the Left Front aligning with spaces along the Right Front.
- Wear it in the wild with confidence!
Complete your Olivia Tunisian Crochet Lace Cardigan by November 15 to be entered into the giveaway for tunisian hooks + more from my friends at WeCrochet.
Here is a recap of how to enter the giveaway, you just need to do the following steps:
- Post at least one picture of each section under the section post in the Facebook Group or submit it via THIS FORM (this is for Crochet Besties that don’t use FB).
- Post a picture of your finished Olivia Tunisian Lace Cardigan (preferably modeled so your amazing stitching can be fully appreciated) by November 15, 2025. This can be posted in the Facebook Group, Confidently Crochet with Creations by Courtney or other social platform and tag me @creationsbycourtneyllc on FB and IG or @creationsbycourtney on TT with #CreationsbyCourtney #OliviaTCAL, or submitted via the form
- Live in the United States, Canada, Australia or United Kingdom
- There has to be progress pictures and a finished cardigan for your entry to count.
One lucky winner will receive a set of Sunstruck Tunisian in the Round hooks, valued at $89.99, and a $30 gift card to use in my pattern shop.
You may enjoy these previous crochet alongs
Pin it for Later

You have a gorgeous finished tunisian crochet lace cardigan!
Hopefully, it’s well before November 15th, and you’re just adding your buttons or weaving in the last end. For all participants that shared progress pictures, and shared a picture of their finished cardigan, will be entered into the giveaway.
The thrill of finishing your Olivia Tunisian Lace Cardigan through this CAL beats any solo project. You’ve built skills, forged bonds, and created a garment full of personal touches. Now, style it in those four ways to enjoy it every season.
Drop the deets on the style you chose / choosing in the comments; let’s chat colors and fibers. Subscribe for upcoming CALs and more crochet ideas.
Wear your cardigan with pride, knowing you made it with a group that cares.
Keep Stitchin,
Courtney
Want to talk about yarn goodness, crochet tips, and exclusive deals? Join my Facebook Group, Confidently Crochet with Creations By Courtney.
If we’re not hanging out on social media yet, come check me out on Facebook, Instagram and Pinterest.
Join my newsletter for sneak peeks, crochet tips, and more.
Use #CreationsByCourtney on social media when sharing your projects.
This pattern is not to be duplicated or resold, and not to be reproduced commercially. You may sell finished products on Etsy, at farmers markets, and craft fairs, but please credit Creations By Courtney as the pattern’s author.


2 Responses
Where can I find a video of the stitch used in the pattern? I am having a sloped side and it doesn’t look like what I see in your photo. Thanks
Hi Angela,
Here’s a tutorial https://creationsbycourtney.com/tunisian-crochet-tutorial-clover-stitch/
I’ll update the post with this too.