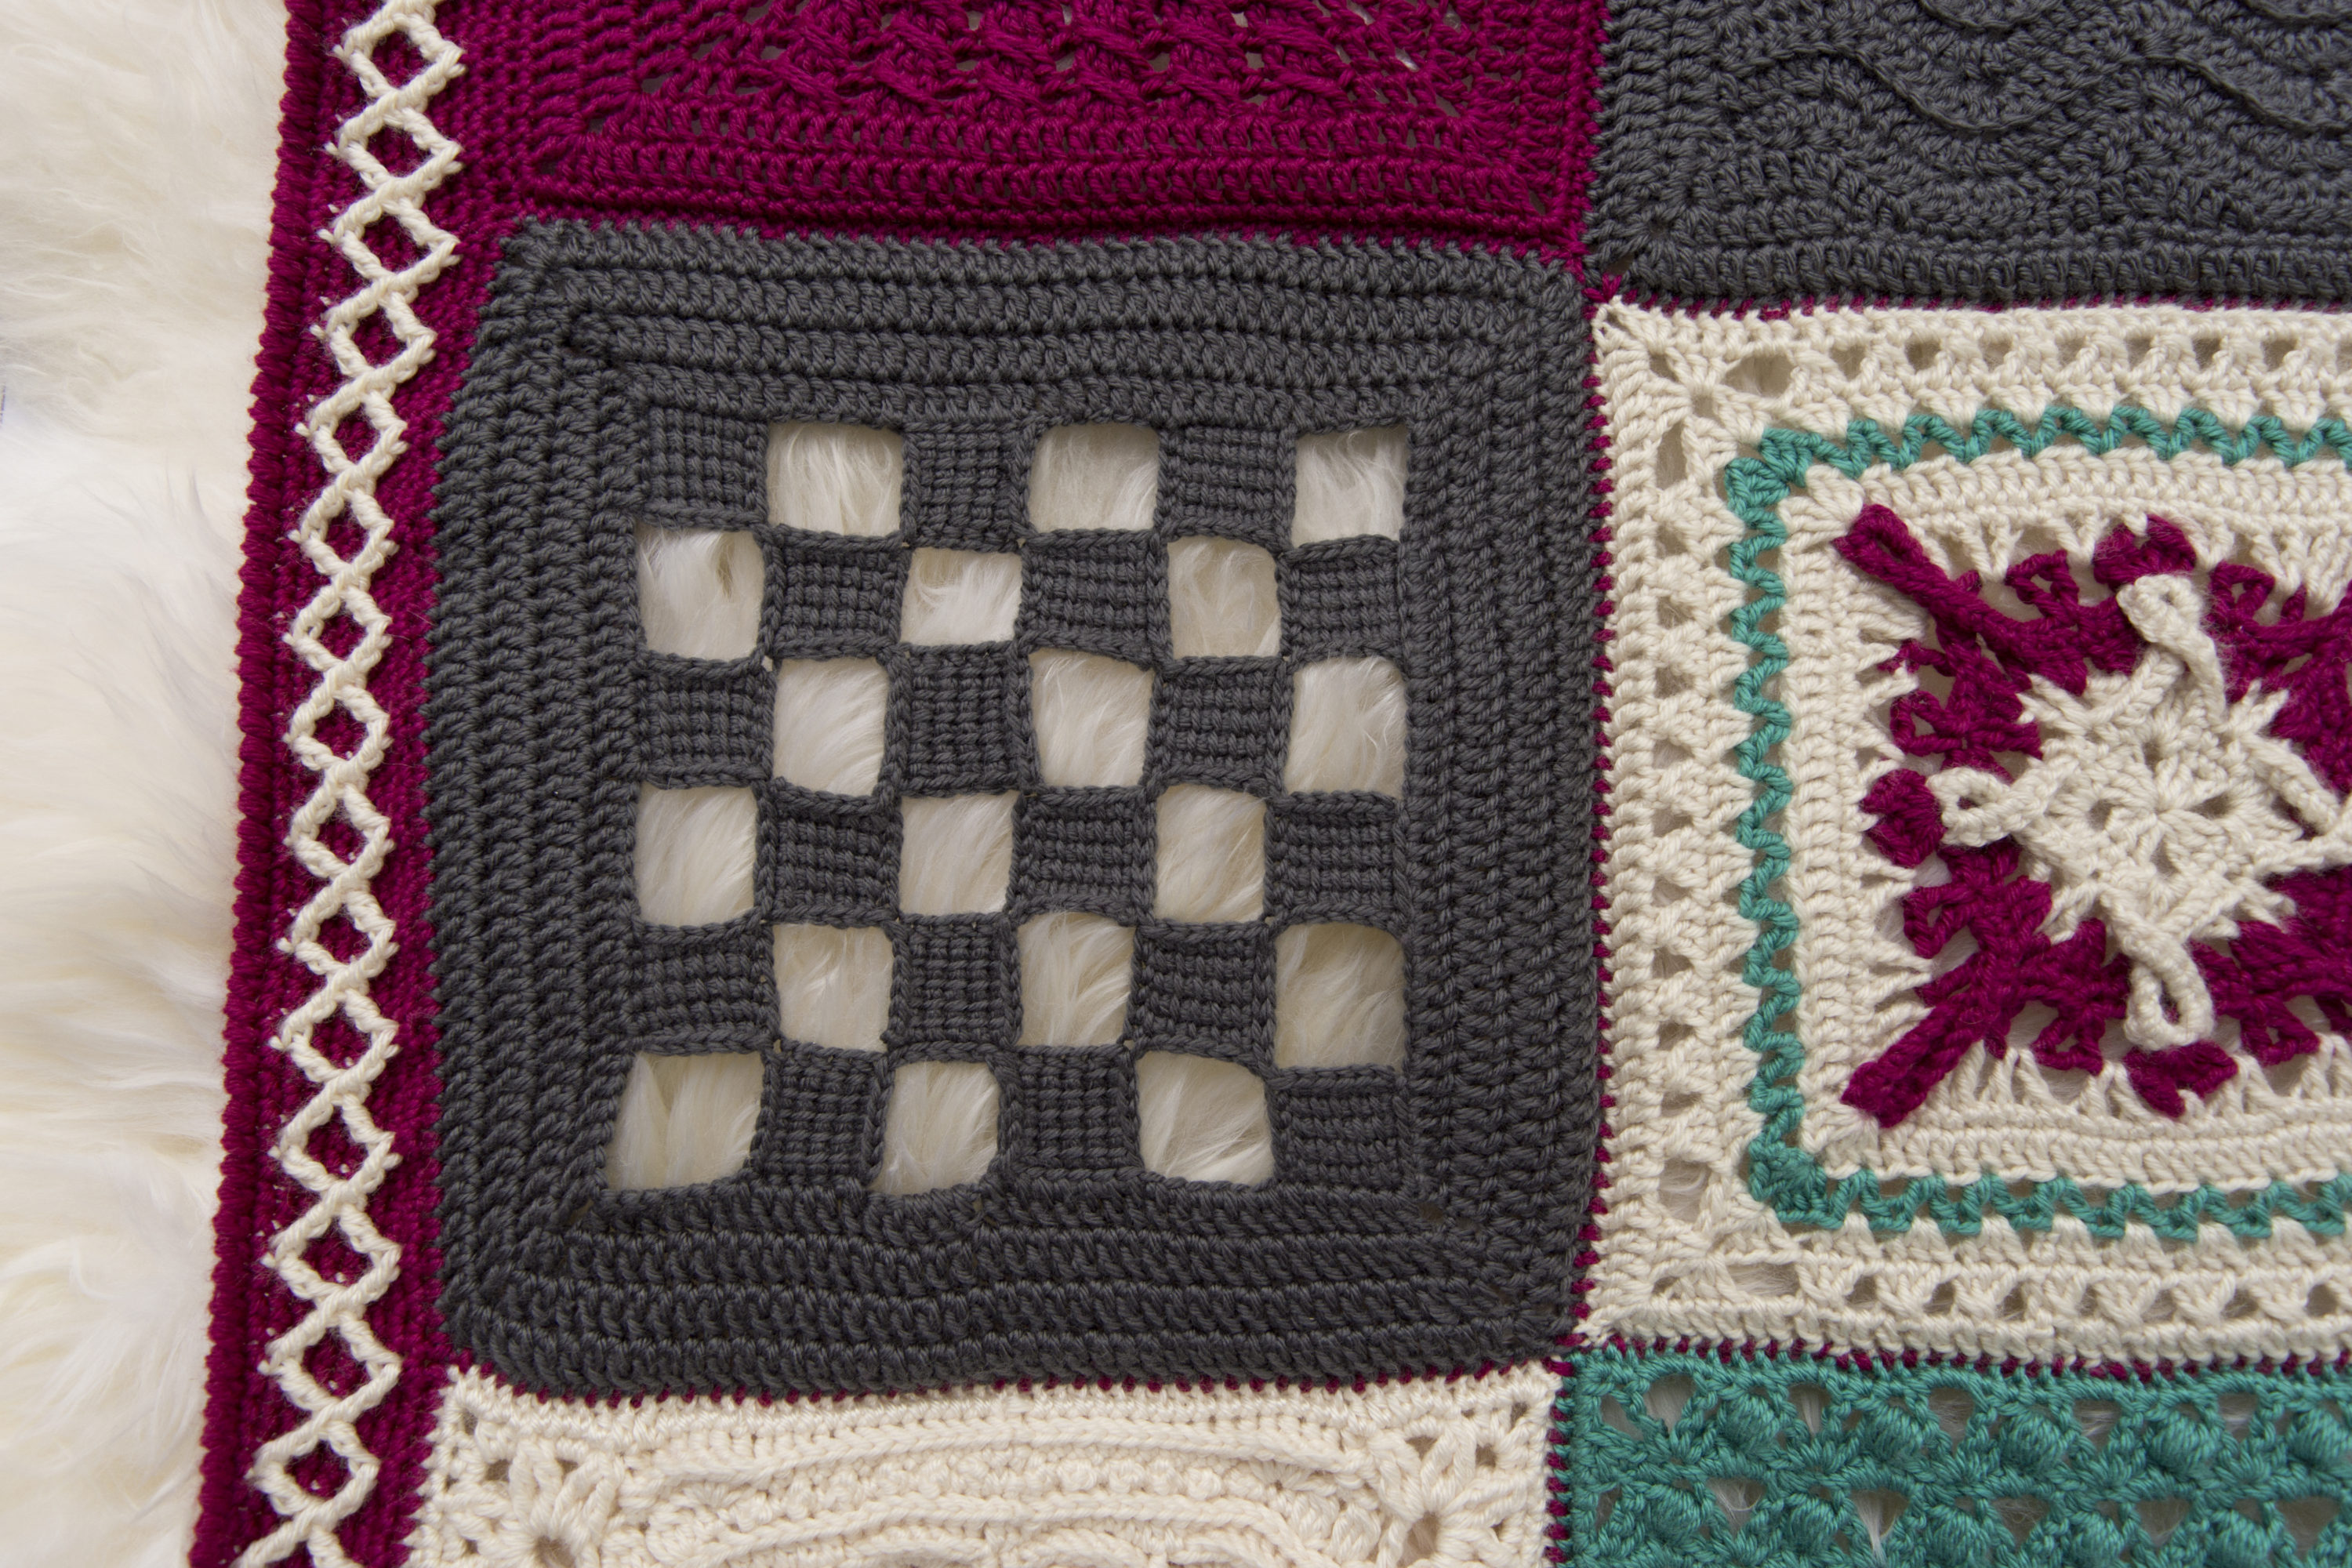
The Tunisian Checkerboard Square is part of the Creative Crossings blanket. This was a collaborative project between 15 designers, as a token of appreciation for Lorene Eppolite is Cre8tion Crochet. We were lucky enough to be a part of her beta group in Cre8tion Business Academy. We worked together to create sqaures for the gorgeous blanket to match the Cre8tion Crochet theme using Red Heart Soft in Deep Sea, Berry, Off White and Charcoal. The Tunisian Checkerboard Square was made in charcoal, but would look lovely in any color.
The Tunisian Checkerboard was inspired by tunisian entrelac, but rather than use two or more colors, I decided to use just one color that creates solid and open squares, like a checkerboard!
I have always been fascinated and intimidated by tunisian crochet, so to design a small project with tunisian was a great introduction. And since it’s small squares, you don’t need a tunisian or afghan hook. All you need is a straight neck hook to make these little squares.
Below is the free crochet pattern for the Tunisian Checkerboard Square. Be sure to check out the Kisses Square and all the rest to make your Creative Crossing blanket in your choice of four colors. (Did you check out the gorgeous edging designed by Kirsten Holloway Designs? ?)
Want a PDF version of this pattern? Grab it from Ravelry for a small fee
Difficulty: Intermediate
Materials Needed:
Hook: H/5mm Furls Crochet Streamline Hook
Yarn: Red Heart Soft in charcoal, or any worsted weight yarn
Scissors
Needle
Stitches Used:
ch: chain
sc: single crochet
dc: double crochet
st(s): stitch(es)
slst: slip stitch
Additional Terms:
Rem: remaining
Ret: return pass
YO: yarn over
BL: back loop
Gauge: 7 loops x 5 rows in Tunisian Simple Stitch = 1 3/8″ x 1 3/8″ square
Measurements: 12 in (30.5 cm) x 12 in (30.5 cm) after blocking
Additional Notes
- Pattern is written in US terms.
- Count to ensure 7 loops are on hook before starting the return pass
- Ch 3 counts as dc throughout the pattern
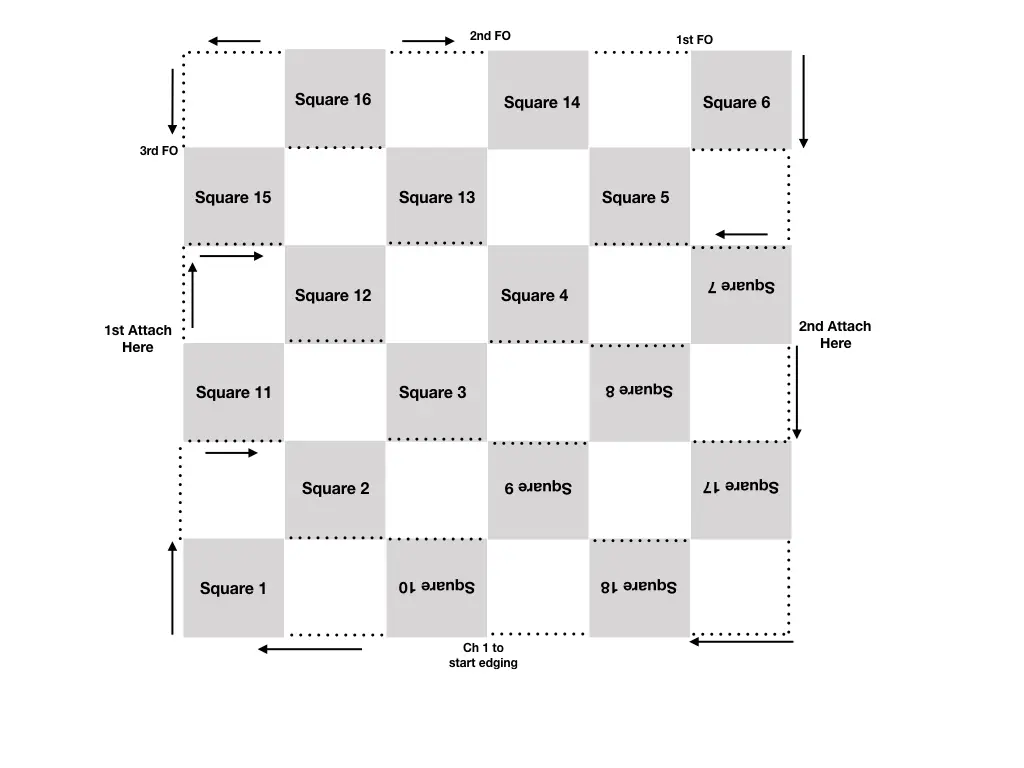
- Follow the diagram at the end of the pattern to know the direction that the squares will be made. They are in numerical order.
- Do not turn at the end of each row of the square.
- Block square to final measurements.
- Extra rows of edging can be added to make square larger than 12” (30.5 cm)
Instructions:
First Square
Row 1 Forward Pass: Ch 7, working through the bump on the back of the chain, insert hook through second ch from hook, *YO, pull up a loop. Repeat from * in each ch across (7 loops on hook)
Ret Pass: YO, pull through one loop, *YO, pull through two loops. Repeat from * until one loop remains.
Row 2 -5 Forward: *Insert hook from right to left under next vertical bar, YO, pull up a loop. Repeat from * in each vertical bar across
Ret Pass: YO, pull through one loop, *YO, pull through two loops. Repeat from * until one loop remains.
Row 3-5: Repeat Row 2 Forward and Ret. After Row 5, ch 7
Squares 2-6
Working in the ch-7 (represented by the black dots in the diagram at the bottom of each square), make each square in the same manner as Square 1. Be sure to ch 7 after each Row 5 Ret.
Square 6: After Row 5 Ret, 5 slst in the BL down of the Square 6 (follow the arrow), ch 12 (counts as ch-5 and ch-7 for next square)
Squares 7-10
Working in the ch-7 (represented by the black dots in the diagram at the bottom of each square), make each square in the same manner as Square 1. Be sure to ch 7 after each Row 5 Ret
Square 10: After row 5 Ret, ch 5, slst to join to Square 1 (follow the arrow), 5 slst in the BL across the bottom of Square 1, rotate the piece to 5 slst in BL up the side of Square 1 (follow the arrow), ch 12
Squares 11-14
Working in the ch-7 (represented by the black dots in the chart at the bottom of each square), make each square in the same manner as Square 1. Be sure to ch 7 after each Row 5 Ret, except Square 14
Square 14: After row 5 Ret, ch 5, slst to join to top go Square 6. FO
Squares 15-16
Attach yarn in the top left corner of Square 11 (1st Attach Here), ch 12
Working in the ch-7 (represented by the black dots in the diagram at the bottom of each square), make each square in the same manner as Square 1. Be sure to ch 7 after Row 5 Ret, except for Square 16
Square 16: After Row 5 Ret, ch 5, slst to join to Square 14, FO
Squares 17-18
Attach yarn in top left corner of Square 7 (2nd Attach Here), ch 12
Working in the ch-7 (represented by the black dots in the diagram at the bottom of each square), make each square in the same manner as Square 1. Be sure to ch 7 after Row 5 Ret, except for Square 18
Square 18: After Row 5 Ret, ch 5, slst to join to Square 10, FO
Edging
Attach yarn to top left corner of Square 16 (3rd Attach Here), ch 10, slst to top left corner of Square 15, FO
Rotate piece and attach yarn to top left corner of Square 17 (4th Attach Here), ch 10, slst to join to Square 18.
Row 1: ch 1, sc in next 5 ch, ch 2 (corner made), sc in next 5 ch, 5 sc across side of Square 17, sc in next 5 ch, 5 sc across side of Square 7, sc in next 5 ch, 5 sc across side of Square 6, ch 2 (corner made), 5 sc across next side of Square 6, sc in next 5 ch, 5 sc across side of Square 14, sc in next 5 ch, 5 sc across Square 16, sc in next 5 ch, ch 2 (corner made), sc in next 5 ch, 5 sc across side of Square 15, sc in next 5 ch, 5 sc across Square 11, sc in next 5 ch, 5 sc across side of Square 1, ch 2 (corner made), 5 sc across next side of Square 1, sc in next 5 ch, 5 sc across side of Square 10, sc in next 5 ch, 5 sc across Square 18, slst to join to first sc. (120 sc, 8 ch)
Row 2-3: Ch 3 (counts as dc), *dc in each st across to corner, (dc, ch 1, dc) in ch-2. Repeat from * three more times, dc in each st across, slst to join to ch-3, FO
Block your square to the final measurement of 12” x 12”, and enjoy!
Table 1. Square Diagram
- Dotted Lines represent chains for starting each square and across the open sides of the total square
- The arrows represent the direction of the chain groups and the direction that the piece will be rotated in order to continue the pattern.
- The upside down squares represent that the piece will be rotated in order to continue pattern.
- Edging rows are not represented in the diagram.

Thank you for your support! ♥ You can pick up my latest free and paid pattern by visiting my website: https://www.creationsbycourtney.com/cbc-designs
Additionally, I invite you to sign-up for my email newsletter, and follow me on social media for more crochet and yarnie goodness!
Newsletter: http://eepurl.com/cJh_2j
Facebook: https://www.facebook.com/creationsbycourtneyllc
Pinterest: https://www.pinterest.com/cbycourtney
Instagram: http://www.instagram.com/creationsbycourtneyllc
Ravelry: http://www.ravelry.com/designers/courtney-w-of-creations-by-courtney Craftsy: https://www.craftsy.com/profile/creations-by-courtney
Table 1. Square Diagram
- Dotted Lines represent chains for starting each square and across the open sides of the total square
- The arrows represent the direction of the chain groups and the direction that the piece will be rotated in order to continue the pattern.
- The upside down squares represent that the piece will be rotated in order to continue pattern.
- Edging rows are not represented in the diagram.


19 Responses
Hi, Courtney. I have a couple of questions. First, should we be working an “ending row” on 5th return pass on the squares?
Thanks.
Oops… I said a couple of questions then figured out the second, but forgot to edit the post! Sorry about that.
It’s okay! I’m glad you were able to figure it out! Let me know if you need anymore help.
I am very lost with this pattern and I am hoping for some assistance. So far, I have gotten as far as block 6. After that, it’s just not making sense. How do I join as I do blocks 7-10? Like, 7 to 5, 8 to 4, etc. I get the chaining to make the spaces between squares. I worked my way up to the first FO but frogged. Thanks for your assistance! I’ve never done Tunisian before and it’s been fun learning!
Hi Joanna! After Square 6, make sure to slip stitch down the right side of Square 6. That’s what the arrow on the right of Square 6. It represents the direction of slip stitches to create the chains for the side of the open space and the chains needed to begin Square 7, which requires rotating the piece upside down. The return pass will always have one remaining loop on the right side of the square in order to slip stitch. The 1st FO won’t occur until you’ve made Square 14
I was missing the joining the smaller squares part. 😀 I did figure it out, and may not have done it *exactly* right, but it LOOKS right. 😀
Hi again, it Elizabeth Rivera. I figured it out, I copied your diagram of the pattern and transposed it backwards. It worked. Your mind is amazing. This was such a challenge, thank you.
That’s awesome Elizabeth! Can’t wait to see your square!
And thank you for the compliment! I have to challenge myself every chance I get.
Are the squares for the Creative Crossings Blanket still available? I would love to make this one.
Hi Sherry,
The squares are still available! I look forward to seeing your finished blanket.
I am afraid that I am still not understanding how all of the squares attach to one another. Not sure if they should somehow be slip stitched along the way? Can’t seem to locate this step in the pattern
Have you looked at the diagram for the direction that the squares are made at the bottom of the pattern? Similar to traditional entrelac squares, you work diagonally, from the bottom left corner up to the upper right corner. After finishing Square 6 by slip stitching, you will make a longer chain to create a space and start the next square. If you have more specific questions, please email me or use the contact me page
Hi, I’m just getting started and am really confused. The first instruction is to chain 7 and then working in the back look of the chains starting with the second chain from the hook, pull up loops and that you should have 7 loops. If you start with the second chain from the hook you will only have 6 loops… Should you chain 8 or only have 6 loops?
nvm… i figured it out…
I’m glad that you were able to figure it out. Your question is a great reminder to me to create a video tutorial for this pattern. I hope you’ll share your finished square online and tag me @creationsbycourtneyllc on Facebook and Instagram.