
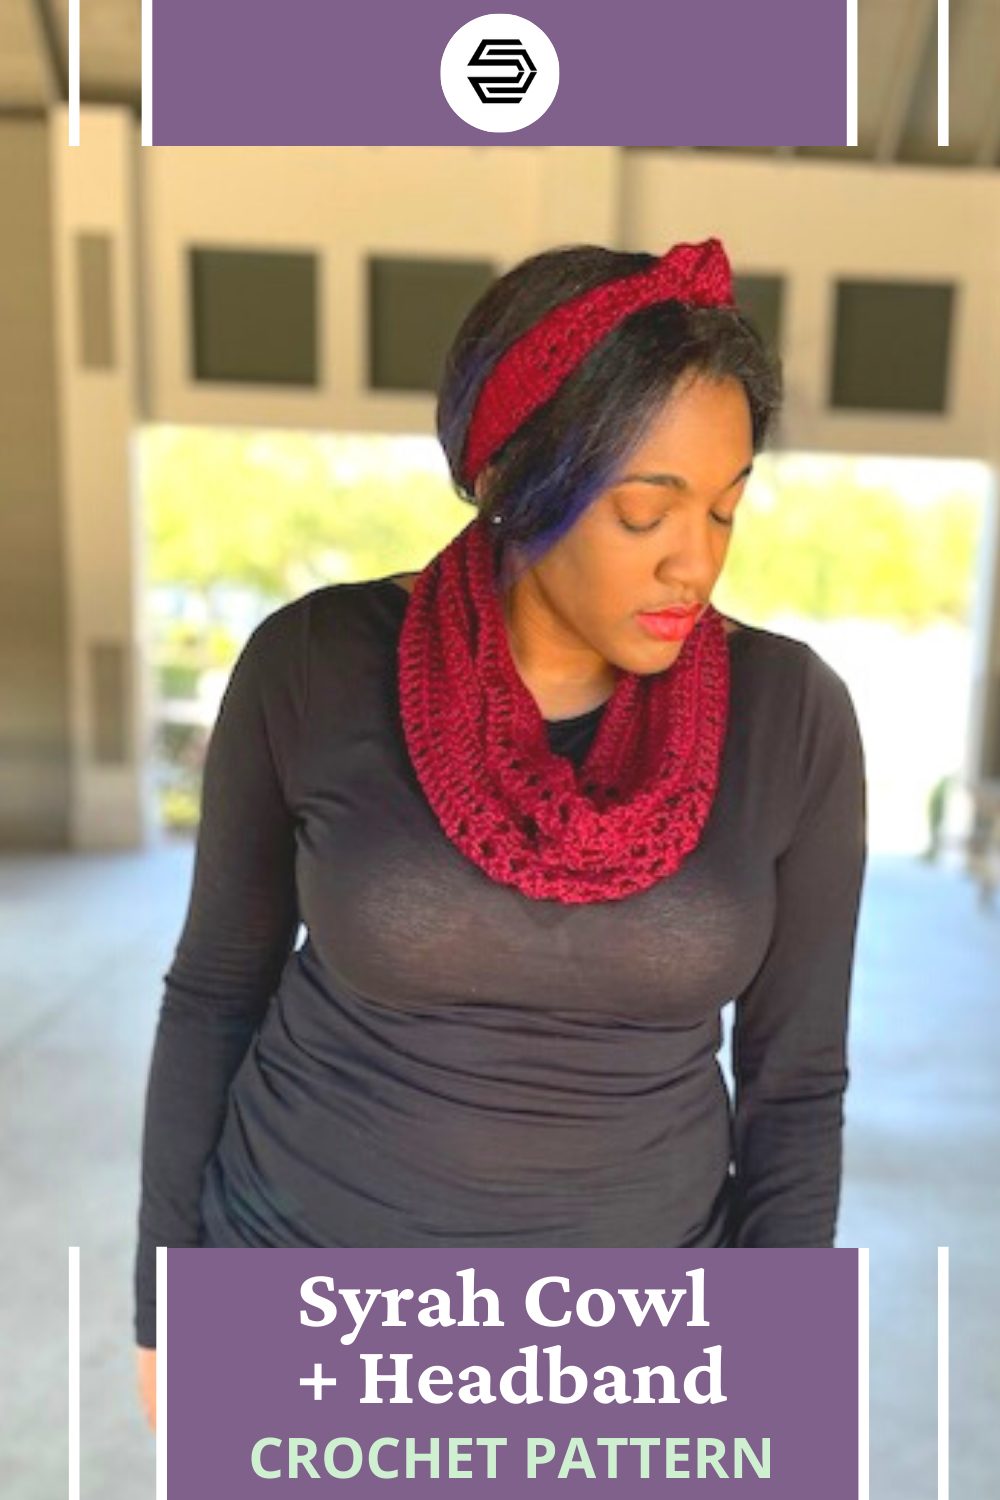
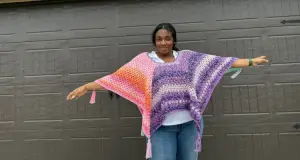
The Syrah Cowl and Headband are the perfect crochet patterns for working through your stash!
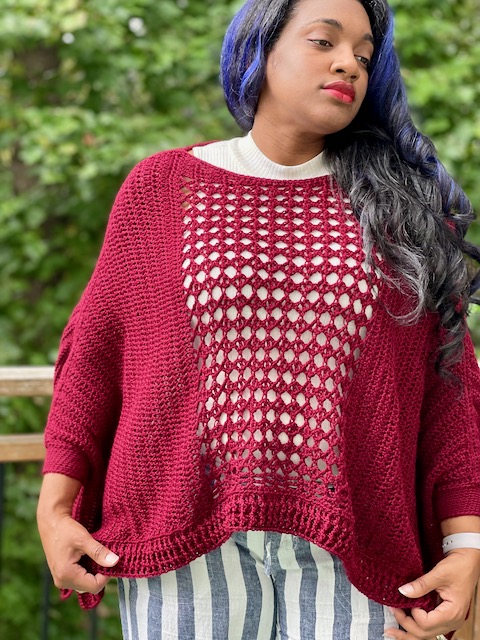
The Syrah Cowl was originally going to be attached to the Syrah Swancho, but I loved how the swancho fit and looked with the cowl. Since there was almost three skeins of yarn left, I figured that a cowl was the perfect coordinating piece.
By making the Syrah Cowl separate, it can be worn with any outfit and coat, or paired with the swancho for a complete look that is stylish and warm.
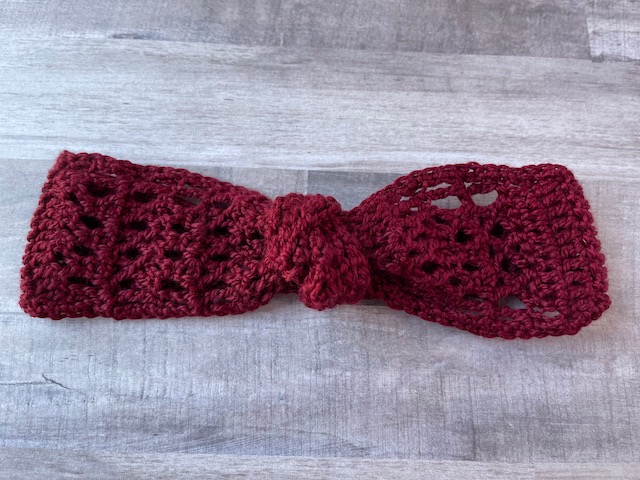
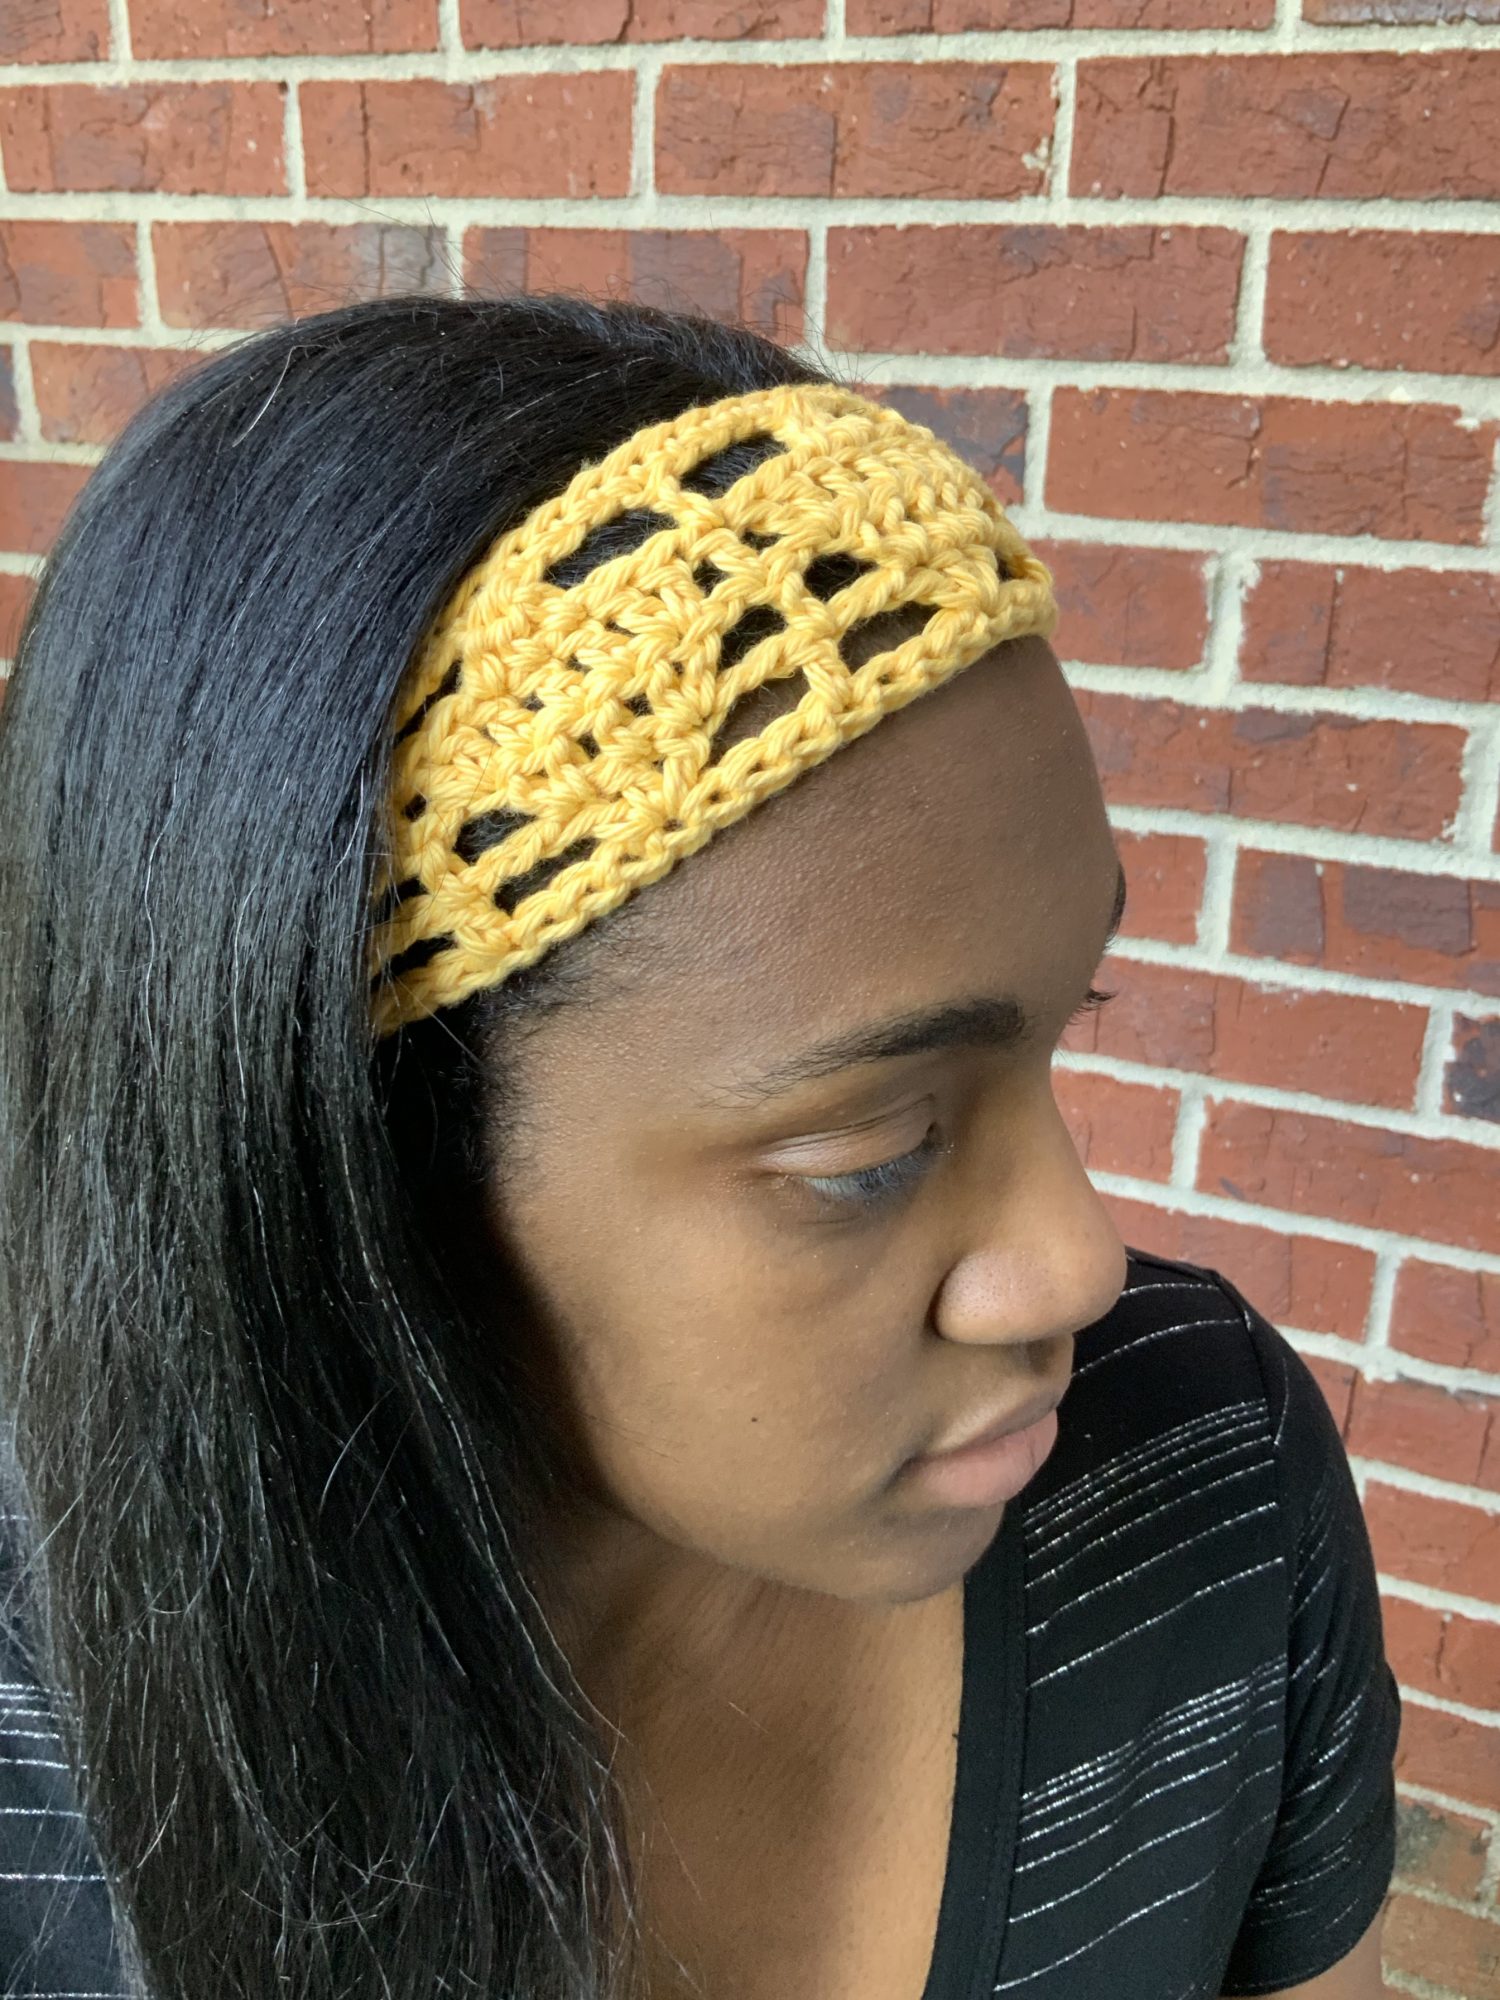
The Syrah Knotted Headband is like adding sprinkles to a cupcake! It’s a quick make that doesn’t require a lot of yarn, and can be a sassy or cute addition to any outfit.
I enjoyed making the Knotted Headband, as I’ve never made one before but have always enjoyed the look.
The Syrah Cowl and Knotted Headband use the X-stitch, but the headband uses a variation of the stitch. If you’ve been hanging with me for a while, you’ll know the X-stitch, and shouldn’t have any trouble with it. In case you need some assistance, check out this tutorial.
Keep scrolling for a clue to the next hidden treasure.
YARN
Let’s talk about a yarn that is wonderfully wonderful! For the Syrah Cowl, I used WeCrochet’s Galileo in Valentine, which was so graciously offered by WeCrochet. Galileo is a sport weight #2 yarn that is 50% merino wool and 50% viscose from bamboo.
If you’re not familiar with the difference in fibers, wool is animal-based and offers warmth and durability, whereas the bamboo is plant-based and offers a silky sheen and cooling properties. It’s the best of both worlds, in my opinion. And as a sport weight yarn, that means any crochet fabric will have amazing drape (it won’t be stiff). Also, the twist of this yarn did not get in the way of crocheting, as there was no splitting. I think it could split if using a crochet hook with pointy tip.
You’ll love the 12 different shades available in Galileo to make garments, cowls, hats, ear warmers, or shawls. Due to its softness, I would not use it for bags or anything that requires a high level of durability for high frequency use.
*Disclosure: This post may contain affiliate links to products that I use, and think you will enjoy using too. Should you decide to use any such link, I will earn a small commission at no cost to you. Thank you for supporting this small business.
Add to Ravelry Queue
MATERIALS
- WeCrochet Galileo (50% Merino wool, 50% Viscose from Bamboo, 131 yds/ 120 m; 1.76 oz/ 50 g): Valentine x 3 skeins or 345 yds / 132 g total
- US G (4.00 mm) hook or hook to meet gauge I used my Furls Crochet Odyssey hook.
- Scissors
- Yarn Needle
GAUGE
14 tr x 5.75 rows = 4” x 4” [10 cm x 10 cm]
FINISHED SIZE
- Cowl: 14” tall x 25.5” wide [22.5 cm tall x 64.5 cm]
- Headband: 24” long before knotting and seaming
PATTERN KEY
Beg-dc2tog: beginning double crochet 2 together
Ch: chain
Cnr: corner
CSDC: chainless starting double crochet
CSTR: chainless starting treble crochet
CX-st: connected x-st
Dc: double crochet
Dc2tog: double crochet 2 together
Fdc: foundation double crochet
FO: fasten off
M: stitch marker(s)
Prev: previous
Rem: remain(s)
Rep: repeat
RS: right side
Sc: single crochet
Sk: skip
Sl st: slip stitch
Sp: space(s)
St(s): stitch(es)
Tr: treble crochet
WS: wrong side
X-st
YO: yarn over
SPECIAL STITCHES & TECHNIQUES
Beg-dc2tog: pull up a loop that is row height, holding loop in place and wrap yarn around hook (YO), insert hook in first st, YO, pull up a loop, YO, pull through 2 loops, YO, insert hook in next st, YO, pull up a loop, YO, pull through 2 loops, YO, pull through all loops
CSDC: pull up a loop that is row height, holding loop in place and wrap yarn around hook (YO), insert hook in first st, YO, pull up a loop, [YO, pull through 2 loops] 2 times
CSTR: pull up a loop to height of row, holding loop in place and wrap yarn around hook 2 times (yarn over), insert hook in first st, YO, pull up a loop, [YO, pull through 2 loops] three times
First CXst in Row: YO 2 times (3 loops on hook), insert hook in next st, YO, pull up a loop (4 loops on hook), YO, pull through 2 loops (3 loops on hook), YO (4 loops on hook), sk next 2 sts, insert hook in next st, YO, pull up a loop (5 loops on hook), [YO, pull through 2 loops] four times, ch 2, YO, insert hook from right to left under two loops in center of the X (not under the legs of the X), YO, pull up a loop, YO, pull through 2 loops (2 loops remain and will be finished with next x-st)
Next CXst(s): YO 2 times (4 loops on hook), insert hook in same st as 2nd leg of previous CXst, YO, pull up a loop (5 loops on hook), YO, pull through 2 loops (4 loops on hook), YO (5 loops on hook), sk next 2 sts, insert hook in next st, YO, pull up a loop (6 loops on hook), [YO, pull through 2 loops] 3 times, YO, pull through 3 loops, ch 2, YO, insert hook from right to left under two loops in center of the X (not under the legs of the X), YO, pull up a loop, YO, pull through 2 loops (2 loops remain and will be finished with next x-st)
Last CXst in row: YO 2 times (4 loops on hook), insert hook in same st as 2nd leg of previous CXst, YO, pull up a loop (5 loops on hook), YO, pull through 2 loops (4 loops on hook), YO (5 loops on hook), sk next 2 sts, insert hook in next st, YO, pull up a loop (6 loops on hook), [YO, pull through 2 loops] 3 times, YO, pull through 3 loops, ch 2, YO, insert hook from right to left under two loops in center of the X (not under the legs of the X), YO, pull up a loop, [YO, pull through 2 loops] twice
X Stitch: YO 2 times, insert hook in next st, pull up a loop (4 loops on hook), YO, pull through 2 loops (3 loops on hook), sk 2 sts, YO, insert hook in next st, pull up a loop (5 loops on hook), [YO, pull through 2 loops] 4 times, ch 2, YO, insert hook from right to left in center of X (not under the legs of the X), pull up a loop, [YO, pull through 2 loops] 2 times
EXPERIENCE LEVEL
Intermediate

NOTES
- Pattern is written US terms.
- Read the entire pattern before beginning.
- The Syrah Cowl is made in 2 parts: Body and Edging & Seam.
- The Knotted Headband is made in 3 parts: Body, Edging, Knot and Seam.
- The Syrah Cowl uses the X-st, and the Knotted Headband uses the CX-st.
- There are pictures located at the end of the pattern for reference for knotting and seaming the headband.
Grab the ad-free PDF that includes tutorial pictures from your favorite pattern shop.


INSTRUCTIONS
Cowl Body
Row 1: 104 fdc, turn
Row 2: CSTR in first st, tr in next 33 sts, X-st 9 times, tr in rem sts, turn – 68 tr, 9 X-st
Rows 3-18: Rep Row 2
Note: the height of the cowl can be adjusted by completing more or fewer rows.
Row 19: CSDC in first st, dc in each st, turn – 104 dc
Edging and Seam
Rnd 1: Turn piece to work along the side, *ch 1, evenly sc to next cnr, ch 1, sc in each st; rep from * around
Row 2: Fold Body in half and holding the sides together, remove hook from loop, insert hook through ch-1 of both sides, pull loop through; working through both fabrics, sc in each st to next cnr, FO
Finishing
Weave in all ends.
Headband
Row 1: 6 fdc, turn
Rows 2-6: CSDC in first st, dc in each st, turn – 6 dc
Row 7: CSDC in first st, dc in same st, dc in each st until 1 rem, 2 dc in last st, turn – 8 dc
Row 8: CSDC in first st, dc in each st, turn
Rows 9-12: Rep [Rows 7-8] 2 times, turn – 12 dc
Note: refer to special stitches for the CX-st
Row 13: CSTR in first st, tr in same st, 3 CX-st, 2 tr in last st, turn – 14 sts
Row 14: CSTR in first st, tr in next st, 3 CX-st, tr in last 2 sts, turn – 14 sts
Rows 15-28: Rep Row 14, turn
Row 29: Beg-dc2tog, dc in next 10 sts, dc2tog, turn – 12 dc
Row 30: CSDC in first st, dc in each st, turn
Row 31: Beg-dc2tog, dc in next 8 sts, dc2tog, turn – 10 dc
Row 32: Rep Row 30
Row 33: Beg-dc2tog, dc in next 6 sts, dc2tog, turn – 8 dc
Row 34: Rep Row 30
Row 35: Beg-dc2tog, dc in next 4 sts, dc2tog, turn – 6 dc
Rows 36-40: Rep Row 30
Edging
Rnd 1: Ch 1, evenly sc along side to cnr, *ch 1, turn cnr, sc in each st*, ch 1, evenly sc along side to cnr; rep from * to *; sl st to join. Remove hook, place M in loop.
Knot
- Lay Headband flat.
- Overlap the ends.
- Pull the end on top underneath the other end.
- Pull gently to tighten.
Seam
Remove M, fold Headband in half with the top of the knot inside, pull loop through ch-1 sp
Row 1: Ch 1, working through both pieces, sc in each st, sl st in ch-1 sp, FO
Finishing
Flip Headband to RS, weave in end.
Pin it for later
Winter Wonders Blog Hop + Bundle
Thank you to everyone that has been following the Winter Wonders Blog Hop! This has been one of the largest and most fabulous blog hops that I’ve been honor to participate in, as it’s 42 days total of wonderful crochet patterns from accessories, home decor and garments. There is something for everyone!
In addition to a new crochet pattern each day, there is an amazing giveaway with gifts by WeCrochet that include the Winder Station Tool Kit, and the Winter Wonder’s Pattern Bundle. To make it even better, a second prize is four winners of the pattern bundle!
The Syrah Cowl + Headband pattern is no longer available as a free download, but you can get this pattern for 41 new crochet patterns in the Winter Wonders Pattern Bundle for under $20! This is such an amazing deal for all of these brand new crochet patterns that were designed with WeCrochet yarns.

Enjoyed this pattern? Check out these patterns.
Click one these images below to find the next hidden treasure.
If we’re not hanging out on social media yet, come check me out on Facebook, Instagram and Pinterest.
Want to talk about yarn goodness, crochet tips, and exclusive weekly deals? Join my Facebook Group, Creations By Courtney Community.
Join my newsletter for sneak peeks, crochet tips, and more. HERE
Please use #CreationsByCourtney on social media when sharing your projects.
This pattern is not to be duplicated or resold, and not to be reproduced commercially. You may sell finished products on Etsy, at farmers markets, and craft fairs, but please credit Creations By Courtney as the pattern’s author.
5 Responses
Love your designs!
Thank you, Carolyn! It’s exciting to share my ideas with you and the fiber community!
Happy Birthday Courtney! A stunning set that will enhance any outfit!
I found I have this in my Ravelry library but have never made it up, Time to pull some thing out of my stash and have a go before winter arrives. Looks Ike it would be a quick and cute make.