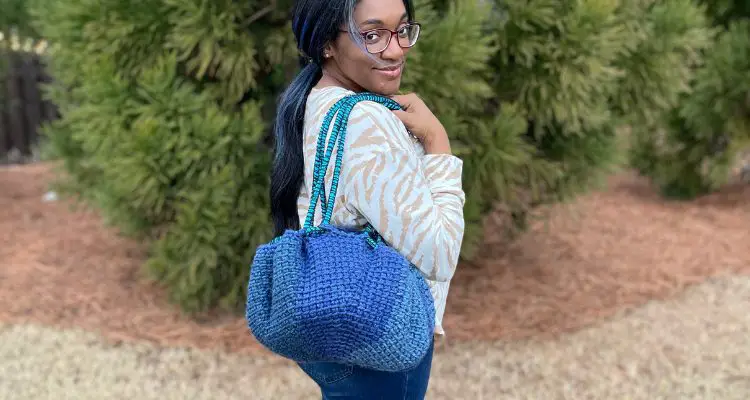
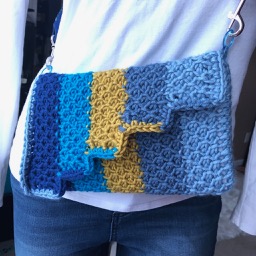
Picture a bag that blends timeless craft with a sleek, urban style—a modern crochet bag that stands out with rich texture and lasting charm. The Nassau Tunisian Knit bag does just that, using Tunisian crochet to create a fabric that’s dense yet flexible, perfect for carrying essentials while adding a touch of handmade elegance to your look. If you’re a crocheter ready to try something new, this project offers a satisfying challenge and a stylish outcome you’ll love.
Also this fun crochet bag is part of the 7th Annual Christmas in July Make Along with Underground Crafter. More deets below.
Finding Inspiration in “the wild”
I had the good fortune of cruising this past spring with my fiber besties in place of the usual fiber retreat. It was a wonderful weekend cruise to Nassau, Bahamas and Coco Cay, a private island for the cruise line.
It was amazing to see the newly renovated post in Nassau, which was filled with brightly colored buildings, straw bags, shell wind chimes, conch fritters, and frozen drinks in pineapples with tiny umbrellas.
As you walk out of the port into Nassau, you encounter the renowned Straw Market filled corner to corner with vendors selling hats, bags, hand carved wooden figures and more. The best part of walking through the market is seeing makers actively embroidering flowers and more onto a straw bag, weaving bags, and whittling at a piece of wood.
As a true crafter, I love bags that will fit at least one project plus the essentials. With so many options, I couldn’t choose one in the few hours we had in port, as I was searching for something with my favorite colors.
Since returning home, I couldn’t stop thinking about those bags, and it didn’t help to wander through Marshalls to see designer “crochet” and straw bags…
It would have been easy to buy one from the store, but I prefer supporting handmade artisans, so until I can return to the Bahamas, the Nassau Tunisian Knit Bag was “born.”
Choosing the Right Yarn and Tools for a Modern Crochet Bag
Choosing the right yarn and tools is key to bringing this modern crochet bag to life. Since the bag needs structure and durability, look for yarns that balance softness with strength. The right crochet hooks make stitching smooth and stress-free, too.
Yarn
For a bag that will last for years like a quality leather, you want to choose strong fibers that do not stretch too much such as cotton, jute, hemp, or acrylic. These yarns provide enough heft to shape the bag without making it heavy. Cotton and cotton blends work particularly well, giving your bag sturdiness and a pleasant matte finish that suits both casual and polished styles. Acrylic yarns offer color variety and easy care. Many assume that it’s best to use worsted or bulky weight yarns for structure, which is a great option for structuring the bag with less need of reinforcement, but you can you can use any weight yarn.
Specifically for this tunisian knit bag, I choose Bernat Maker, which is a bulky weight tubular yarn made from cotton and nylon. It’s soft, slightly stretchy, and strong. Each large skein is 250 grams / 8.8 ounces with a put-up of 290 meters / 317 yards, and available in 17 colors.
Consider color thoughtfully. Neutral tones like cream, tan, or gray create a versatile accessory, while jewel tones add a pop of personality. Texture makes a difference too—smooth yarn highlights the stitch pattern, while a slightly tweedy or heathered yarn adds depth and complexity.
Tools and Accessories
This bag calls for a tunisian crochet hook, typically longer than regular hooks to accommodate multiple loops. It’s important to remember that when making a tunisian crochet project, you want to increase the hook size, as the fabric created is dense from the forward and return pass of each row.
Bernat Maker recommends a size 8mm, so you’re going to use a size 10 mm hook to avoid creating tight stitches that can strain your hands. You can use a straight tunisian hook, which is usually called afghan hook, but I recommend using a tunisian hook with a cable. The cable will hold the extra loops and the weight of the fabric to not strain your wrist, whereas a straight hook hold everything and can feel heavy after a while.
You’ll also need a 6.5 mm crochet hook for the final rounds of edging along the top of the bag.
Besides the usual tools, a tape measure, scissors, yarn needle and stitch markers, it will help to track rows with a row counter, app or notebook, you’ll need purse handles and wire. Although we’re using bulky weight yarn, which can be stiff, Bernat Maker is soft and not as stiff compared to using a bulky weight cotton yarn, so adding wire at the top will maintain the structure that you find in straw bags. For the purse handles, I chose half circle wood handles, but you can choose whatever shape and material fits your preference, or what is within your stash.
When it comes to adding the wire, you’ll hold it along the top of the previously made round and crochet over it, like carrying a second strand of yarn.
For a closure, you can add a button like seen in this post. If you prefer a way to close your crochet bag, you can use a zipper, or premade purse zipper, such as the ones found on Etsy.
Seamless Crochet Bag Construction
If you’re new to Creations by Courtney crochet patterns, many include lesser known techniques to reduce seaming. The Nassau Tunisian Knit Bag is the latest pattern in a collection of seamless bags. In fact, the yarn needle is only needed to weave in the ends and attach the handles.
Rather than creating five pieces to be sewn together, this crochet purse is made in one pice. You’ll start with the main side to decrease every few rows until the base is reached. This creates a trapezoid. You’ll continue for several rows with no decreases or increases to create the base, and then continue on making increases every few rows to create the second side. You’ll be making an inverted trapezoid for the second side.
The fun continues on to starting the first side that will connect the edges of the trapezoid, and slip stitches are worked to “seam.” You’ll move on to crocheting along the top of the bag to the other edge of the trapezoids, where you’ll make the narrow side in the same manner. The last steps will be to slip stitch everything together and finish working along the top to add the wire and purse handles.
After making this crochet purse, you may never want to seam again for other bag designs. *wink wink*
Creating the Nassau Tunisian Knit Stitch Pattern
The Nassau stitch is a textured Tunisian pattern that feels almost woven. You’ll work a series of forward and return passes to build the stitch rows. The key is to keep your loops even and hands relaxed to avoid tight stitches. If you’re new to Tunisian crochet, this tutorial on Tunisian Crochet Fun Techniques offers clear, hands-on guidance for two popular tunisian stitches.
Tracking your finished rows is going to be important to ensure that you decrease and increase evenly to create the trapezoid shape. If you forget to track a few rows, you can always count along the first or last stitch of each row, which creates a V like the top of standard crochet stitches.
Adding Finishing Touches
Bag charms have been around for a while, but are having a moment in the fashion world lately. Don’t forget to show your personality with the button you choose for closure, or add tassels. Maybe you have charms from attending a fiber event that you can add to the handle, or even use handmade stitch markers to decorate.
Styling Your Modern Crochet Bag
Your Nassau Tunisian Knit bag fits seamlessly into both relaxed and refined outfits. Here are a few ideas for styling your bag.
- This crochet bag’s modern shape and classic look from the tunisian knit stitch makes it a timeless piece when paired with a spring dress, simple dangling earrings, a chain bracelet and strappy sandals.
- Heading to an outdoor festival? Wear a tank or loose t-shirt tucked in the front of your shorts with sneakers and throw your essentials in your Nassau Tunisian Knit Bag.
- Make this your go to purse when heading to dinner or a social gathering. This pairs so well with a blouse tucked into wide leg trousers, platform shoes, and a jean jacket with rolled cuffs. Don’t forget a statement necklace and large stud earrings to complete the look.
- For everyday looks, grab jeans, ankle boots and a comfortable top. Drop your favorite sunglasses in your bag with your wallet, keys, lipstick and phone to head out the door.
Care Tips
- After spending hours hand making your modern crochet bag, consider storing it in a pillowcase to prevent dust buildup.
- Keep it away from sharp objects to avoid snags and preserve the intricate stitches.
- Spot clean if there are any stains. Although you’ll be using a washable fiber, depending on the handles you attach, you won’t be able to submerge the handles in water in order to wash your bag.
7th Annual Christmas in July Make Along

Come join me and 26 bloggers that have teamed up to bring a month full of free patterns to kick start the handmade holiday season — including crochet, knitting and sewing projects. There’s something new to make every day in July. Each week will have a theme,
- Week 1 (July 1-7): Babies, Kids, and Teens
- Week 2 (July 8-14): Women
- Week 3 (July 15-21): Gifts for Anyone
- Week 4 (July 22-28): Home
- Week 5 (July 29-31): Pets
We’ve also partnered with some of our favorite companies – GlassEyesOnline, KennyClayCo, KnitPal, MBT Creates, Search Press North America, Storey, and Unicorn – to get 8 fabulous prizes for the make along giveaway! Find out more information about participating designers, the schedule, and enter to win a prize on Underground Crafter. The deadline for entering the giveaway is Monday, August 4, 2025 at 11:59 pm Eastern.
How To Join the 7th Annual Christmas in July Make Along
- Sign up for the Christmas in July Make Along updates and Underground Crafter’s newsletter to get regular emails, including a daily email in July as each make along post goes live.
- You can join in by crocheting, knitting, or sewing the projects as you have time.
- Share your progress and post pictures of your finished projects. Tag your projects and posts #CIJMakeAlong2025 on all social media.
- If you’d like to chat with other crafters, join the Underground Crafters Facebook group or the Underground Crafter Ravelry group.
- By the end of the Make Along, you’ll have up to 31 awesome projects. Get ready for the handmade holiday season while having fun with us!
*Disclosure: This post may contain affiliate links to products that I use, and think you will enjoy using too. Should you decide to use any such link, I will earn a small commission at no cost to you. Thank you for supporting this small business.
ADD TO RAVELRY FAVORITES
MATERIALS
- Yarnspirations Bernat Maker, #5 bulky weight yarn (72% cotton, 28% nylon; 317 yds/ 290 m; 8.8 oz/ 250 g): Jam
- Alternative Yarn:
- US 10 mm tunisian crochet hook with cable or size to meet gauge
- US 6.5 mm) crochet hook I used a Furls Metal Streamline.
- Half circle wood handles, 8.5” [21.5 cm]
- 20lb wire, 74” [188 cm] in length
- 1.5″ [38 mm] button
- Scissors
- Yarn Needle
- Measure Tape
GAUGE
12 tks x 14 rows = 4” x 4” [10 cm x 10 cm]
FINISHED SIZE
Excluding handles: 15” W x 10.5” w x 8” h [38 cm W x 26.5 cm w x 20 cm h]
PATTERN KEY
BO: bind off
Btw: between
Ch: chain
Dc: double crochet
FwdP: forward pass
FO: fasten off
Inc: increase
M: stitch marker
PM : place stitch marker
Rem: remain(s)
Rep: repeat
RetP: return pass
Sl st: slip stitch
Sc: single crochet
Sk: skip
Sl st: slip stitch
St(s): stitch(es)
Tks2tog: tunisian knit 2 together
Tks: tunisian knit stitch
Tss: tunisian simple stitch
SPECIAL STITCHES & TECHNIQUES
End St: insert hook under both loops of last vertical bar, YO and pull up a loop
Inc: insert hook in top loop of ch between 2 vertical bars, YO and pull up a loop
K2tog: insert hook under first vertical bar as if for tss and then insert hook front to back btw the next vertical bar
RetP: Ch 1, *YO and pull through 2 loops, rep from * to end
Tks: insert hook front to back btw the legs of the indicated vertical bar
Tss: insert hook in next vertical bar, YO and pull up a loop
EXPERIENCE LEVEL
Intermediate
NOTES
- Pattern is written in US terms.
- Read entire pattern before beginning.
- Most of this purse is made in one piece for the Main Side 1 and 2, and Side 1. Side 2 is attached seamlessly as it is made. The handles are added last.
- A schematic with arrows that indicates the direction in which the bag is made and seamed is included in the ad-free PDF.
Purchase the ad-free PDF from your favorite pattern shop


Don’t forget to join Confidently Crochet with Creations By Courtney for CALs, crochet tips, and yarnie fun.
INSTRUCTIONS
Main Side 1
Ch 45
Foundation Row: Starting in 2nd ch from hook, *insert hook in next ch, YO and pull up a loop, rep from * across. RetP. 45 tss
Rows 2-3: Tks in each st across, end st. RetP. 45 tks
Row 4: K2tog, tks in each st until 3 sts rem, k2tog, end st. RetP. 43 tks
Rows 5-7: Tks in each st across, end st. RetP. 43 tks
Rows 8-10: Rep Row 4, then [Row 5] 2 times. 41 tks
Rows 11-14: Rep Row 4, then [Row 5] 3 times. 39 tks
Rows 15-17: Rep Row 4, then [Row 5] 2 times. 37 tks
Rows 18-21: Rep Row 4, then [Row 5] 3 times. 35 tks
Rows 22-24: Rep Row 4, then [Row 5] 2 times. 33 tks
Rows 25-28: Rep Row 4, then [Row 5] 3 times. 31 tks
Base
Row 1: Tks in each st across, end st, PM in first and last st. RetP. 31 tks
Rows 2-7: Tks in each st across, end st. PM in first and last st. RetP.
Main Side 2
Rows 1-4: Tks in each st. RetP. 31 tks
Row 5: Tks, inc, tks in each st until 2 sts rem, inc, tks, end st. RetP. 33 tks
Rows 6-7: Tks in each st across, end st. RetP. 33 tks
Rows 8-11: Rep Row 5, then [Row 6] 3 times. 35 tks
Rows 12-14: Rep Row 5, then [Row 6] 2 times. 37 tks
Rows 15-18: Rep Row 5, then [Row 6] 3 times. 39 tks
Rows 19-21: Rep Row 5, then [Row 6] 2 times. 41 tks
Rows 22-25: Rep Row 5, then [Row 6] 3 times. 43 tks
Rows 26-28: Rep Row 5, then [Row 6] 2 times. 45 tks
BO: Ch 1, sl st as tks in each st, do not FO
Side 1
Ch 7
Row 1 FwdP: Tss in back bump of each ch.
Row 1 RetP: Insert hook in back loop of End st of corresponding row of Main Side 2, YO and pull through (counts as ch 1), *YO and pull through 2 loops, rep from * across
Rows 2-28: Tks in each st across. RetP as completed in Row 1
BO: Ch 1, sl st as tks in each st, do not FO
Attach Side 1
Using the 6.5mm hook, hold the RS of each piece together, sl st btw the 2 M using the FL of the Side 1 and BL of the Base, remove M, continue to sl st in the end of each row up the side. 35 sl st
Edging
Start of Rnd 1: Pull active loop through sts at corner of Sides, sc in each st along Row 1 of Main Side 1. 45 sc

Side 2
Using Tunisian hook
Row 1: 6 fsc (this is part of the Edging)
Row 2 FwdP: Tss in each sc.
Row 2 RetP: Insert hook in back loop of End st of corresponding row of Main Side 1, YO and pull through (counts as ch 1), *YO and pull through 2 loops, rep from * across
Row 3-29: Tks in each st across. RetP as completed in Row 2
BO: Ch 1, sl st as tks in each st, do not FO
Attach Side 2
Complete the same as Attach Side 1
Continued Edging
Finishing Rnd 1: Using 6.5 mm, pull active loop through sts at corner of Sides, sc in each st along Row 28 of Main Side 2 and Side 1. 52 sc
Cut wire 74” [188 cm]; fold wire into a rectangle, 15” x 2.25” [38 cm x 5.7 cm], two times, and overlap and twist the ends to secure.
Rnd 2: Hold the wire as this row is created; ch 1, *sc in each st around, sl st to join.
Rnd 3: Ch 1, sc in next 10 sts, sl st in next 5 sts, sc in next 8 sts, ch 16, sc in next 8 sts, sl st in next 5 sts, sc in next 26 sts, sl st in next 5 sts, sc in next 15 sts, sl st in next 5 sts, sc in rem 16 sts, sl st to join, FO.
Finishing
Attach handles on each side where the sl st were made.
Weave in all ends.
You may enjoy these patterns too
- The Tunisian Cinch Bag is a fun project that will introduce you to creating short rows in tunisian crochet in order to create a circle. Lay it flat to load up, and cinch to close and create carrying straps.
- The Tunisian Honeycomb Purse features one of the most satisfying stitch patterns out there — and it’s easier than it looks. You’ll learn the honeycomb stitch, play with color and an intriguing shape.
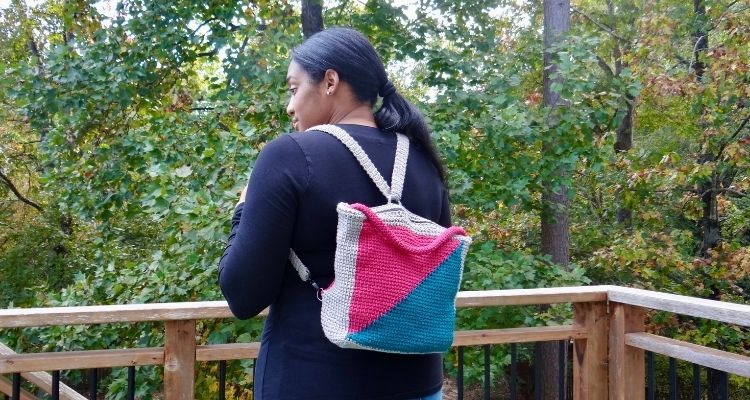
- The Tunisian Color Block Back Pack combines style and utility in one handmade masterpiece. With bold color blocking, you’ll learn a simple color change while making this seamlessly.
Pin it for Later

Making the Nassau Tunisian Knit modern crochet bag gives you a unique accessory that showcases your skill and taste. The process is rewarding, and the result is a bag that’s stylish, practical, and handmade with care. Ready to take your Tunisian crochet further? Check out more inspiring patterns and tutorials like the Tunisian Box Crochet Cowl Design to keep your crochet journey exciting. Happy stitching!
Want to talk about yarn goodness, crochet tips, and exclusive weekly deals? Join my Facebook Group, Confidently Crochet with Creations By Courtney.
If we’re not hanging out on social media yet, come check me out on Facebook, Instagram and Pinterest.
Join my newsletter for sneak peeks, crochet tips, and more.
Use #CreationsByCourtney on social media when sharing your projects.
This pattern is not to be duplicated or resold, and not to be reproduced commercially. You may sell finished products on Etsy, at farmers markets, and craft fairs, but please credit Creations By Courtney as the pattern’s author.