In the world of crochet, nothing can be more frustrating than spending hours on a project, only to find that it doesn’t turn out as expected. One of the key factors in achieving the desired outcome is checking crochet gauge. In this blog post, we will explore the importance of checking crochet gauge and how it can help you perfect your projects. From understanding what gauge is, to tips and tricks for measuring it accurately, this comprehensive guide will equip you with the knowledge you need to create stunning and well-fitting crochet items.
Do you skip making a crochet gauge swatch?
Are you a crocheter that finds gauge to be a dirty word?? If so, you’re not alone in detesting making crochet gauge swatches. From what I’ve been told, some crocheters live on the edge and never make a crochet gauge swatch, even when making a garment *insert 1950s movie scream*. LOL Fewer crocheters will say that they always make a gauge swatch.
Did you know that you should block your crochet gauge swatch?? I’ll save that for a different conversation.
Some crocheters are so excited to get started in the project that they start with the first line of instructions after looking at what yarn and hook to use. The gauge information is usually listed pretty close to the materials, and tells one how many stitches and rows are in a 4″ x 4″ square, and the number of stitches and rows should match throughout the project.
Gauge
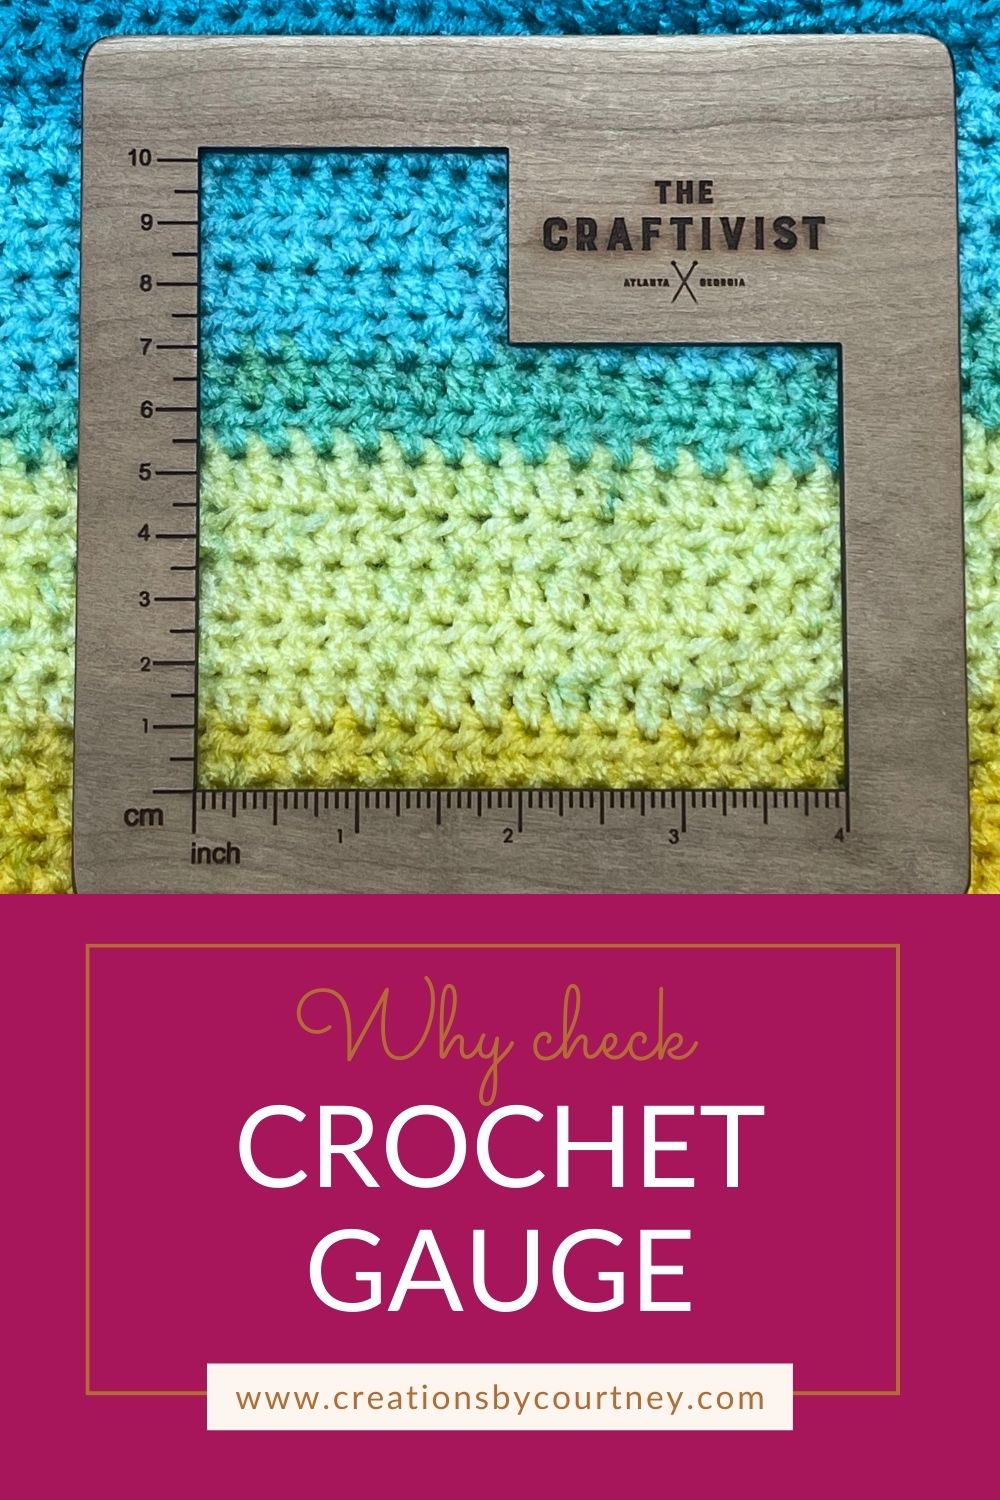
Gauge refers to the measurement of a specific number of stitches or stitch pattern in a row and the specific number of rows in a specific area. Typically recorded as a 4″ square, as it easily converts to 10 centimeter square, but any measurement can be listed. Personally, I like to calculate crochet gauge per inch, as it’s a smaller unit to use if modifications are needed. Crochet gauge can be listed in other sizes such as per inch, 5 inches or whatever the designer chooses.
Crochet gauge is impacted by the stitches, yarn and hook.
Why does it matter that the crochet gauge matches throughout a project?
As a person that experiences a range of feelings, your body tension can change which translates to your crochet stitches. Tighter stitches means a smaller fabric will be created, whereas loose stitches means a larger fabric created. Where and how we sit can impact the tension of our hands, arms and back which translate to the stitches being made. Always aim to be comfortable when crocheting and minimizing strain to your hands, arms, back and neck.
When one’s crochet gauge is smaller than listed in the patten, it means that there are more stitches per inch, which will impact the overall size of the finished crochet project. When one’s crochet gauge is larger, meaning that there are fewer stitches per inch, the finished size will be larger than listed in the crochet pattern.
When making a crochet garment, the difference in gauge will impact overall fit of the finished piece. For example, if a crocheter’s gauge is too small with 5 stitches and 4 rows per inch instead of 4 stitches and 3 rows per inch (pattern gauge of 16 stitches x 12 rows = 4″ x 4″), a piece for a garment that needs to be 16 inches wide by 20 inches in length will come out to be approximately 13 inches wide by 15 inches in length. That’s quite a difference in size and hours wasted! This is also a reason to check your gauge periodically while crocheting to ensure that it hasn’t changed.
You will save time and possible frustration by making a crochet gauge swatch in the beginning to ensure that your efforts will result in a finished piece that fits well.
Also, a difference in crochet gauge will impact the drape of the finished fabric. Tighter stitches create a stiffer fabric that will not drape as well, whereas loose stitches improve drape, but more drape may impact the structure and fit of a crochet garment that needs little drape.
How to measure crochet gauge
Besides measuring how many stitches and rows in a given area, there are a few rules to ensure your measurements are accurate.
- Always measure in the middle of the swatch. The gauge tends to vary the most along the first and last row and the edge stitches.
- Include the space between the stitches.
- If a pattern lists crochet gauge after blocking, measure your gauge after blocking per the instructions in the pattern.
- If crochet gauge is listed a 4″ x 4″, make a swatch that is is at least 6″ x 6″
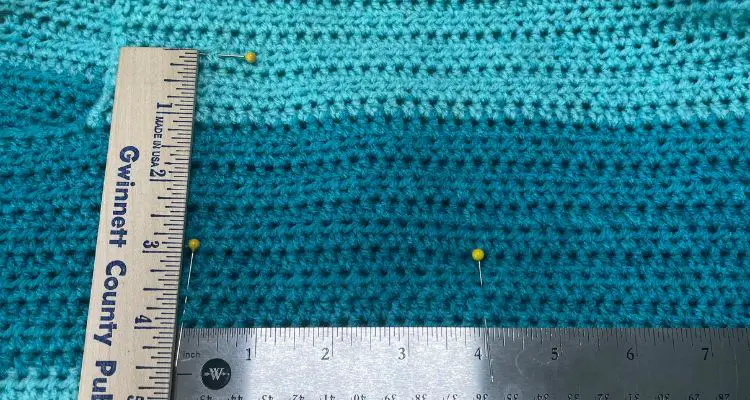
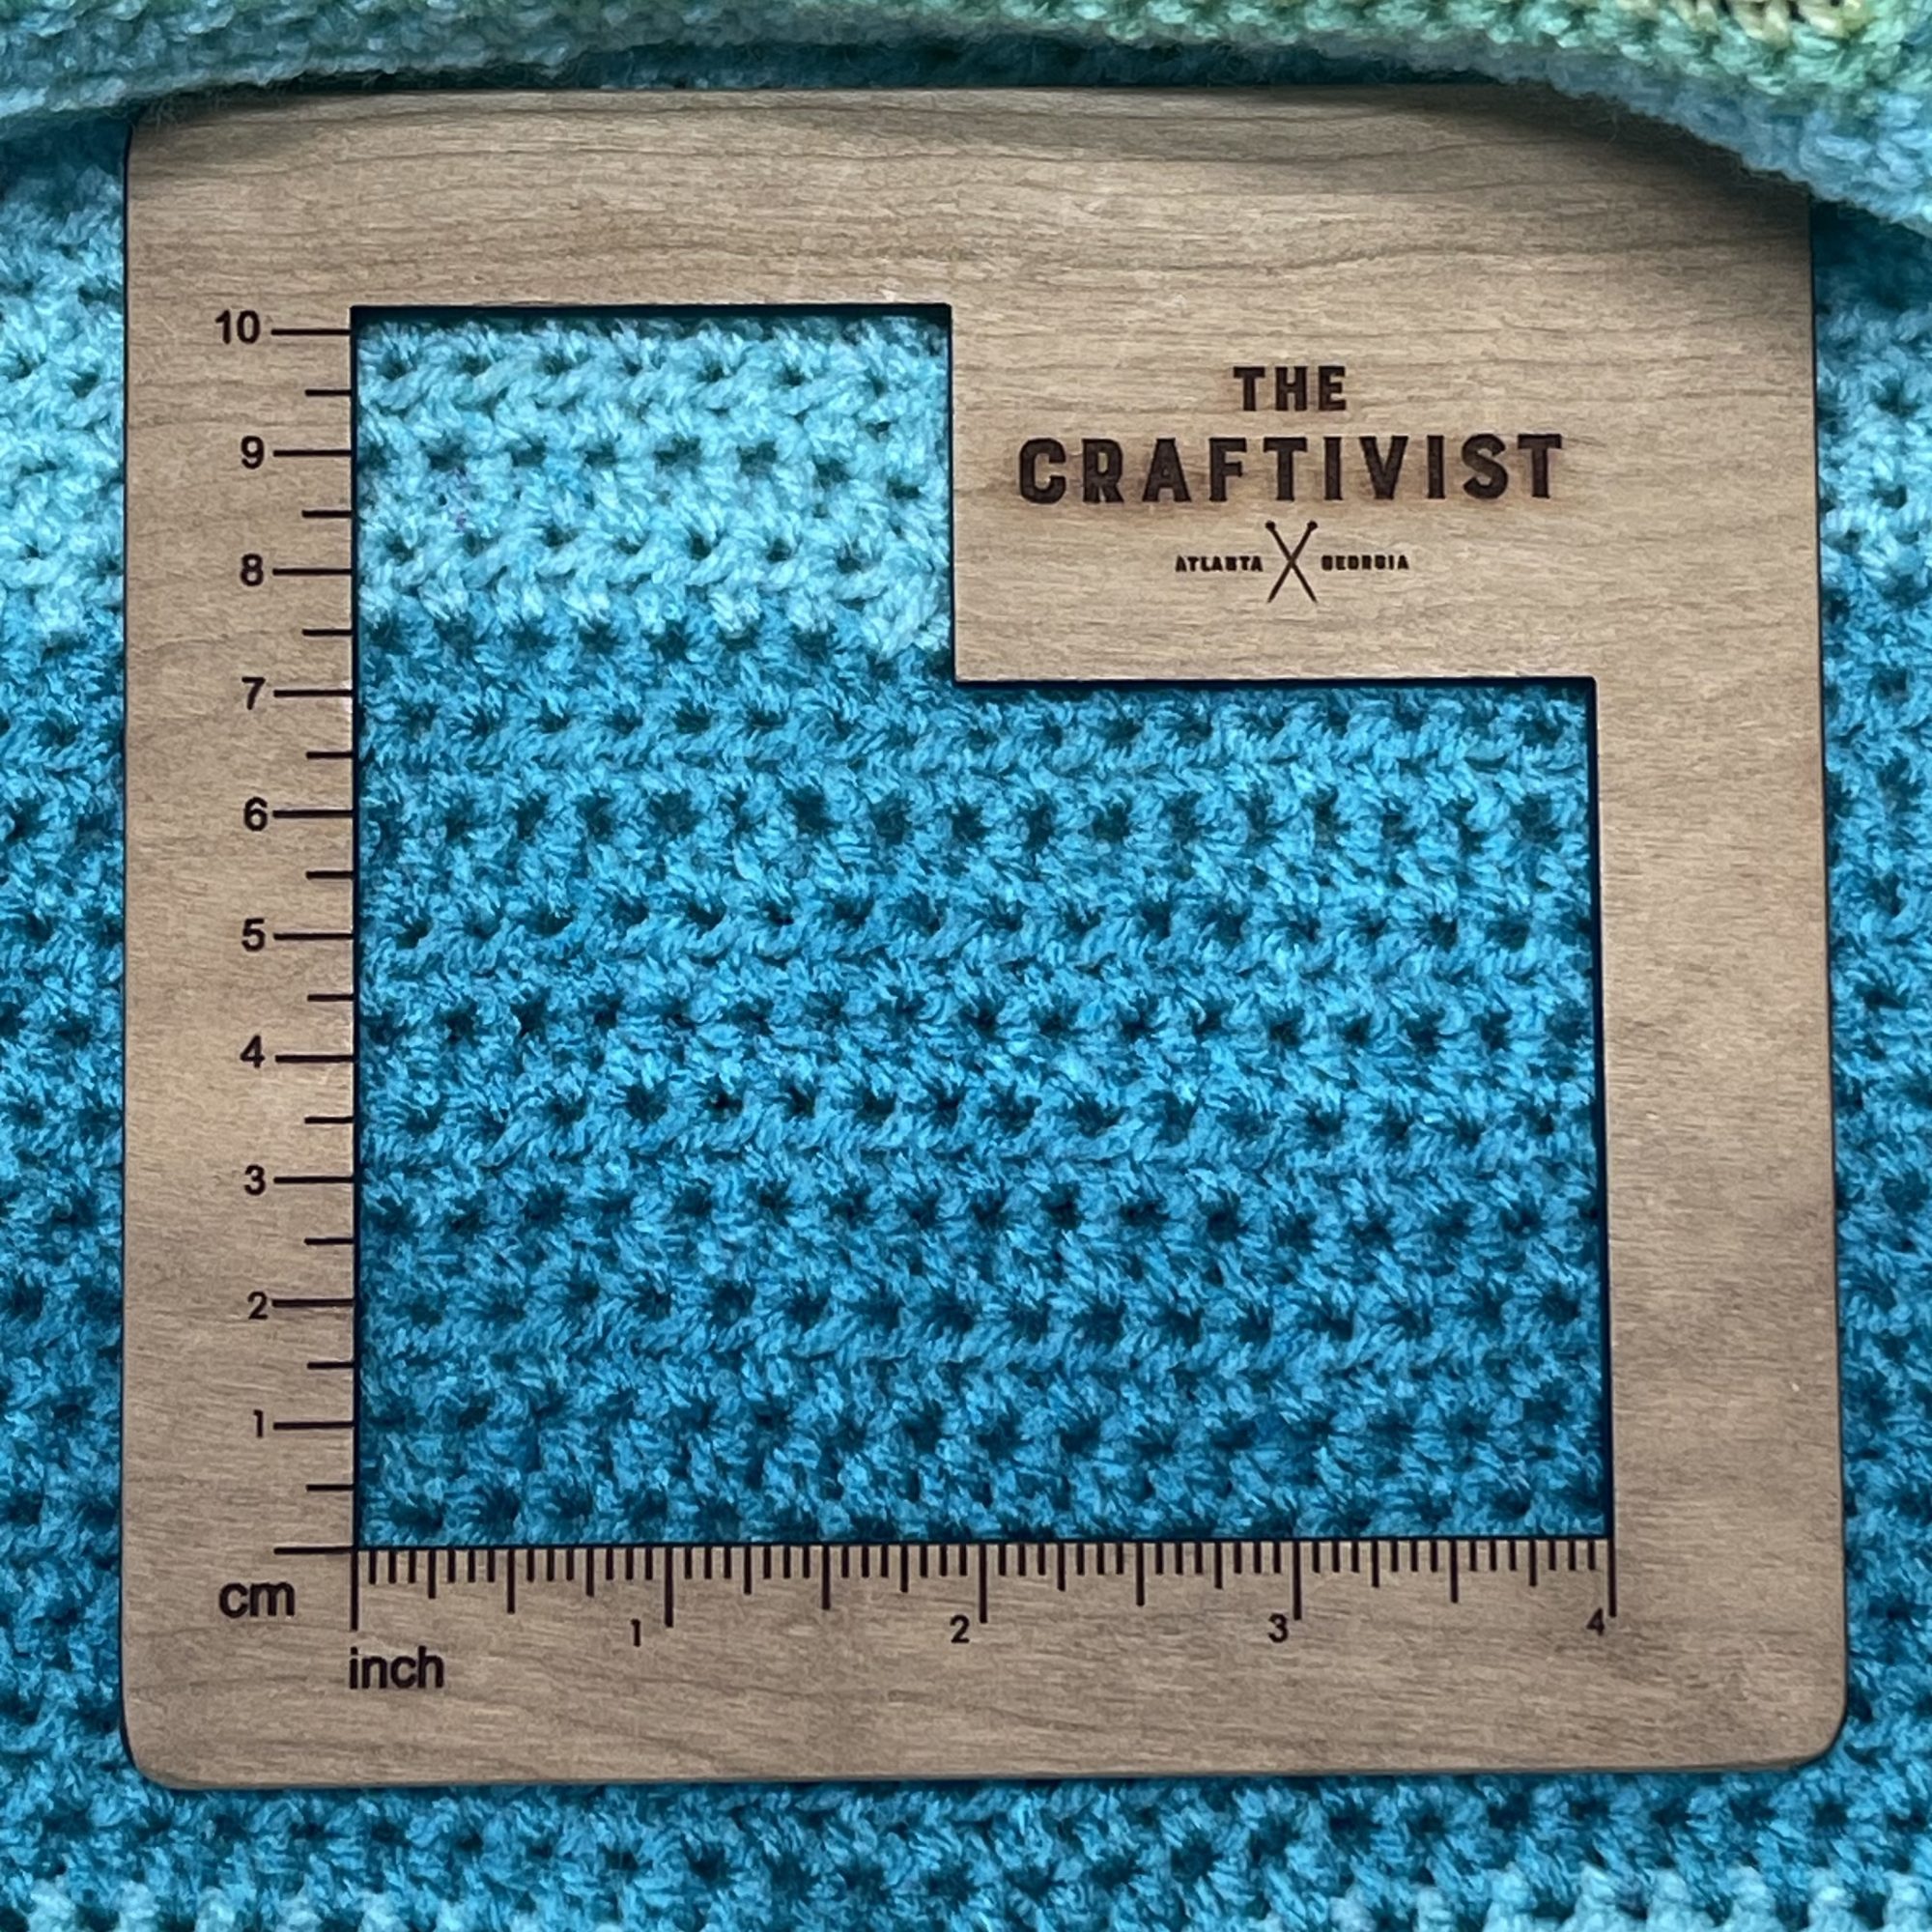
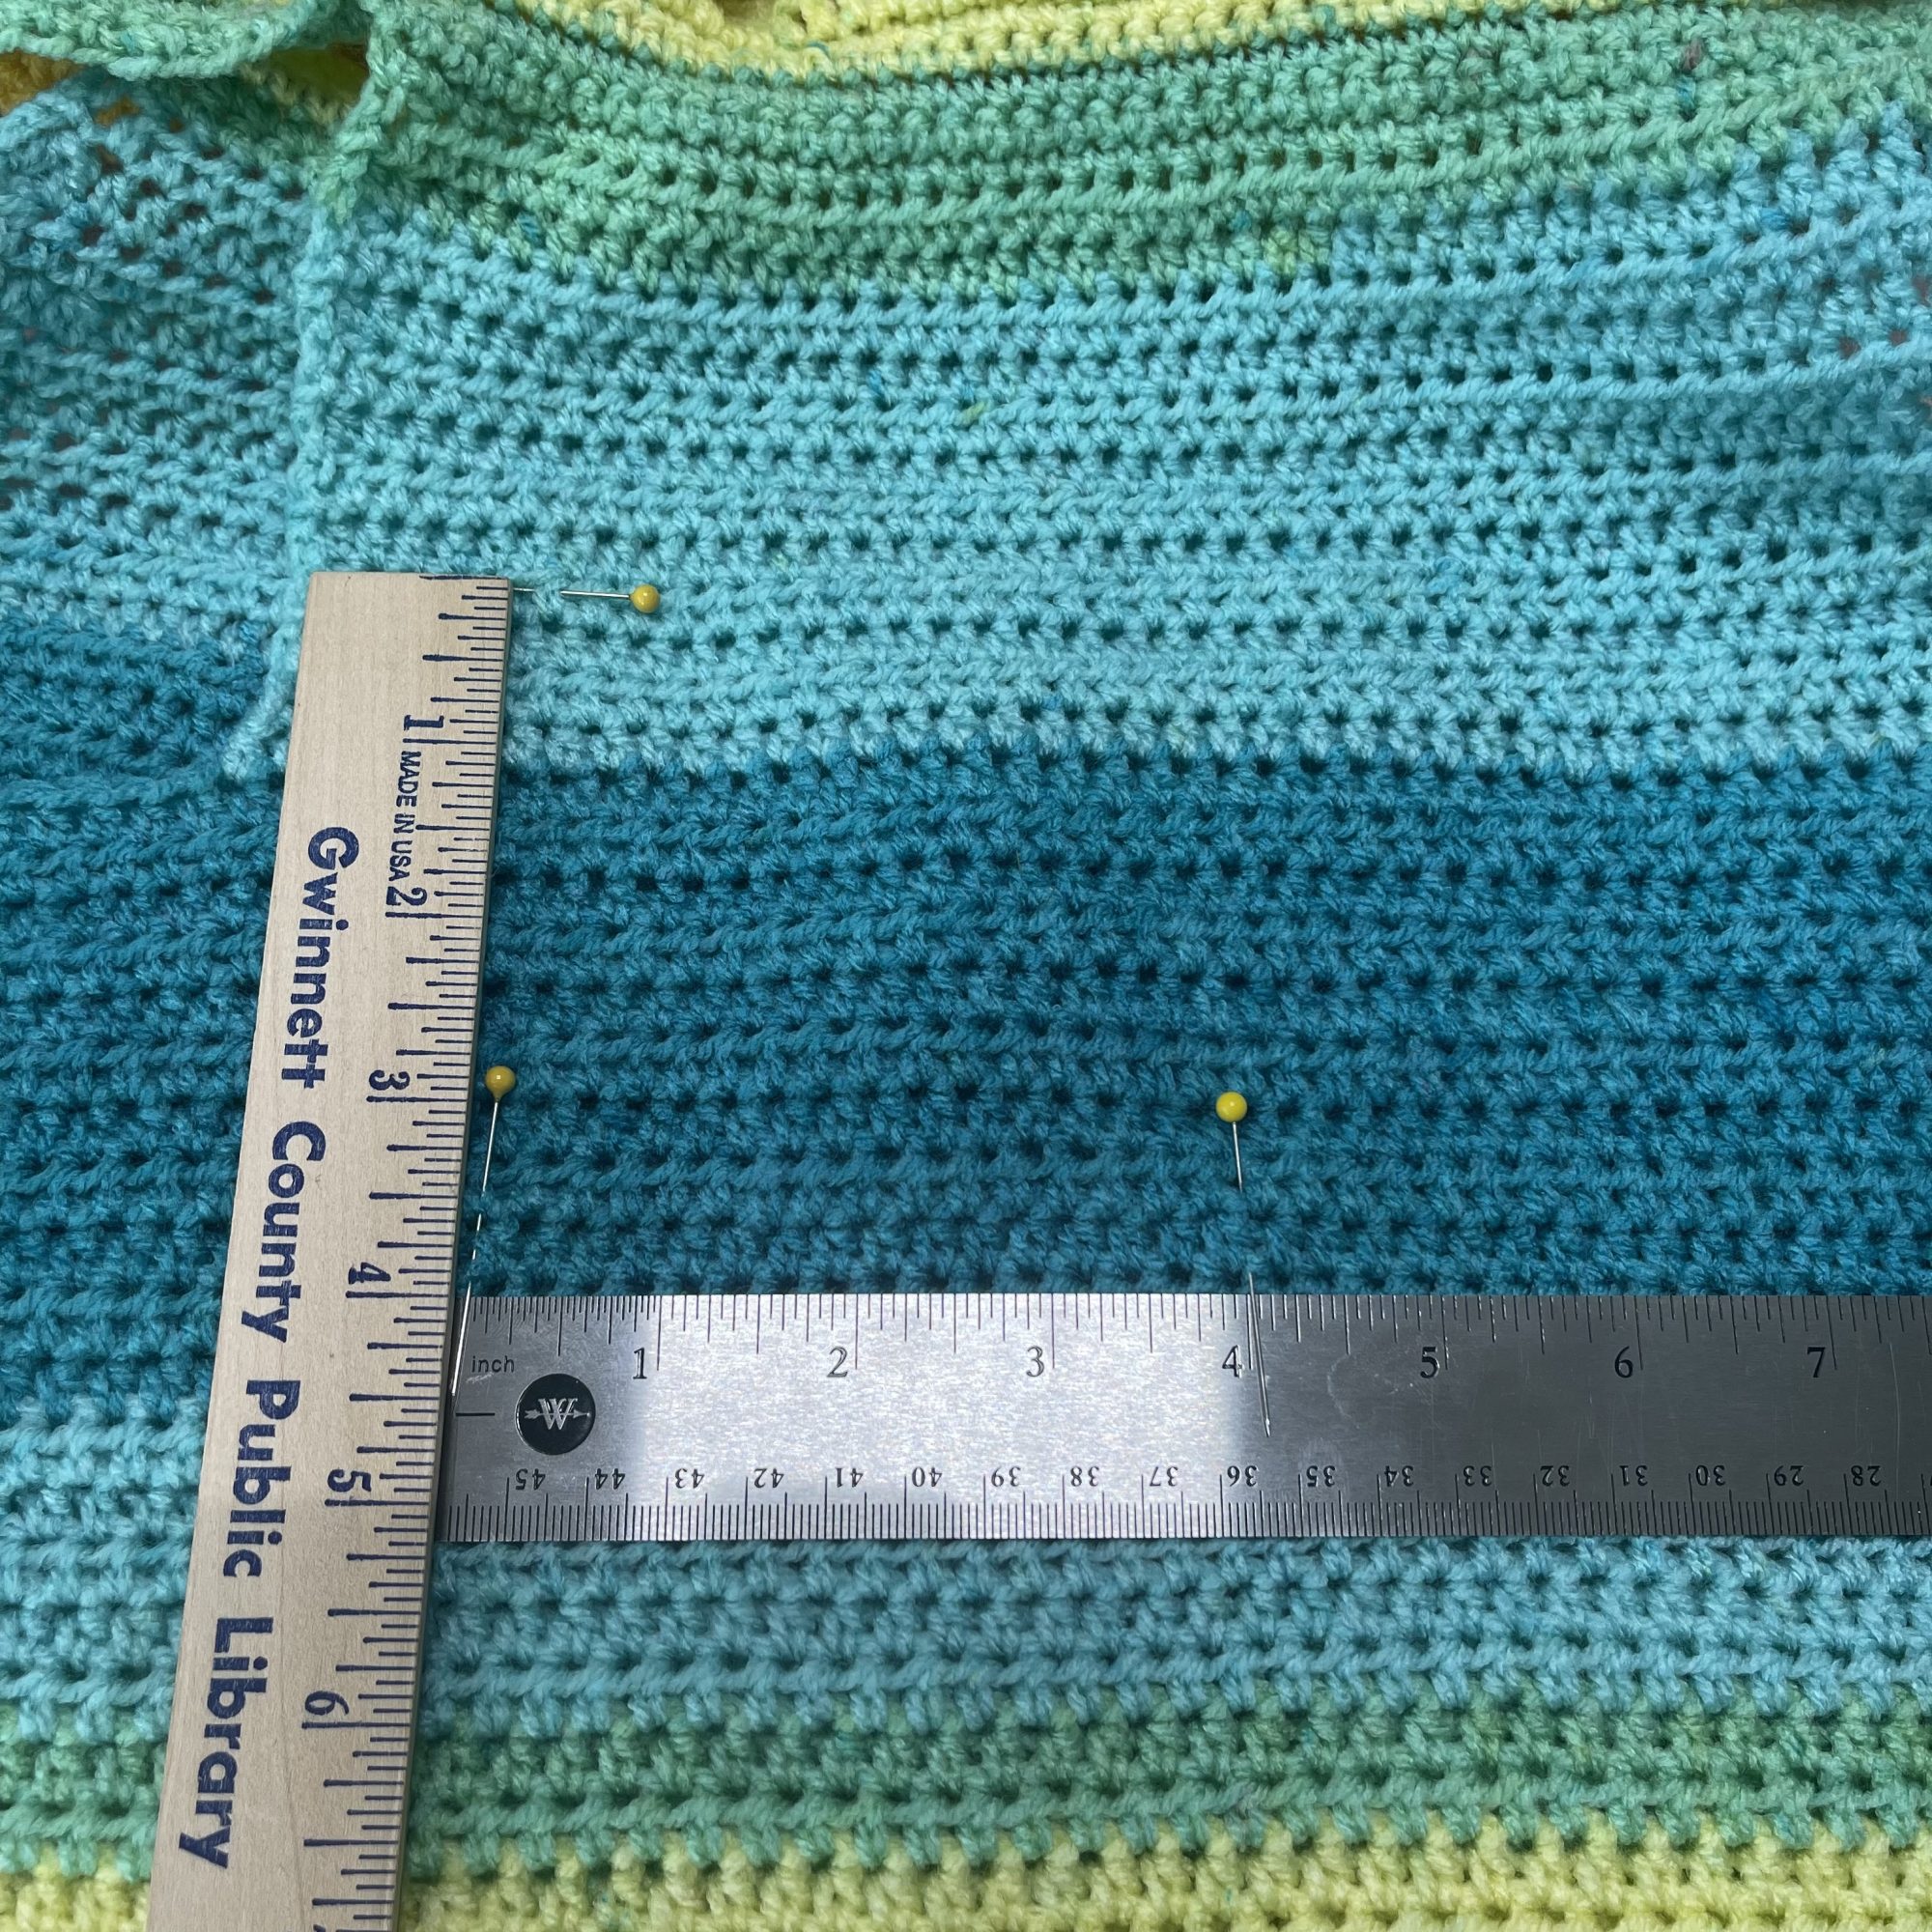
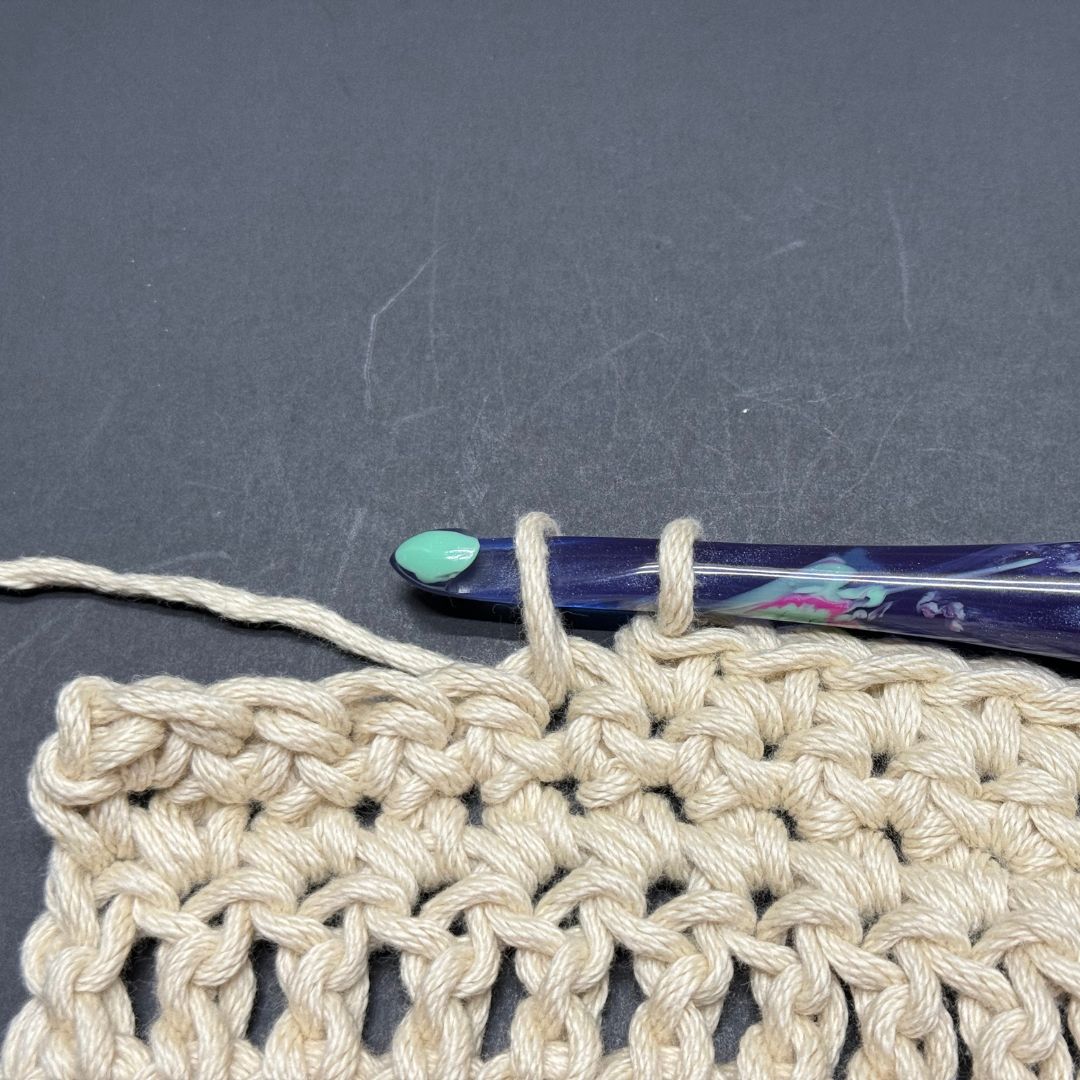
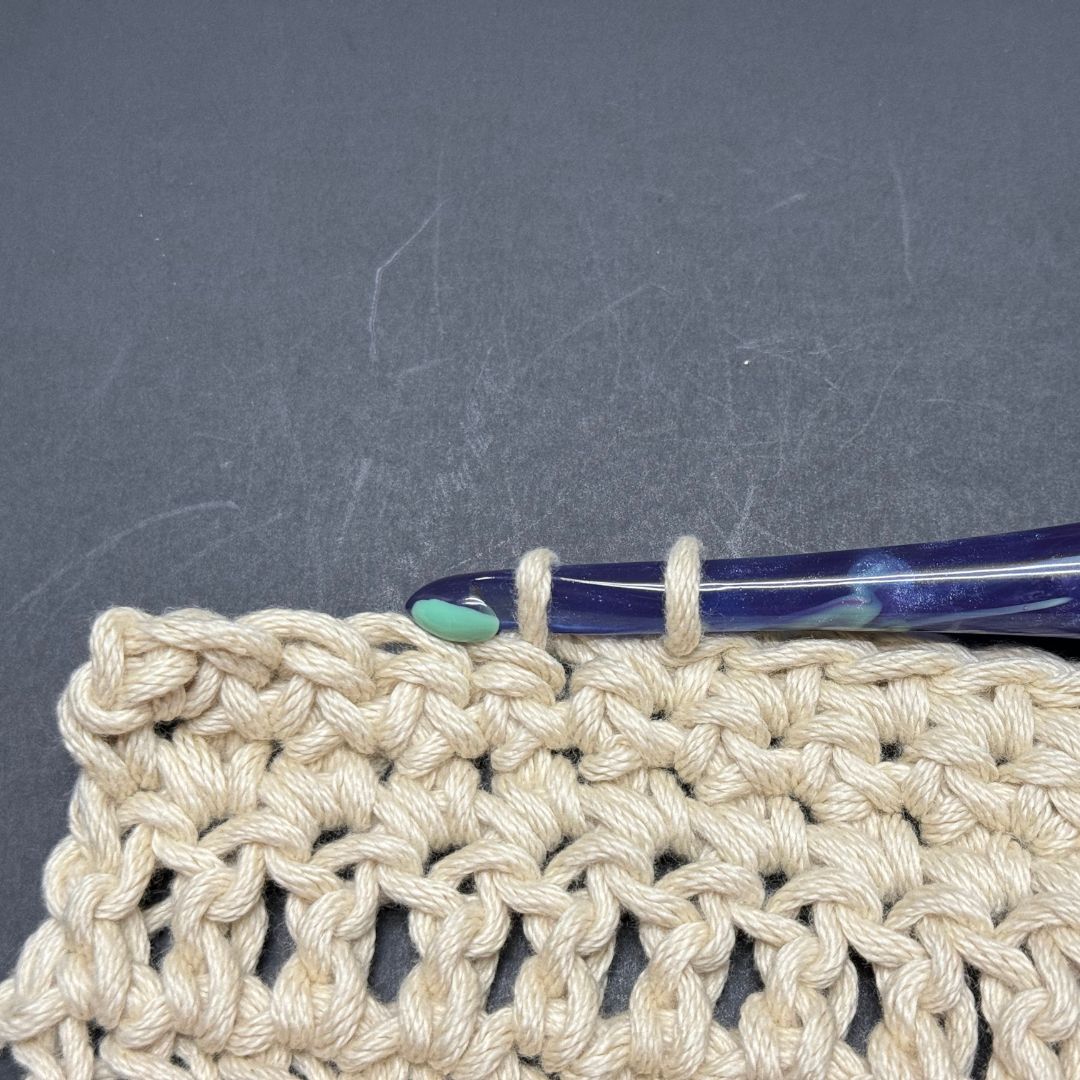
When it comes to the tools for measuring crochet gauge, you can use any type of ruler including a flexible tape measure. One note about a flexible tape measure, especially the super cute retractable tape measures we love to keep in our notion pouch is to check it against a straight ruler periodically, as it can stretch. Obviously, straight rulers will always work as it will be the most accurate. If you use a ruler, it can help to use straight pins to mark the stitches and rows where you’re measuring as the fabric may shift when you lift and place the ruler. My favorite tool is a gauge square, like the one pictured, as you don’t have to move anything to check the crochet gauge. Just place the center of the gauge square along a row starting at the edge of a stitch, and count the stitches and rows.
If you’re using a ruler or tape measure, line up the 0 mark with the edge of a stitch that is not at the edge of the swatch, mark the stitch that falls at 4″ / 10cm, and count the stitches between 0 and 4. To measure the row gauge, holding the ruler or tape measure vertically, place the 0 or 4″ mark at the feet of a stitch in the center of the third or fourth row, and count the rows until you reach 4″.
This picture shows the ruler laid the opposite direction since straight pins are used to mark the stitches and rows for accuracy.
Adjusting Crochet Gauge
Previously you read an example of how not matching gauge can impact the overall size of a project. Now let’s learn how to fix one’s crochet gauge to match the pattern.
Crochet is a unique craft that cannot be replicated by machine, which means that each crocheter is unique even though we all learn how to make the basic stitches in the same way. Luckily, we have a range of crochet hook sizes which helps us match crochet gauge for a project.
Typically, the first step to correcting crochet gauge if it doesn’t match the pattern’s listed gauge is to change hook size. If you have too many stitches, make another crochet gauge swatch with the next larger crochet hook. If you have 2 or more stitches, I would grab a hook that is one millimeter larger, i.e. pattern lists 4mm hook so make another swatch with 5mm hook. The opposite is true for reducing gauge if you have too few stitches in your swatch. A smaller crochet hook is needed in order to create more stitches. Be kind to yourself when making crochet gauge swatches and make the time to make a few, if needed, to save time once you start the project.
Row gauge can sometimes be the easiest to fix because you can create fewer or more rows to get the required length. If you’re following a pattern with a row repeat that cannot be easily fixed by adjusting the total rows, then we look at the golden loop.
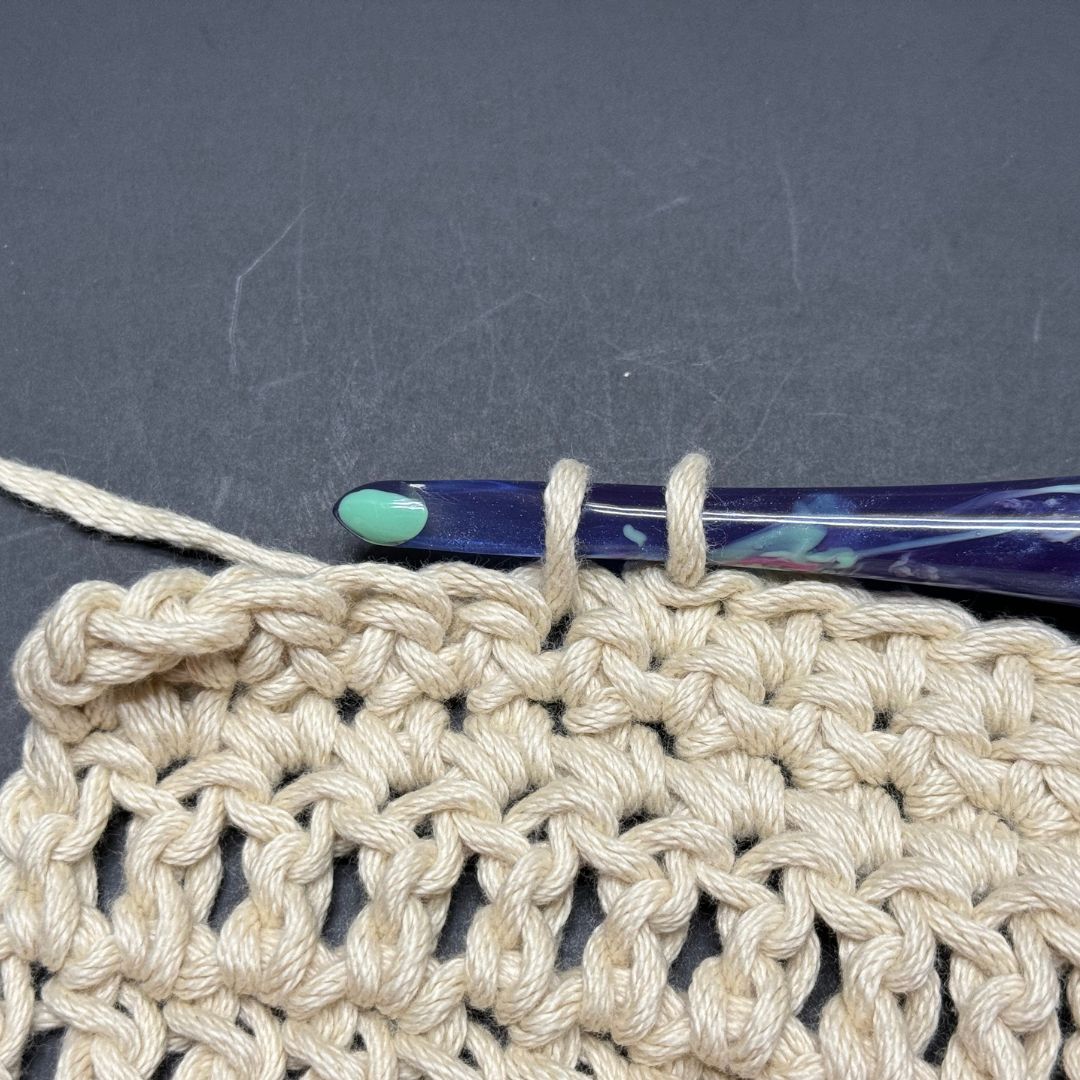
What is the golden loop??
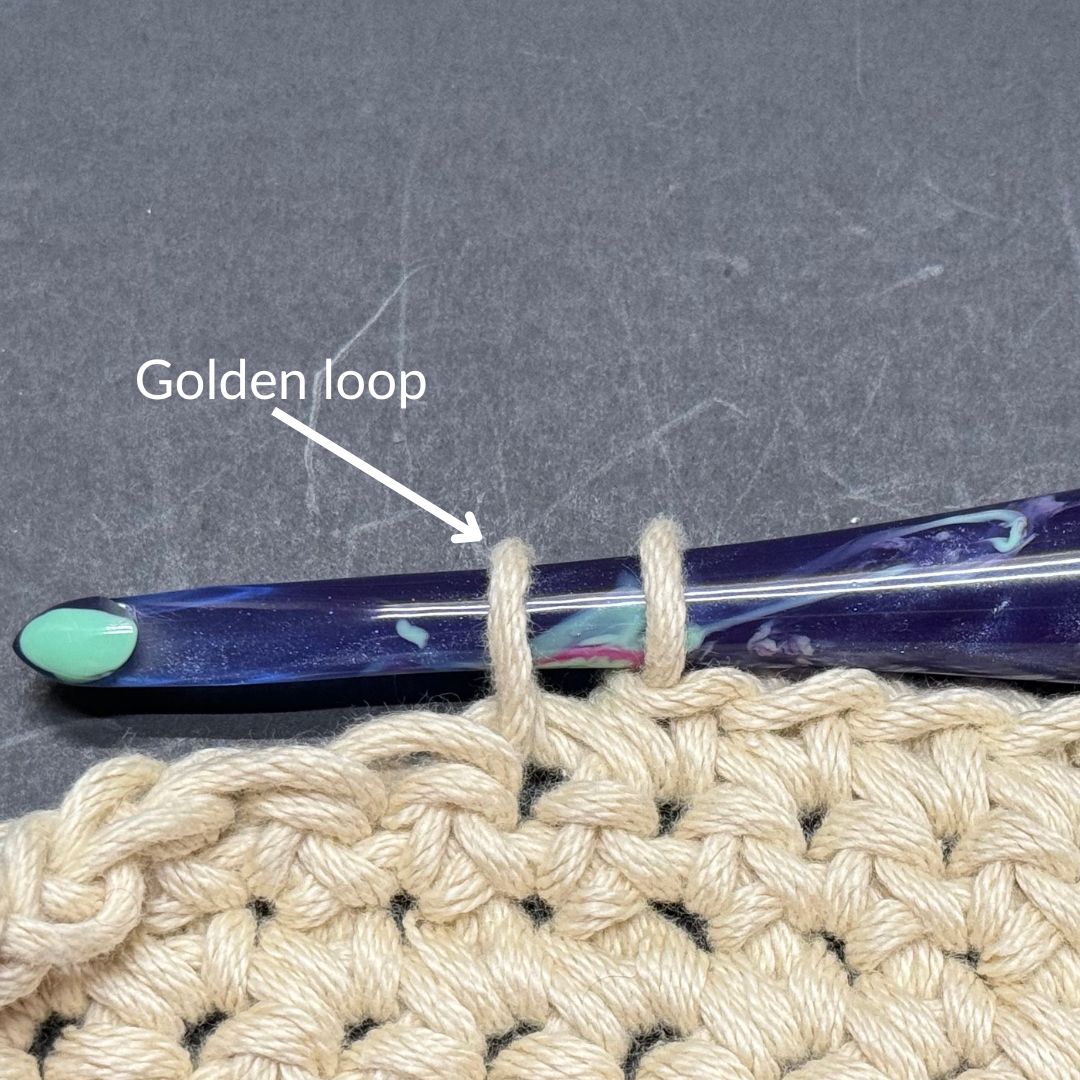
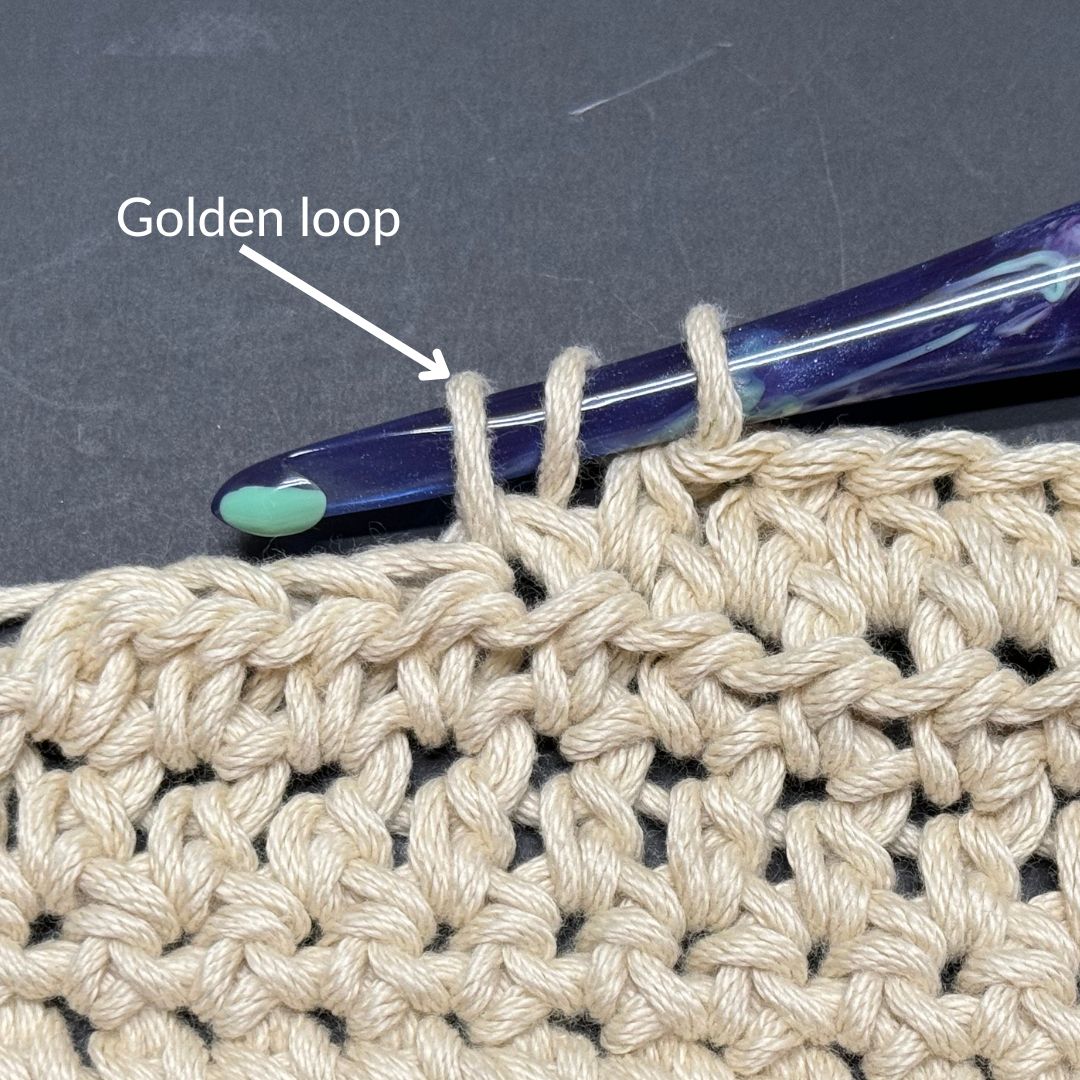
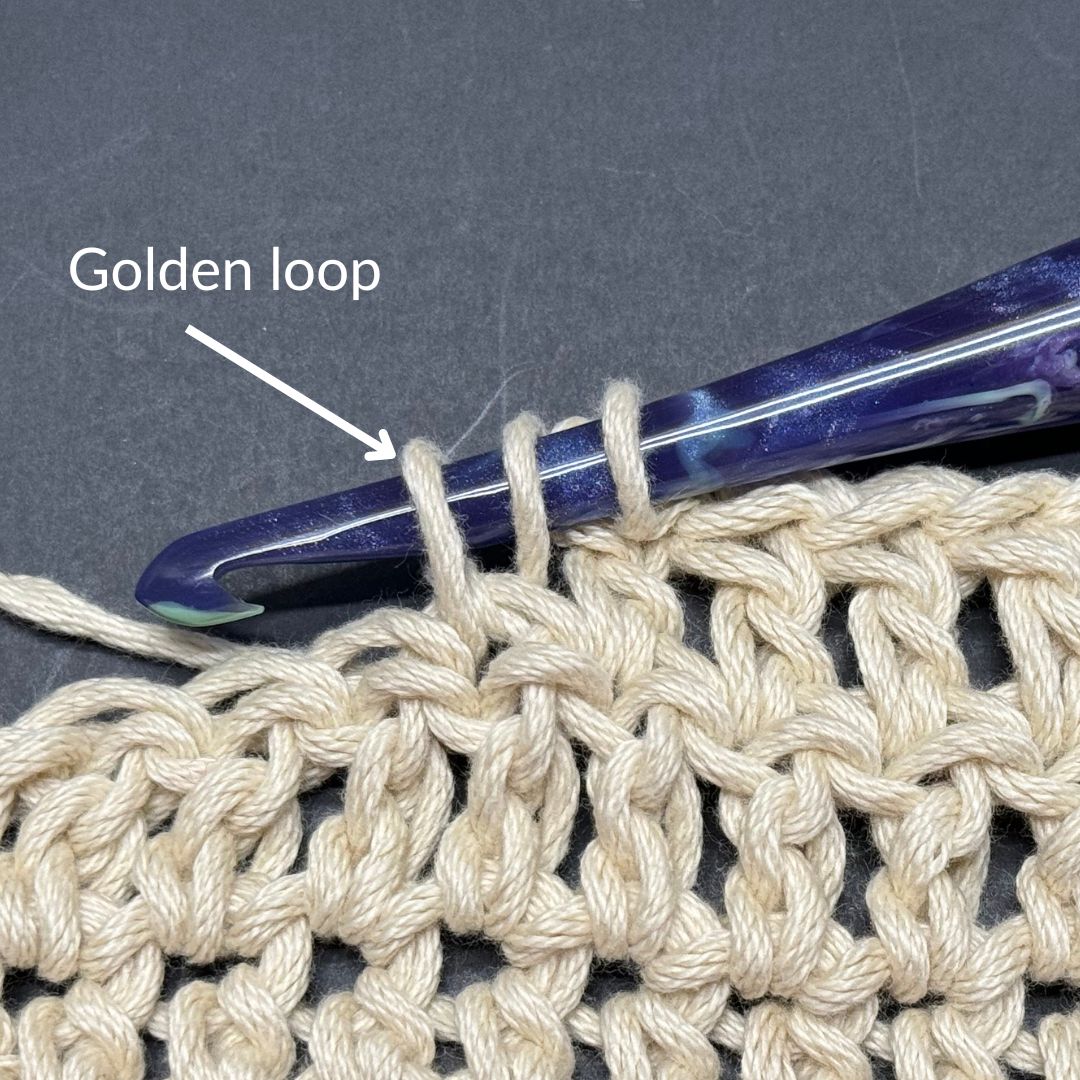
The golden loop is the first loop that is pulled through the stitch, the loop created from “yarn over and pull through.” The special loop determines the height of a crochet stitch. Depending on your crochet style, a “rider,” “lifter” or “yanker”, the golden loop is typically the culprit of not meeting row gauge.
A rider tends to hold their crochet hook along the top of the stitch being worked into, so the golden loop is the size of the hook’s throat. A lifter tends to pull their golden loops upward, therefore making taller stitches; whereas a tanker pulls the golden loop tight on the throat of their hooks, therefore making shorter stitches.
It will require focus and practice to adjust your golden loop to adjust row gauge. If you prefer to be lost in the rhythmic stitching / mindless crochet with a movie or audiobook playing in the background, you can try creating extended stitches to meet row gauge if it’s too short. If your row gauge is too tall, then yanking the golden loop is the best option to try when adjusting the crochet gauge.
What is an extended stitch??
An extended crochet stitch is making a ch 1 before completing a stitch in the usual manner. For example an extended single crochet is made by inserting the hook into the next st, yarn over and pull up a loop, yarn over and pull through one loop, yarn over pull through two loops. This extra chain is made the same way for all extended stitches which tend to offer a height between the standard stitch and the next tallest stitch.
Say it with me, “I will always make a crochet gauge swatch.”
By this point, I hope you have come to learn something new and understand the importance of checking your crochet gauge for a project. When we do not check our gauge, we are possibly setting ourself up to waste hours and hours stitching on a wearable that will not fit well. You love crochet because there’s no limit to what you can for yourself and others, and you don’t have time to waste when you’re building your dream handmade closet, preparing for a market, or making items to donate.
Keep your tools handy for checking the first swatch, and if it doesn’t match, you can change hook size for stitch gauge, and change the golden loop or make extended stitches to match row gauge. It’s time to enjoy your crochet even more knowing that you’ll make the right size every time.
Pin it for later


4 Responses
I know swatching is important, but it’s frustrating. Your article is very interesting and provides good information. There’s been a many times that I have not made the gauge and that makes me fall in love with designers who provide full measurements in their patterns.
Yes, swatching can be frustrating but hopefully you’ll consider making one the next time you really really need to with these tips. I know that you’ve been crocheting long enough to know how to make some adjustments on the fly. *wink wink* Thank you for the feedback, Connie!
Thank you. I have been crocheting quite a long time. I never knew to gauge my work. The directions would tell you/me that the gauge would be met with the correct weight of the yarn and the size of the hook. I learned something new!
I’m happy to help you learn something new, Patricia!