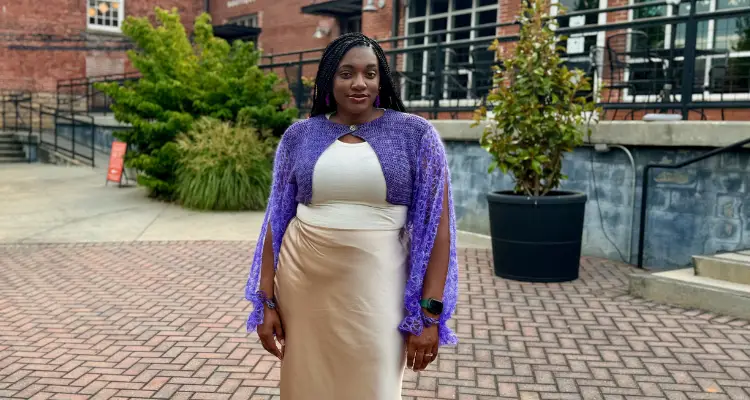
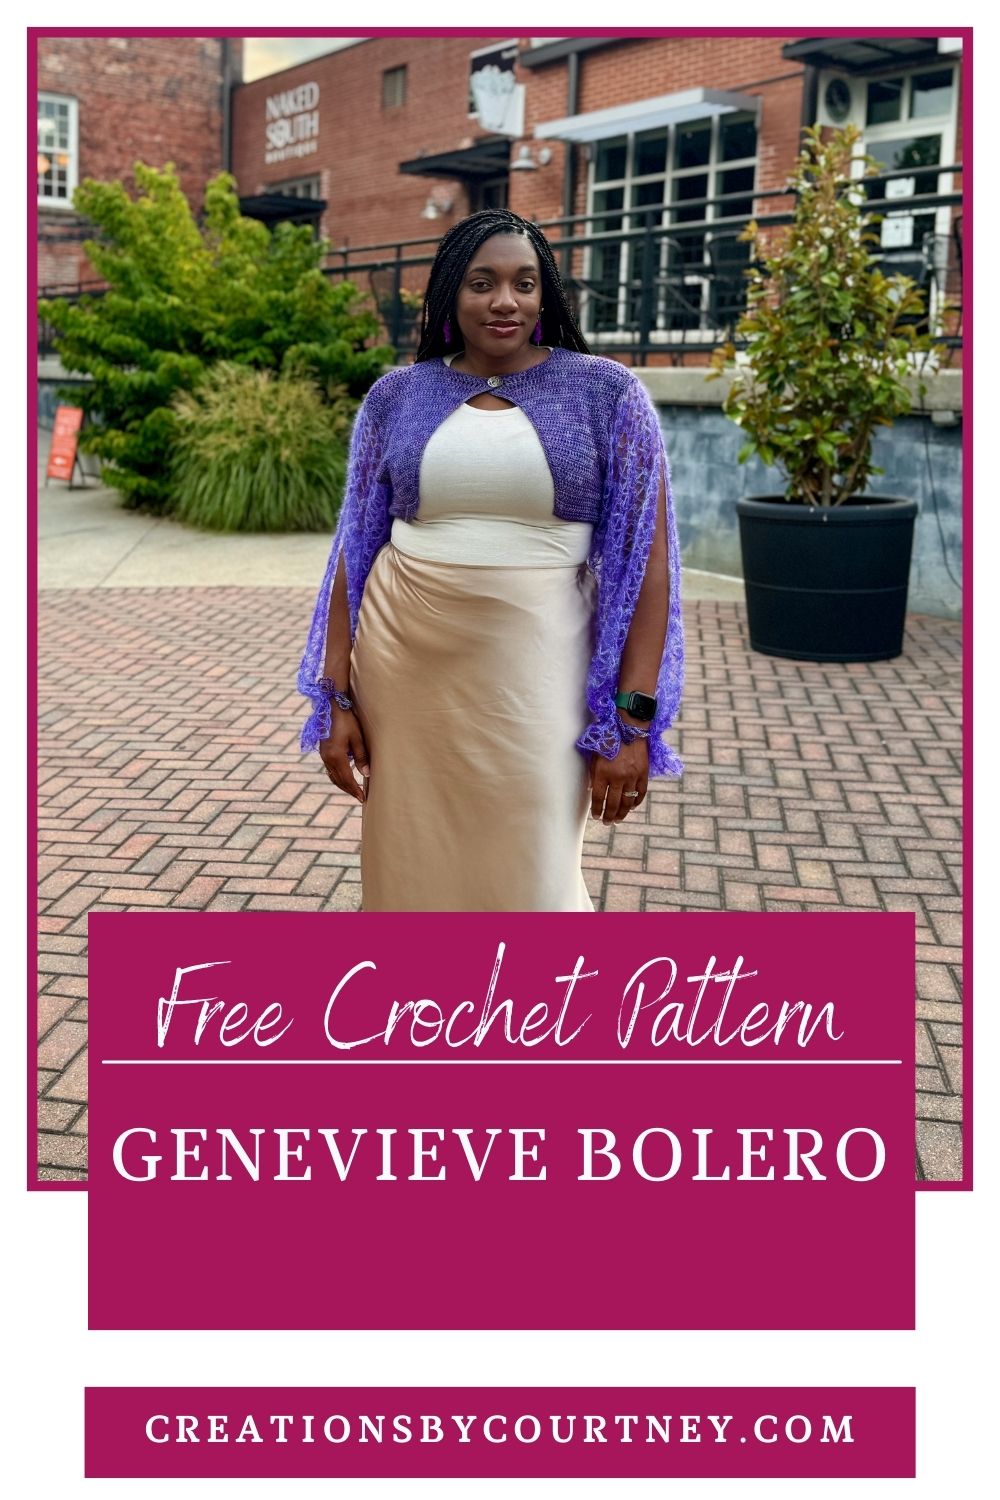
Welcome, fellow crocheters! Are you ready to level up your crochet game and add a touch of Parisian style and romance to your wardrobe? If the idea of diving into creating a crochet garment, using thin yarn, and mastering the art of crochet lace has been lingering in your mind, then it’s time to take the plunge with this easy crochet bolero!
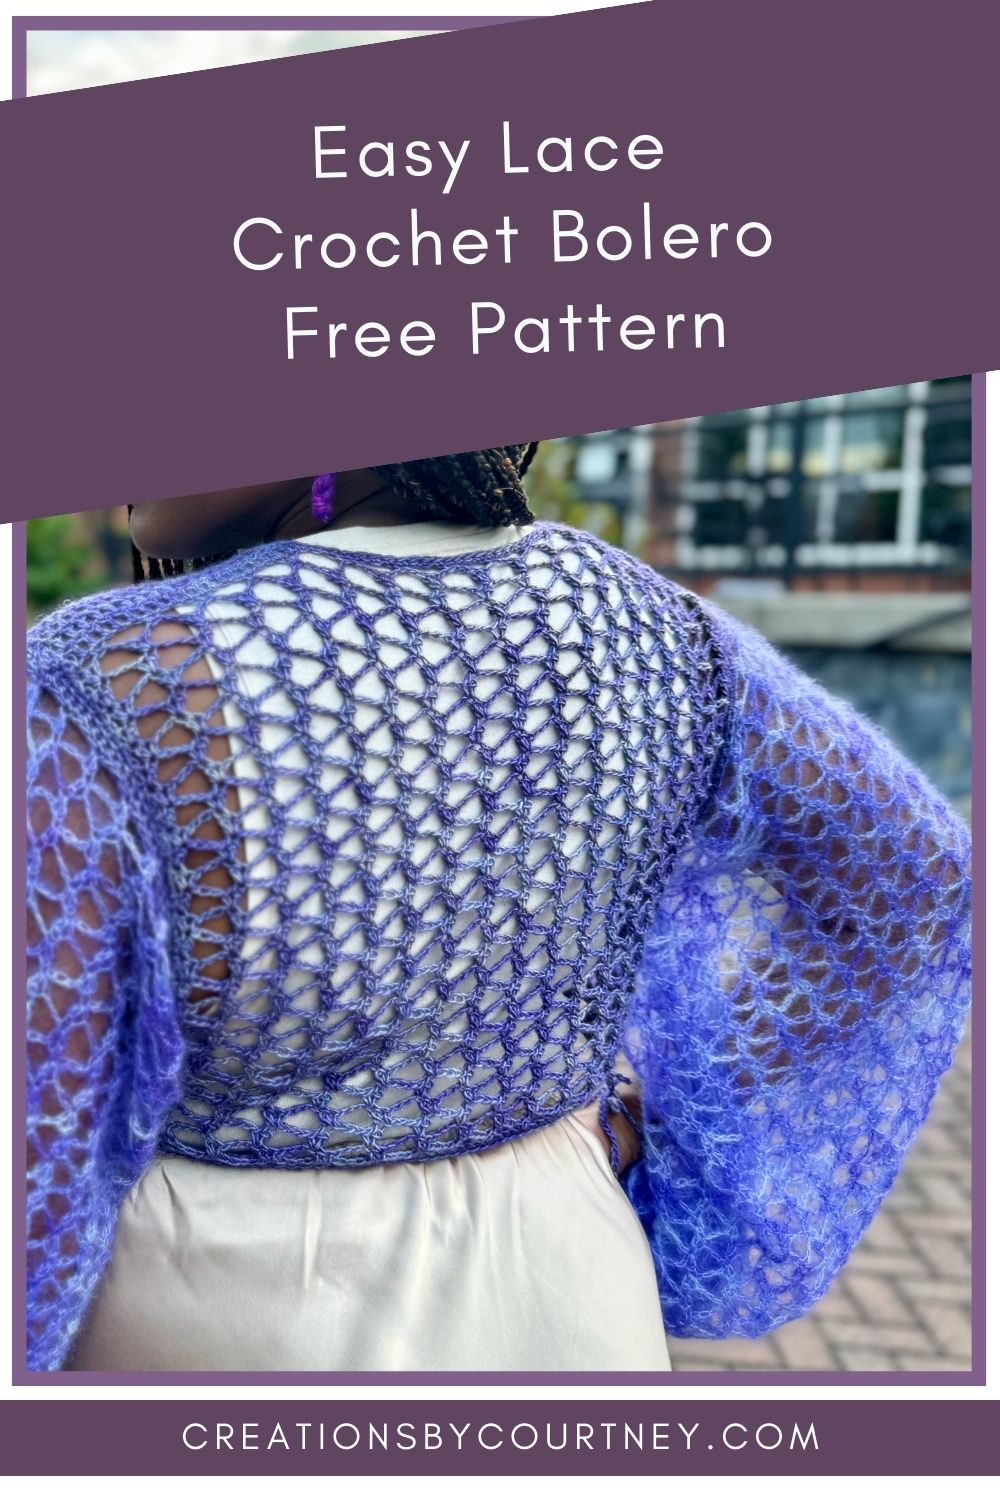
Today, we’re here to inspire and encourage you to embrace the world of crochet shrugs, specifically the enchanting crochet lace bolero, Genevieve. Picture yourself in a stylish and airy bolero jacket that exudes elegance and charm, perfect for those breezy summer evenings or adding a whimsical flair to any outfit.
If you’re new to crocheting garments or lacework, fear not! We’ve got you covered with an easy crochet shrug pattern that will guide you through creating a stunning crochet lace bolero. This design features shaped, fitted front pieces, a delicate lace back, and open, balloon-shaped lace sleeves that tie at the wrist, adding a touch of sophistication to your ensemble.
This look will absolutely delight and surprise others when it’s worn as the lacy back is unexpected and a little whimsical.
Why a Crochet Bolero?
If you’re new to the Creations by Courtney world, I have had the pleasure of working with Denise and other designers and independent dyers from around the world for the Progress, Hope and Happiness (PHH) collection and make along since 2021. Each year there is a theme that allows me to tap into my creativity in a different way than my usual designs. This year is particularly special with the alignment of the 2024 Paris summer Olympic Games, the last PHH collection’s theme of Before + After = Now, and current trends of fringe, bows, romantic flowers, and sheer fabrics.
In thinking about the significance of this year’s collection, I tapped into the bow trend with the Adeline Crochet Necktie and air of elegance and high fashion that Paris became known for with the Genevieve Bolero.
Join the Happiness Along in the Raverly Group as the fun starts July 19
Check out the entire collection!
Did you know that the shrug has been a wardrobe staple since the 17th century?
It started as and has remained as a cropped jacket with sleeves of varying length that offers modesty, warmth and style for women. Specifically the bolero is a type of shrug with a few distinguishing details.
A bolero can be slightly longer in length, may have a closer fit and always has a closure, whereas a shrug tends to be open and with a loose fit (positive ease). The Genevieve Crochet Bolero features overlapping points at the front that can be closed with a small shawl pin, brooch or a Jūl stud button. I think a bolero fits with the resurgence of crochet shrugs over the past few years in a way that offer an option that wants a different style to wear in more formal settings. Add dramatic sleeves and an easy crochet lace that looks way more complicated.
Outfit Ideas for your easy Crochet Bolero
- Chic Evening Look: Pair your crochet lace bolero with a sleek black dress and heels for a sophisticated evening ensemble that will turn heads.
- Bohemian Vibes: Combine the bolero with a flowy floral maxi dress, well worn straw hat and sandals for a bohemian-inspired look that’s perfect for a casual day out.
- Parisian Chic: Channel your inner Parisian fashionista by wearing the bolero over a striped top, high-waisted wide leg trousers, and platform sneakers for a classic yet trendy outfit.
- Festival Ready: Rock your crochet lace bolero with denim shorts, a crop top, and ankle boots for a chic festival look that’s both stylish and comfortable.
- Beach Glam: Don your bolero over a swimsuit or a simple tank top paired with shorts for a beach-ready look that’s effortlessly glamorous.
Yarn
As mentioned above, the Progress, Hope and Happiness is an international collaboration that offers a collection of unique knit and crochet designs and exclusive color ways from indie dyers. Choosing yarn can be one of the toughest parts of a crochet project, but the yarn spoke to me as if it were a person in the same room with me once I knew what I wanted to design.
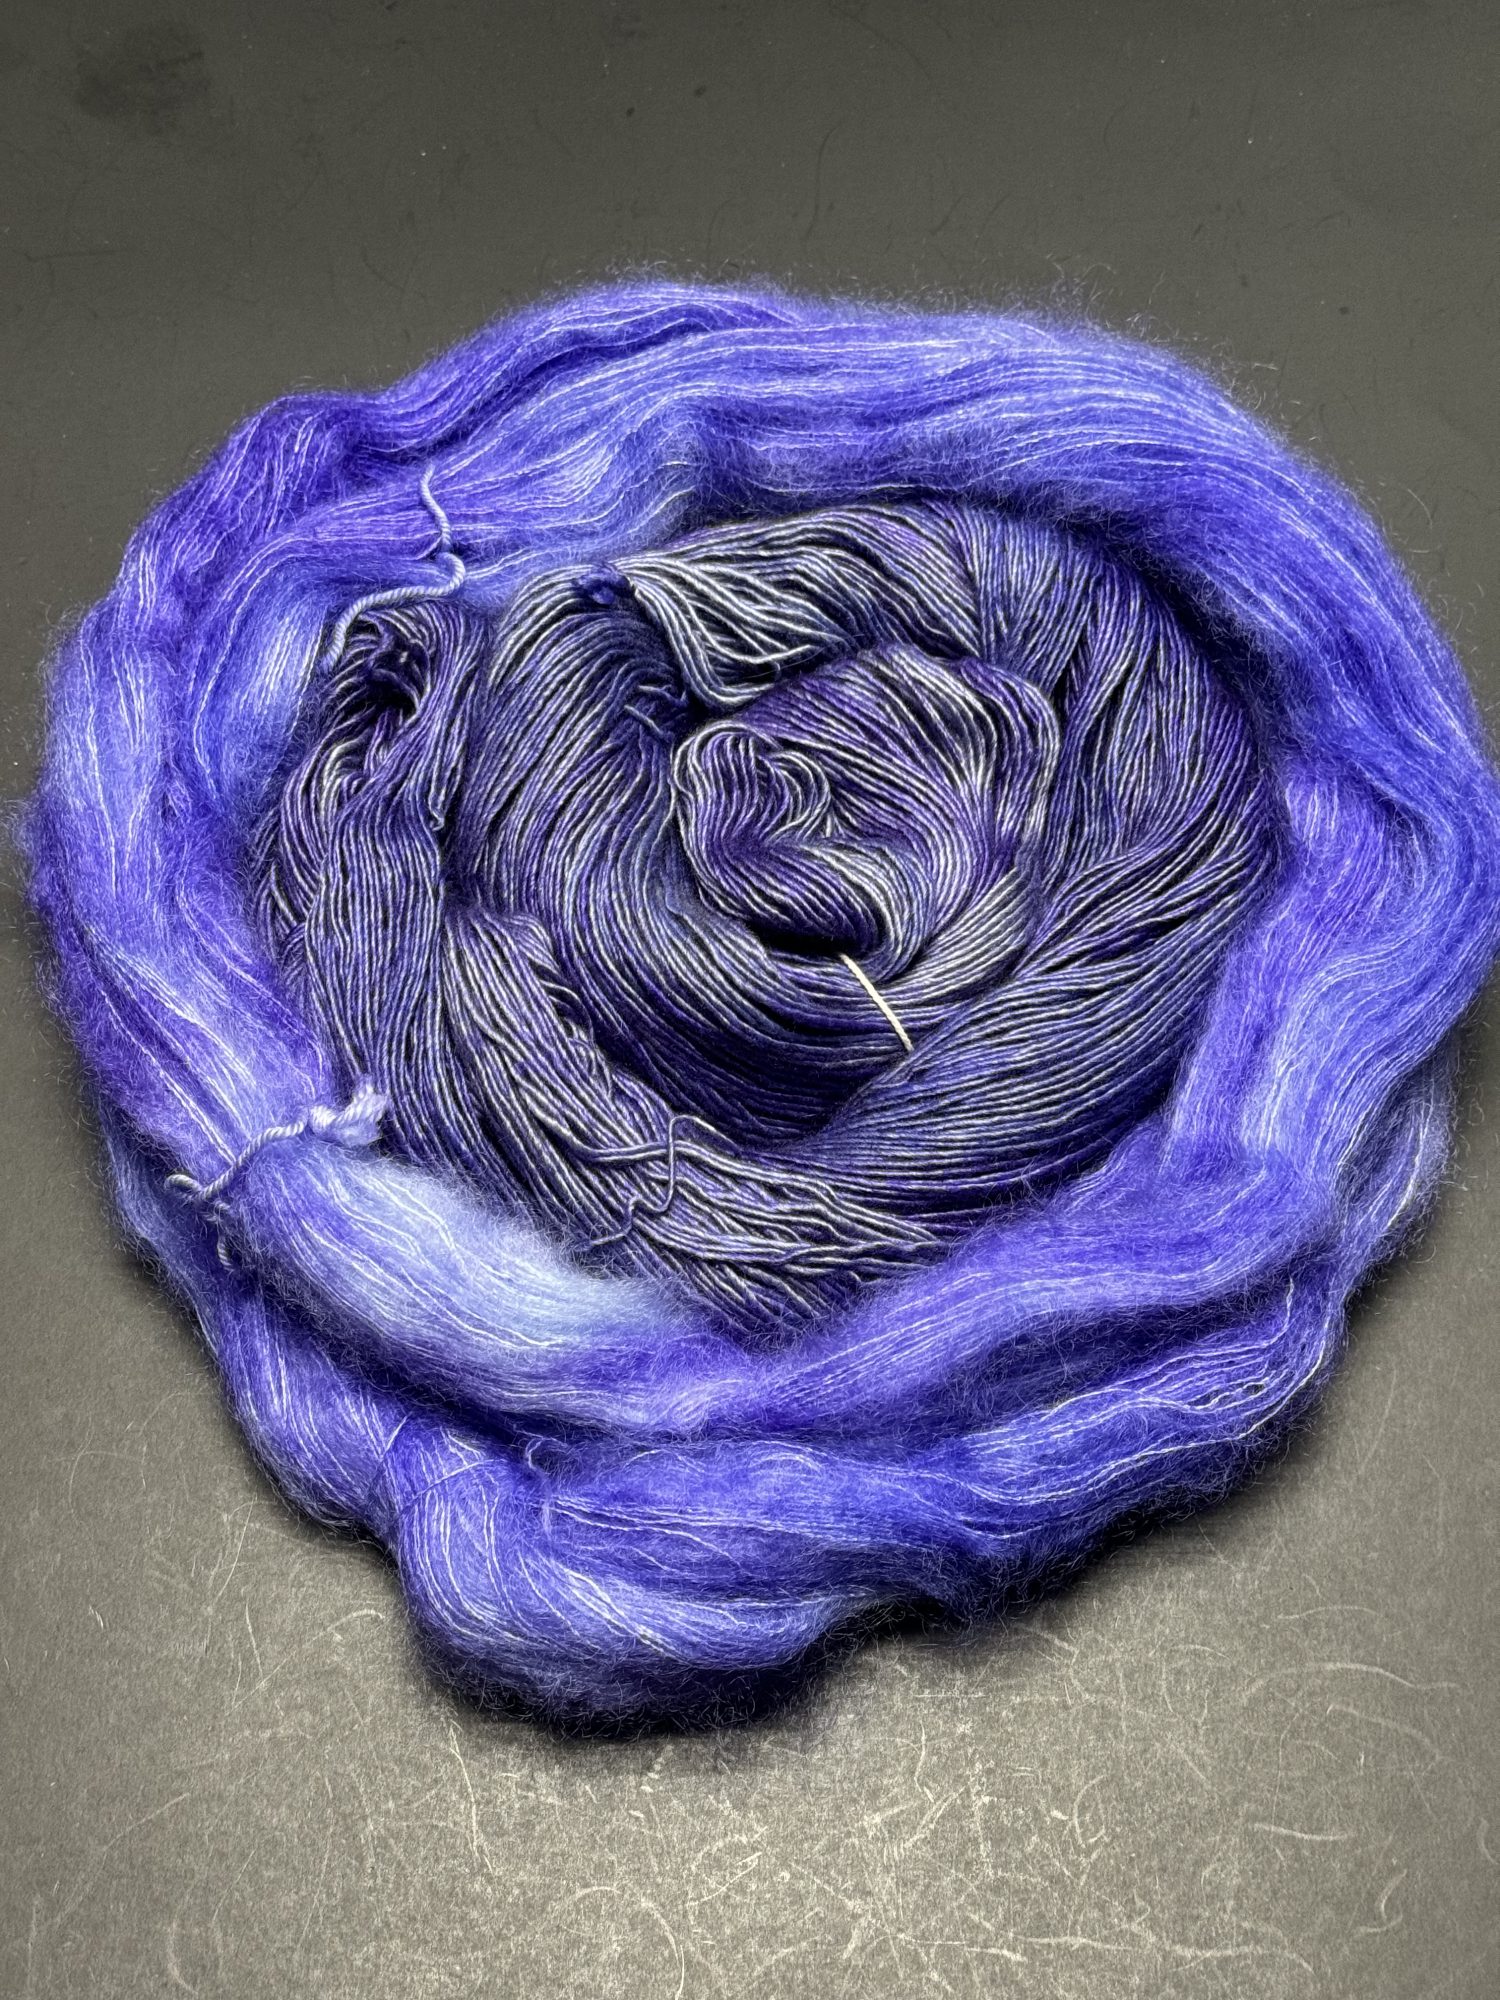
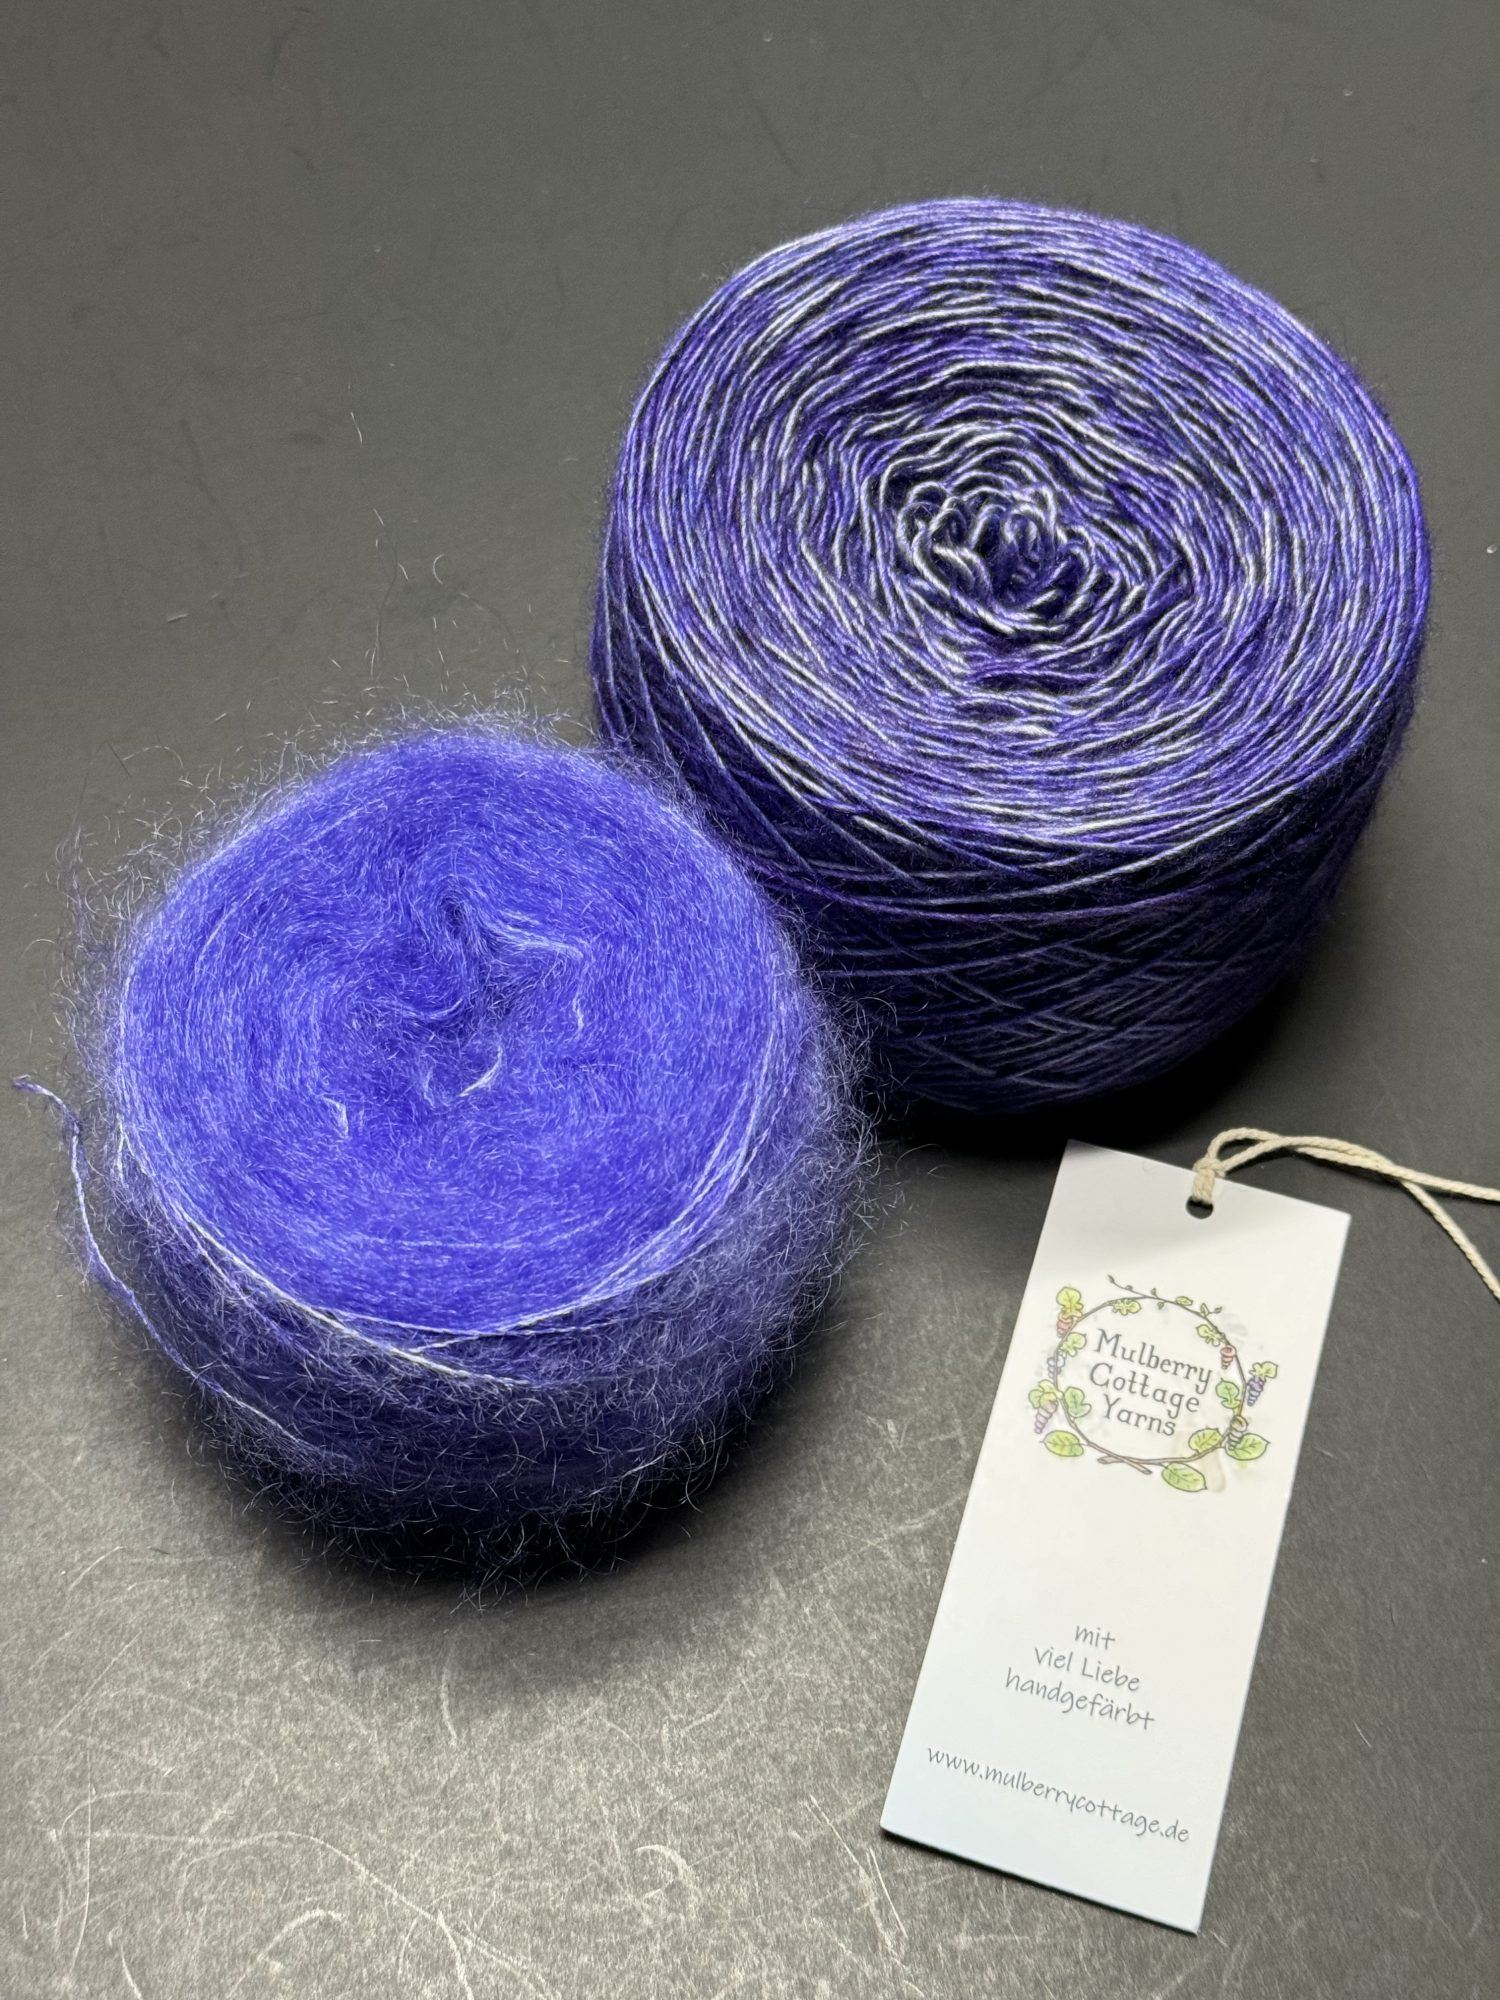
I had the pleasure of working with Mulberry Cottage Yarns, an indie dyer living in Germany. She offered Tibet Single, a single ply fingering weight yarn, and Flausch, a kid mohair blend in lace weight.
This yarn is DIVINE to work with!
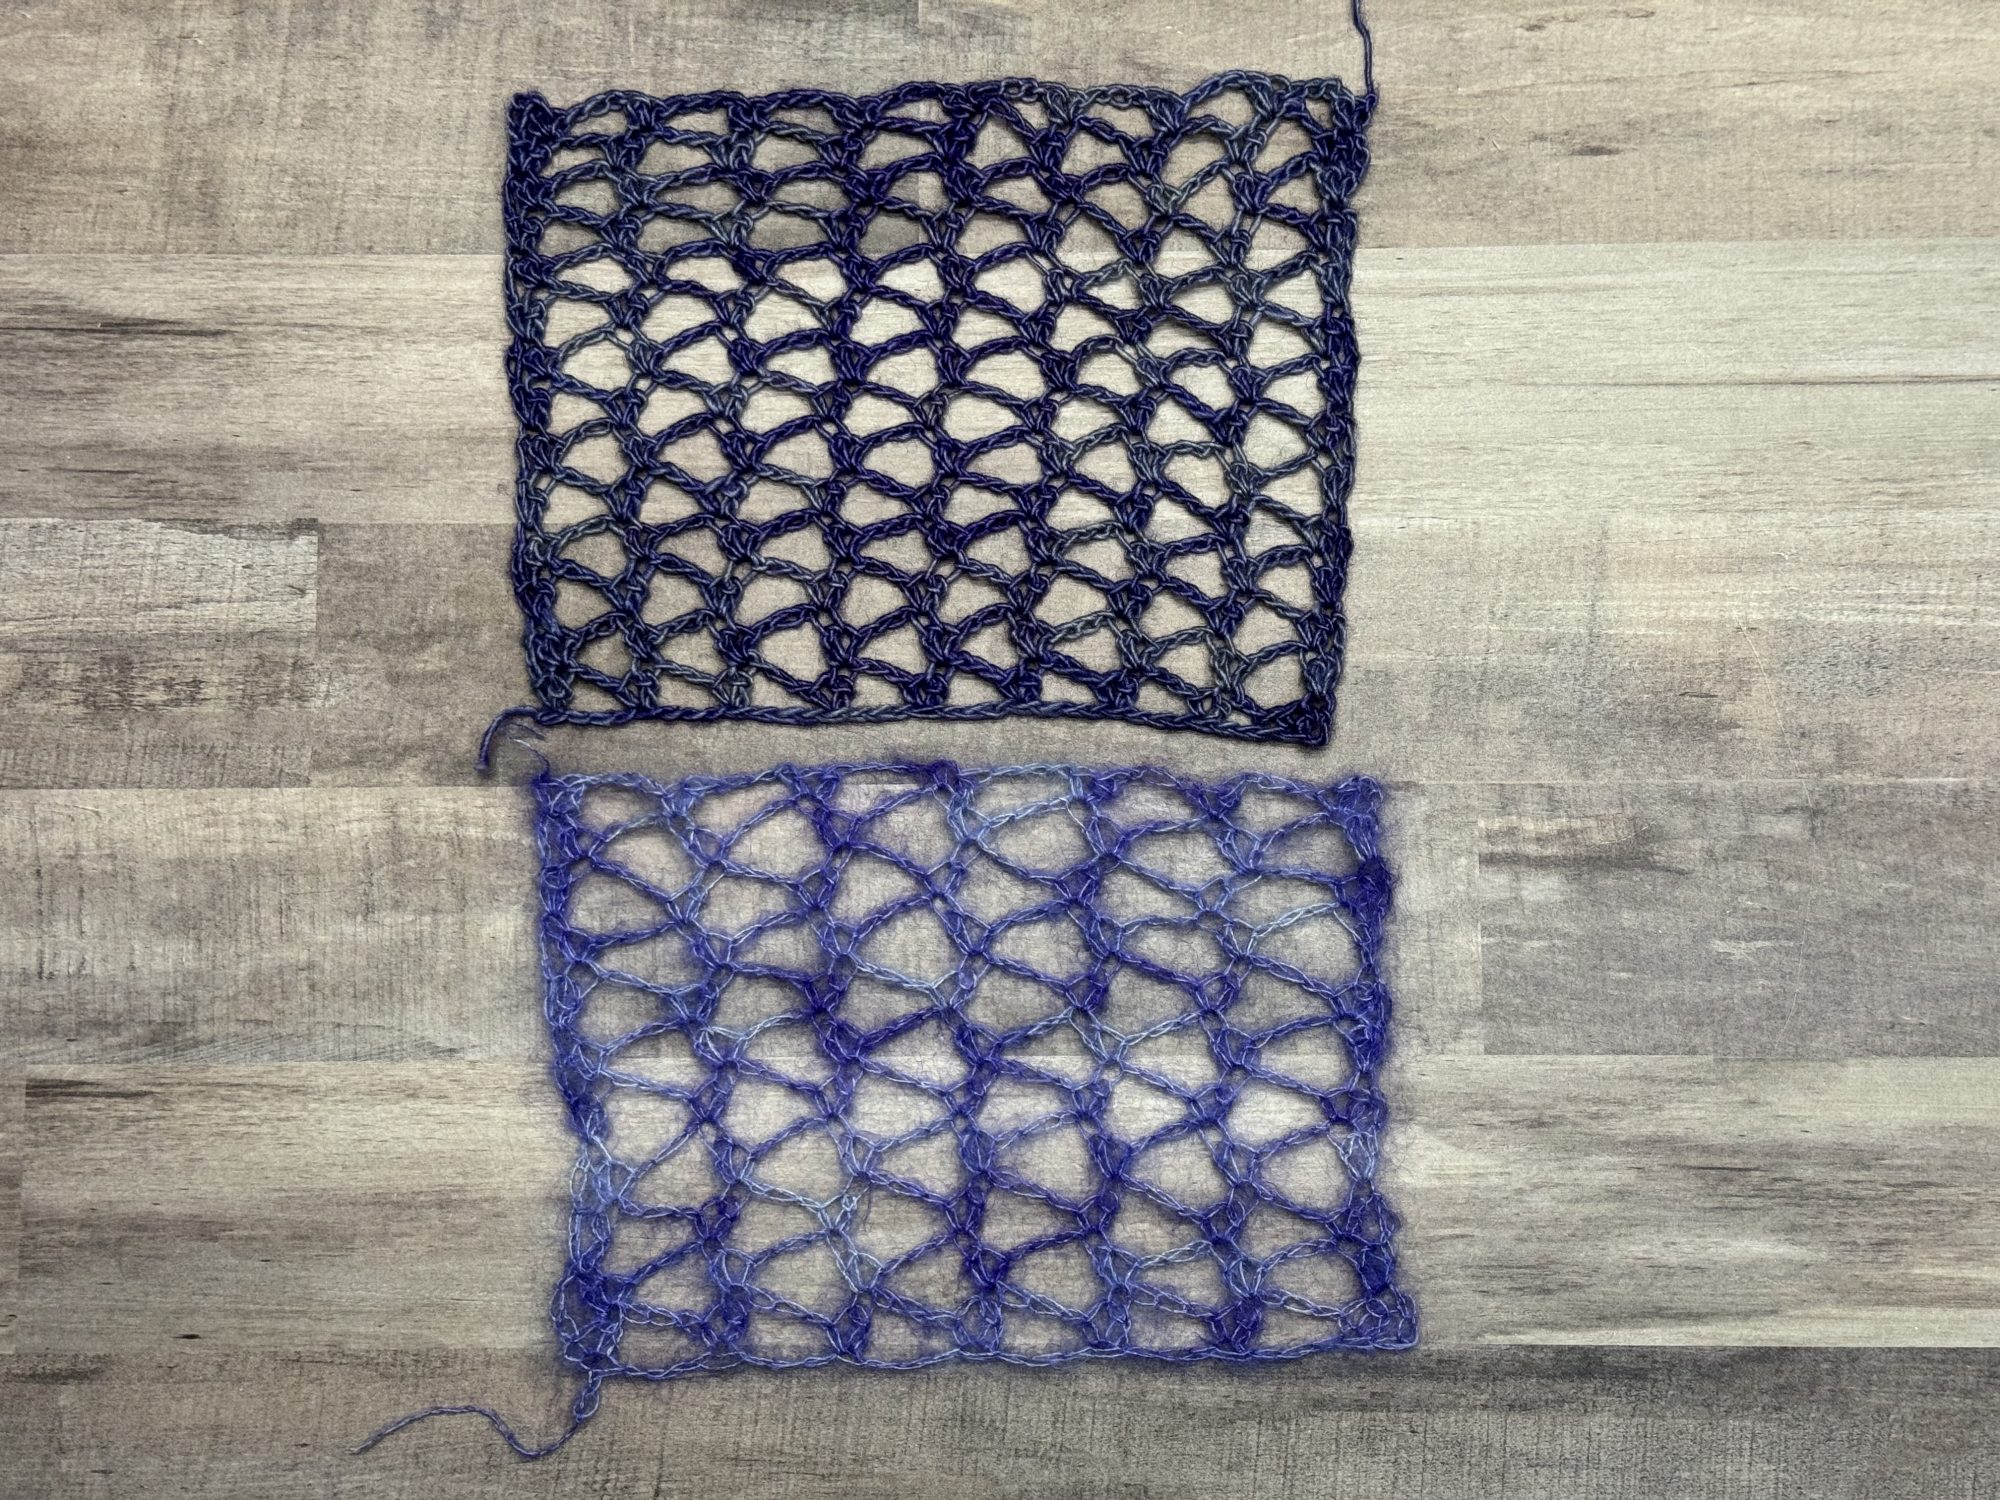
This is my first crochet project utilizing lace weight, which seems very intimidating by the thinness. By pairing it with a reasonable size hook and easy lace pattern, it was a breeze to work with after a few rows were made. I will caution you to know what stitches you want to make in a kid mohair, as it grabs and is not fun to frog. Definitely keep a pair of small scissor handy if you do have to unravel some stitches to carefully separate the strands without cutting the main thread.
Franzi, the amazing mind behind Mulberry Cottage Yarns, offers a generous amount of yardage in each yarn that not even the largest size requires more than 3 skeins. ???? Tibet Single puts up 437 yards or 400 meters per 120 grams. It is a lovely single ply of 65% merino, 20% silk and %15 yak. Flausch is as light as air like many kid mohair yarns with a put up of 459 yards or 420 meters per 50 grams. Its light weight and silky soft texture comes from a 72% kid mohair and 27% silk blend.
I love how each yarn shows the color way, No Rain Today, differently because of the fiber content. The color is deeper on Tibet Single, whereas you get to see hints of a faint blue almost white on Flausch.
I hope you’ll check out the lovely yarns from Mulberry Cottage Yarns and the other independent dyers that participated in the PHH event, as well as the other designers.
Blocking
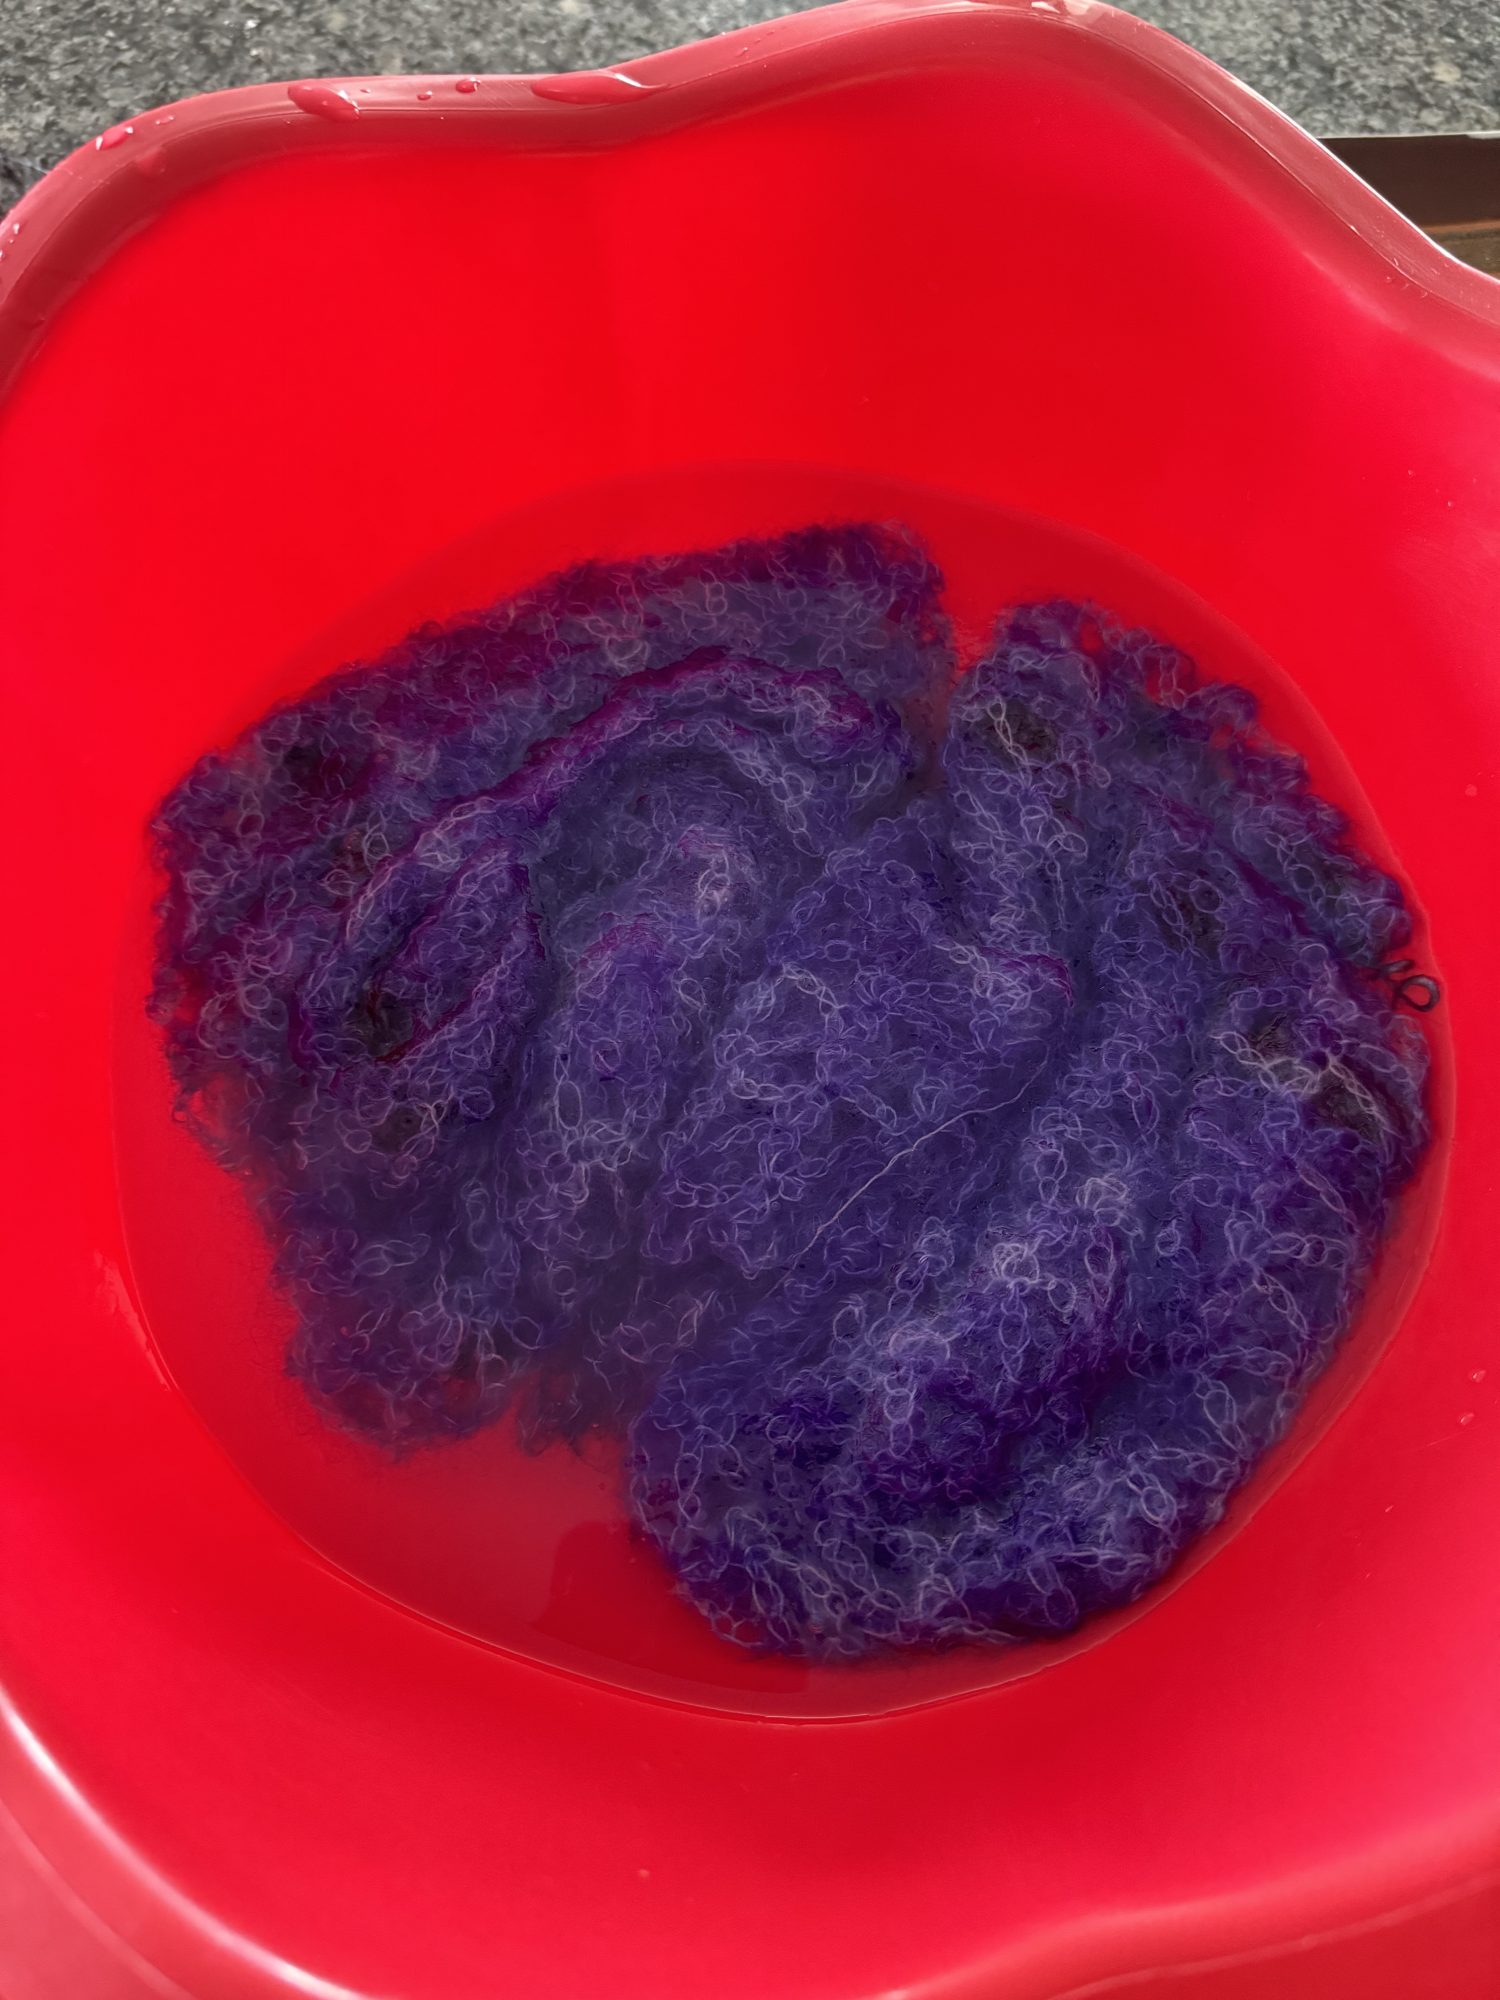
We cannot skip a quick chat about blocking this easy crochet bolero. Some may think that blocking is unnecessary for a lace stitch since it creates an open fabric. Blocking and lace are two peas in pod as they work so beautifully together.
Blocking is the process of wetting the fabric in order to relax the strands and shape the fabric. By using a 4.5 mm crochet hook for this crochet bolero, there is a lot of stretch available from the “large” loops of each stitch. Once these stitches are dampened or soaked, they relax to a flatter position which removes the wavy edge of the starting chain and the curving chain three between the other stitches.
There are there types of blocking: spray, steam and wet. Each one is a straightforward process and requires a few tools. If spray blocking, the crochet fabric needs to be placed on a surface that can get wet, and then you fill a spray bottle with water and small amount of a gentle detergent. Once the fabric is damp, pin (use rust-proof pins) the fabric to the final shape and measurements. You can also pin the fabric to its shape and measurements, then spray with the bottle. Allow to dry before removing any pins.
Steam blocking involves a flat surface that can get wet, pins and a steamer. Pin the crochet bolero to the final measurements for the size being made, and then hold the steamer a few inches from the fabric and slowly move over the entire piece. Allow to dry before removing the pins.
Wet blocking requires the most time, but offers great results. In some kind of container filled with tepid water and a gentle detergent, submerge the entire crochet piece and allow to sit for up to 15 minutes. Drain the water and DO NOT WRING OR TWIST the crochet fabric. Gently press the water out, then place on a towel to roll out the excess water. Pin the fabric to final measurements and allow to dry.

*Disclosure: This post may contain affiliate links to products that I use, and think you will enjoy using too. Should you decide to use any such link, I will earn a small commission at no cost to you. Thank you for supporting this small business.
ADD TO RAVELRY FAVORITES
MATERIALS
- Color A: Mulberry Cottage Yarns Tibet Single, fingering weight #1 (65% merino, 20% silk, 15% yak, 437.4 yds/400 m, 4.2 oz /120g): No Rain Today
| Size | 1 | 2 | 3 | 4 | 5 | 6 | 7 | 8 | 9 | 10 | 11 |
| Yards | 215 | 241 | 257 | 283 | 292 | 311 | 317 | 337 | 340 | 364 | 367 |
| Meters | 197 | 220 | 235 | 256 | 267 | 284 | 290 | 308 | 311 | 333 | 336 |
| Skeins | 1 | 1 | 1 | 1 | 1 | 1 | 1 | 1 | 1 | 1 | 1 |
- Color B: Mulberry Cottages Flausch, lace weight #0 (72% kid mohair, 28% silk, 459.3 yds/ 420 m, 1.75 oz/ 50 g): No Rain Today
| Size | 1 | 2 | 3 | 4 | 5 | 6 | 7 | 8 | 9 | 10 | 11 |
| Yards | 434 | 454 | 496 | 530 | 573 | 609 | 631 | 647 | 670 | 709 | 750 |
| Meters | 397 | 415 | 454 | 485 | 524 | 557 | 577 | 592 | 613 | 648 | 686 |
| Skeins | 1 | 1 | 1 | 1 | 2 | 2 | 2 | 2 | 2 | 2 | 2 |
- US G+ (4.50 mm) hook or hook to meet gauge
- Stitch Markers x 6-8
- Scissors
- Yarn Needle
- Measuring Tape
- Blocking Mats
- Rust-proof pins
- Gentle detergent
- Spray bottle, steamer or basin large enough to fit the bolero.
- Optional, but recommended: blocking wires
GAUGE
Before blocking
Body: 6 rep x 12 rows= 4.5” x 4.25” [11.5 cm x 10.5 cm]
Sleeve: 5 rep x 11 rows = 4.5” x 4.25” [11.5 cm x 11 cm]
After blocking
Back: 4 rep x 10 rows = 4.25”x 4.25” [10.5 cm x 10.5 cm]
Front: 18 sts x 14 alternating rows of dc and dc = 4” x 4” [10 cm x 10 cm]
Sleeves: 4 rep x 8 rows = 4” x 4” [10 cm x 10 cm]
FINISHED SIZE(S)
| Size | 1 | 2 | 3 | 4 | 5 | 6 | 7 | 8 | 9 | 10 | 11 |
| To Fit Chest | 28-30” 71-76 cm | 32-34” 81-86 cm | 36-38” 91-96.5 cm | 40-42” 101.6-106.7 cm | 44-46” 112-116.8 cm | 48-50” 122-127 cm | 52-54” 132-137 cm | 56-58” 142-147 cm | 60-64” 152-163 cm | 66-68” 167.6-172.7 cm | 70-72” 178-183 cm |
| Cross Back | 14.5” 37 cm | 15” 38 cm | 16” 40.6 cm | 17” 43 cm | 17.5” 44.5 cm | 18” 45.7 cm | 18” 45.7 cm | 18.5” 47 cm | 18.5” 47 cm | 19” 48 cm | 19” 48 cm |
| Length | 12” 30.5 cm | 13” 33 cm | 13” 33 cm | 13.5” 34 cm | 13.5” 34 cm | 14” 35.6 cm | 14” 35.6 cm | 14.5” 37 cm | 14.5” 37 cm | 15” 38 cm | 15” 38 cm |
| Sleeve Length | 20” 51 cm | 21” 53 cm | 22” 56 cm | 23” 58 cm | 23” 58 cm | 23” 58 cm | 24” 61 cm | 24” 61 cm | 24” 61 cm | 24” 61 cm | 24” 61 cm |
PATTERN KEY
Ch: chain
Cnr: corner
Dc: double crochet
Dc2tog: double crochet 2 together
Fdc: foundation double crochet
Fsc: foundation single crochet
FO: fasten off
Hdc: half double crochet
hdc2tog: half double crochet 2 together
M: stitch marker(s)
PM: place stitch marker
Prev: previous
Rem: remain(s)(ing)
Rep: repeat
RS: right side
Sc: single crochet
Sc2tog: single crochet 2 together
Sk: skip
Sl st: slip stitch
St(s): stitch(es)
WS: wrong side
YO: yarn over
SPECIAL STITCHES & TECHNIQUES
CSDC: pull up a loop that is row height, holding loop in place and wrap yarn around hook (yarn over), insert hook in first st, YO, pull up a loop, [YO, pull through 2 loops] twice
EXPERIENCE LEVEL
Easy
NOTES
- Pattern is written in US terms.
- Read entire pattern before beginning.
- Each size is color-coded for ease of reading within the ad-free PDF.
- The Genevieve Bolero is made in 10 parts: Back, Shoulder and Front, Second Shoulder and Front, Sleeves, Blocking, Seaming the underarm, Attaching the Sleeves, Edging, Ties and Finishing.
- Changes in size are listed in parentheses in the following format Size XS (Small, Medium, Large, X-Large) (2X-Large, 3X-Large, 4X-Large, 5X-Large) (6X-Large, 7X-Large)
- The pieces may appear small prior to blocking, especially the Sleeves. The lace will relax quite a bit after blocking for the Back and Sleeves.
- The pieces must be blocked prior to seaming for the best fit and a finished look.
- The ad-free PDF includes a schematic for the Body and Sleeves, and a stitch diagram for the lace pattern.
Purchase the ad-free PDF from your favorite pattern shop


Don’t forget to join the Confidently Crochet with Creations By Courtney for CALs, crochet tips, and yarnie fun.
INSTRUCTIONS
Back
Row 1: With Color A, 52 (56, 60, 64, 64) (68, 68, 72, 72) (72, 72) fsc, turn. 52 (56, 60, 64, 64) (68, 68, 72, 72) (72,72) sts
Note: If you need to make the back piece more narrow or wider, -/+ multiple of 4 fsc.
Row 2: Ch 3 (does not count as st here and throughout), (dc, sc) in first st, ch 3, sk next 3 sts, *(dc, sc) in next st**, ch 3, sk next 3 sts, rep from * to end, stopping at **, turn. 13 (14, 15, 16, 16) (17, 17, 18, 18) (18,18) (dc, sc) groups, 12 (13, 14, 15, 15) (16, 16, 17, 17) (17,17) ch-3 groups
Row 3: Ch 3, *(dc, sc) in next dc**, ch 3, sk next 3 sts, rep from * to end, stopping at **, turn.
Rows 4-28 (31, 31, 32, 32) (33, 33, 34, 34) (35,35): Rep Row 2
Row 29 (32, 32, 33, 33) (34, 34, 35, 35) (36,36): Ch 1 (does not counts as a st), hdc in first st, ch 1, working only in ch-3 groups, *sc in 2nd ch of next ch-3 group, ch 3, rep from * to last ch-3 group, ch 1, sc in top of dc, turn. DO NOT FO. 1 hdc, 11 (12, 13, 14, 14) (15, 15, 16, 16) (16,16) ch-3 groups, 13 (14, 15, 16, 16) (17, 17, 18, 18) (18, 18) sc
Shoulder and Front
Mark center 18 (20, 20, 22, 22) (24, 24, 24, 24) (26, 26) st with M. There should be 17 (18, 20, 21, 21) (22, 22, 24, 24) (23, 23) sts on each side. This creates the neck opening.
Row 1: CSDC in first st, *dc in each st until M, turn. 17 (18, 20, 21, 21) (22, 22, 24, 24) (23, 23) dc
Rows 2-4 (4, 4, 6, 6) (6, 8, 8, 8) (10, 10): Rep Row 1, turn.
Row 5 (5, 5, 7, 7) (7, 9, 9, 9) (11,11): CSDC in first st, dc in next 16 (17, 19, 20, 20) (21, 21, 23, 23) (22, 22) st, 16 (16, 16, 17, 20) (20, 21, 20, 21) (24, 25) fdc, turn. 33 (34, 36, 38, 41) (42, 43, 44, 45) (47, 48) dc
Note: If you would like the Front pieces to overlap more, add more fdc. Be sure to make a note of the new total. The last row will have more sts than the provided number, unless you choose to create additional decreases in the following rows.
Row 6 (6, 6, 8, 8) (8, 10, 10, 10) (12,12): Sc in each st, turn.
Row 7 (7, 7, 9, 9) (9, 11, 11, 11) (13,13): CSDC in first st, dc2tog, dc in each st, turn. 32 (33, 35, 37, 40) (41, 42, 43, 44) (46, 47) dc
Rows 8-33 (8-35, 8-37, 10-37, 10-39) (10-41, 12-41, 12-43, 12-45) (14-45,14-47): Rep Row 6-7, turn. 19 (19, 20, 23, 25) (25, 26, 27, 27) (30, 30) dc
Row 34 (36, 38, 38, 40) (42, 42, 44, 46) (46,48): Sc in next 19 (19, 20, 23, 25) (25, 26, 27, 27) (30, 30) sts, 9 (9, 14, 14, 18) (18, 18, 18, 18) (23, 23) fsc, turn. 28 (28, 34, 37, 43) (43, 44, 45, 45) (53, 53) sc
Note: The additional stitches create the underarm. You can +/- fsc to adjust the fit of the underarm. Make note of any changes, as this will be needed for the Sleeves.
Rows 35-42 (37-46, 39-46, 39-48, 41-48) (43-50, 43-50, 45-52, 47-52) (47-54,49-54): Rep Row 7, then Row 6, FO with tail for seaming the underarm. 24 (23, 30, 32, 39) (39, 41, 41, 42) (49, 50) sc
Second Shoulder and Front
Attaching yarn to the cnr, follow the instructions as written for the Shoulder and Front
Sleeve
Make 2
Row 1: With Color A, 84 (88, 96, 100, 108) (112, 116, 116, 120) (124, 128) fsc, turn. 84 (88, 96, 100, 108) (112, 116, 116, 120) (124, 128) sc
Row 2: Ch 1, sc in each st, FO Color A, change to Color B, turn.
Row 3: Ch 3 (does not count as st here and throughout), (dc, sc) in first st, ch 3, sk next 3 sts, *(dc, sc) in next st**, ch 3, sk next 3 sts, rep from * to end, stopping at **, turn. 21 (22, 24, 25, 27) (28, 29, 29, 30) (31, 32) (dc, sc) groups, 20 (21, 23, 24, 26) (27, 28, 28, 29) (30, 31) ch-3 groups
Row 4: Ch 3, *(dc, sc) in next dc**, ch 3, sk next 3 sts, rep from * to end, stopping at **, turn.
Next Rows: Rep Row 4 until 3”/ 7.5 cm shorter than desired sleeve length.
Note: Sample shows 23.5” / 59.5 cm sleeve length
Last Row: Ch 1 (does not counts as a st), hdc in first st, ch 1, working only in ch-3 groups, *sc in 2nd ch of next ch-3 group, ch 3, rep from * to last ch-3 group, ch 1, sc in top of dc, FO. 1 hdc, 19 (20, 22, 23, 25) (26, 27, 27, 28) (29, 30) ch-3 groups, 21 (22, 24, 25, 27) (28, 29, 29, 30) (31, 32) sc
Blocking
- Wet or steam block the Body to measurements in schematicfor the size being made.
- Wet block the Sleeves to the width of the arm opening and desired length.
- Continue to Seaming once all pieces are dry.
Seaming Front to Back
Seam the underarm to the back, FO and weave in ends.
Attaching Sleeves
Rnd 1: Working on the RS of fabric, attach Color A at the Shoulder of the Body, make 82 (86, 94, 98, 106) (110, 114, 114, 118) (122, 126) sc evenly spaced around the Back, underarm and Front, FO with long tail to attach Sleeve.
- Fold the Sleeve in half, and overlap 2 sts
- Using M, line up the Sleeve with the arm opening with the overlap at the Shoulder so that the sleeve is open along the top.
- Using the tail from Rnd 1 of Attaching Sleeves, use the mattress stitch to seam the Sleeve to the arm opening.
Edging
With RS facing, attach yarn to last row at the underarm (left side of the Bolero when worn), sc in each stitch along Back until cnr, ch 1 and turn cnr, sc evenly spaced up the Front to cnr, ch 1 and turn cnr, sc in each st to inner cnr, sc2tog to turn cnr, sc evenly across the Shoulder, sc2tog to turn cnr, sc in each ch and sc across Back, sc2tog to turn cnr, sc evenly across second Shoulder, sc2tog to turn cnr, sc in each st to cnr, ch 1 and turn cnr, sc evenly spaced down the second Front, ch 1 and turn cnr, sc in rem sts, sl st to join and FO.
Tie
Make 2
Using Color A, make a chain at least 20”/ 51 cm
Note: You can make two additional ties to close the sleeve at the elbow.
Finishing
- Weave in all ends.
- Steam block to relax the fabric and smooth out any wrinkles.
- Weave the ties through a row towards the end of the sleeve to close and secure the sleeve at the wrist.
Awesome Autumn Blog Hop
Just in time for the autumn equinox, Malena of Straight Hooked, has put together the Awesome Autumn Blog Hop with some designer friends. From earrings and hats to amigurumi to wraps and shawls to pumpkins, there’s 30 crochet patterns perfect for the cooling weather and making your space feel warm and cozy.
I’m excited to be the featured designer for September 23, 2024 and share the Genevieve Bolero for a 50% off discount. This easy crochet bolero only requires a max of three skeins of yarn for any size and features a beautiful lace that is perfect to layer at the office or going to dinner. Also, the sleeves are open for a touch of sass.
Head over to Straight Hooked to get the coupon code for today, then come back here get your discounted copy. The discount ends Tuesday, September 24 at 8am MST/ 10 am EST.
Just follow the check out steps when you click the “Get the Pattern” below, and do not forget the add the coupon code and double check that it shows the 50% discount. If you would like to add the pattern to your Ravelry library, kindly send me an email. The email address will be listed on the invoice.
You may enjoy these patterns too

Pin it for Later
Want to talk about yarn goodness, crochet tips, and exclusive weekly deals? Join my Facebook Group, Confidently Crochet with Creations By Courtney.
If we’re not hanging out on social media yet, come check me out on Facebook, Instagram and Pinterest.
Find crochet tutorials, help with crochet patterns, fiber fashion styling and more on my YouTube Channel.
Join my newsletter and receive the Ultimate Guide to Crochet Garments.
Use #CreationsByCourtney on social media when sharing your projects.
This pattern is not to be duplicated or resold, and not to be reproduced commercially. You may sell finished products on Etsy, at farmers markets, and craft fairs, but please credit Creations By Courtney as the pattern’s author.