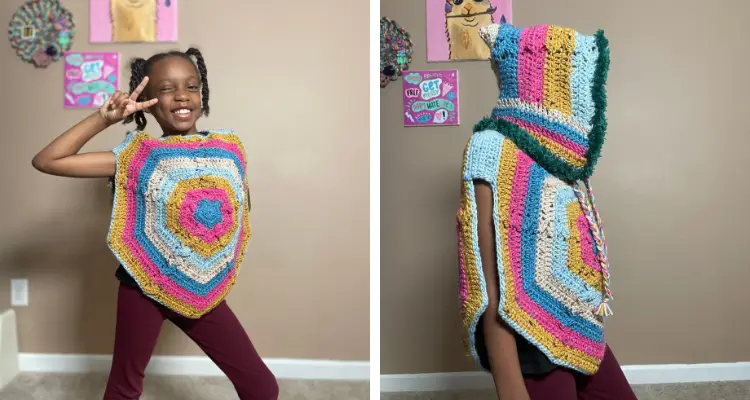
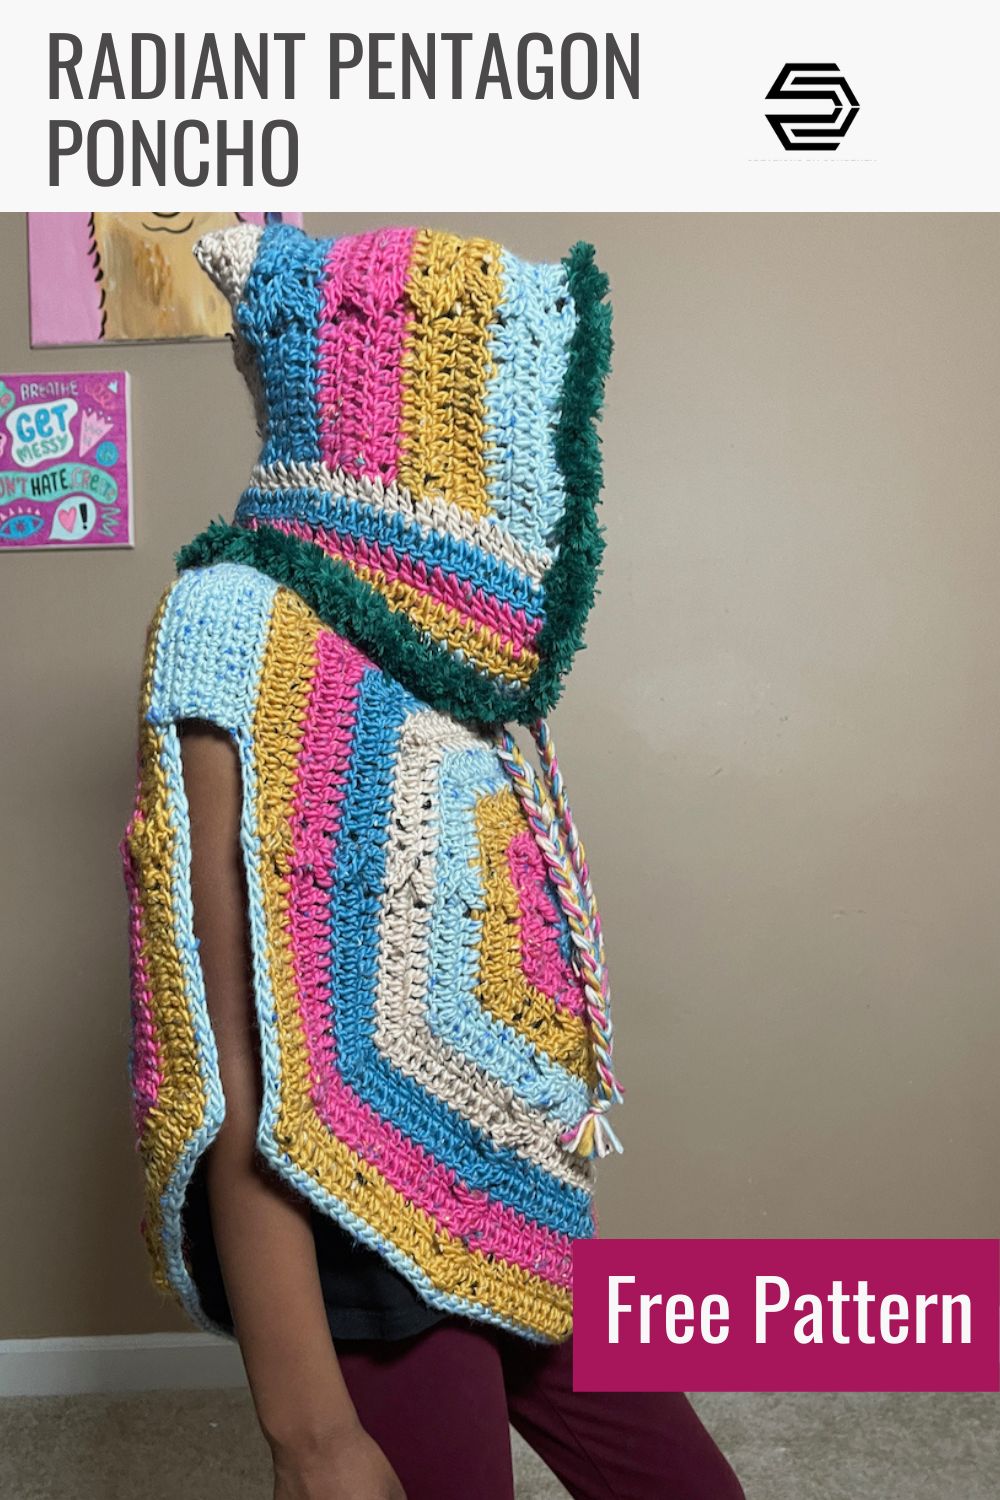
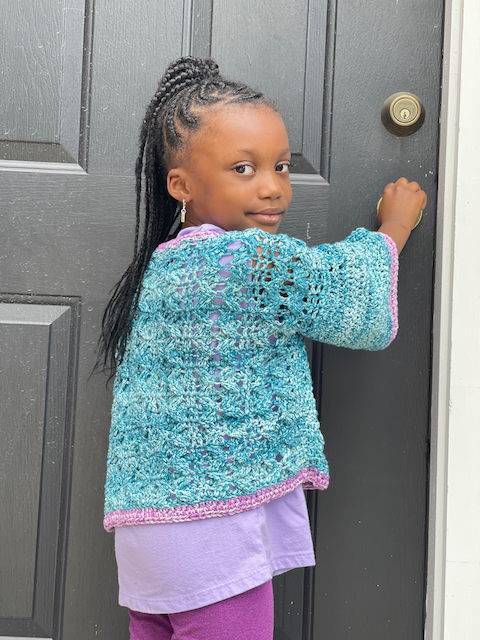
✨ Welcome to the world of cozy creativity, where warmth meets style in the enchanting embrace of crochet! Today, let’s dive into the colorful realm of the Radiant Pentagon Poncho Crochet pattern – a project that brings together the charm of a classic crochet poncho with the whimsy of a playful pentagon twist. Say hello to your new favorite handmade masterpiece, perfect for little ones and crafted with love.
Picture this: your kiddo wrapped in the comfort of a poncho that not only keeps them snug but also adds a touch of handmade magic to their outfit. Our free crochet poncho pattern for children is not just a creative endeavor; it’s a cozy adventure waiting to unfold.
✨ The heart of this design lies in the unique crochet pentagon pattern, a delightful detour from the typical rectangle. We’ve curated a pattern that’s not only easy to follow but also a joy to create. Even if you’re a crochet novice, fear not – this project is your golden ticket to crafting bliss.
But the magic doesn’t end there! This crocheted poncho pattern comes with a little something extra – a matching hood! Because, let’s be honest, what’s a poncho without a hood to add an extra dose of charm? Your little one will be all set to conquer chilly days with style and grace.
Now, let’s talk style! Our Radiant Pentagon Poncho isn’t just a garment; it’s a fashion statement for your little trendsetter. Need some tips on how to style and wear this crochet poncho for parents? Picture it paired with denim and boots for a rustic flair, or over a dress for a touch of boho-chic. The possibilities are as endless as your imagination!
So, grab your crochet hook, dive into the world of stitches and loops, and let the Radiant Pentagon Poncho Crochet pattern be your guide to creating a cozy masterpiece that’s as unique as your little one. Let the crochet magic begin!
Yarn
Hobbii provided me with Tweed Delight and Peacock for the #NoShadesofGreyIG this spring. What’s better than crocheting with a rainbow of yarn? Using a fun tweed that is oh so soft and faux fur that adds a touch of sass!
Tweed Delight is a light worsted weight yarn that comes in a 50g skein or 109 yards / 100 meters, and in 30 colors! Yes, 30 colors to crochet a tweedy rainbow. I love the softness of this roving style yarn that comes from a make up of 85% wool, 10% acrylic and 5% viscose. At the time of this writing, Tweed Delight is on sale for $3.90 from the usual $8.
Peacock is a bulky weight yarn that is too soft and fuzzy in the best way. It’s made of 100% polyester and comes in a 100g skein of 71 yards / 65 meters. With 14 colors available, you’re sure to find the right touch of fluff for a fall or winter project. Can we say super warm and smooth hood, muff, ankle warmers or cowl? At the time of this writing, you can purchase Peacock on sale for $3.30 rather than the normal price of $6.60.
*Disclosure: This post may contain affiliate links to products that I use, and think you will enjoy using too. Should you decide to use any such link, I will earn a small commission at no cost to you. Thank you for supporting this small business.
ADD TO RAVELRY FAVORITES
MATERIALS
- Hobbii Tweed Delight, #4 (85% wool, 10% acrylic, 5% viscose, 109 yds/ 100 m, 1.75 oz/ 50 g):
- Color A: River Stone x 3 (4, 5, 6, 6, 7, 8, 9)
- Color B: Geranium x 1 (2, 2, 2, 3, 3, 4, 4)
- Color C: Dijon x 1 (2, 2, 2, 3, 3, 4, 4)
- Color D: Misty Blue x 1 (2, 2, 2, 3, 3, 4, 4)
- Color E: Chai Latte x 1 (2, 2, 2, 3, 3, 4, 4)
- TOTAL: 484 (598, 741, 863, 978, 1152, 1287, 1381)
- Alternative Yarns
- Hobbii Peacock, #5 bulky weight (100% polyester, 71 yds / 65m, 3.5 oz /100g): Petrol x 1 skein
- US 7 (4.50 mm) hook or hook to meet gauge
- US L (7.00 mm) hook or hook to meet gauge
- Scissors
- Yarn needle
- Stitch markers
- measuring tape
GAUGE
3 rounds in pattern, measured at widest points = 4”[10 cm]
FINISHED SIZE(S)
| Size | Shoulder to Shoulder | Length each side |
| 2 | 9.25” [23.5 cm] | 10” [19.1 cm] |
| 4 | 9.75” [25 cm] | 11” [21.6 cm] |
| 6 | 10.25” [26 cm] | 12” [26.7 cm] |
| 8 | 10.75” [27 cm] | 14” [31.8 cm] |
| 10 | 11.25” [28.5 cm] | 15” [38.1 cm] |
| 12 | 12” [30.5 cm] | 15” [38.1 cm] |
| 14 | 12.25”[31 cm] | 17” [39.4 cm] |
| 16 | 13” [33 cm] | 18” [40.6 cm] |
PATTERN KEY
2/2 tr-LC: left leaning 2 over 2 treble cross
2/2 tr-RC: right leaning 2 over 2 treble cross
Ch: chain
Cnr: corner
CSDC: chainless starting double crochet
Dc: double crochet
Fsc: foundation single crochet
FO: fasten off
Hdc: half double crochet
M: stitch marker(s)
PM: place stitch marker
Prev: previous
Rem: remain(s)
Rep: repeat
RS: right side
Sl st: slip stitch
Sc: single crochet
Sk: skip
St(s): stitch(es)
Tr: treble crochet
YO: yarn over
SPECIAL STITCHES & TECHNIQUES
2/2 tr-LC: over the next 4 stitches, skip next 2 sts, tr in next 2 sts, working in front of sts just made, tr in each of skipped sts.
2/2 tr-RC: over the next 4 stitches, skip next 2 sts, tr in next 2 sts, working behind sts just made, tr in each of the skipped sts.
CSDC: pull up a loop that is row height, holding loop in place and wrap yarn around hook (yarn over), insert hook in first st, YO, pull up a loop, [YO, pull through 2 loops] twice
EXPERIENCE LEVEL
Intermediate
NOTES
- Pattern is written in US terms.
- Read entire pattern before beginning.
- Each size is color-coded to ease of reading.
- The Amelie Pentagon Poncho is made in 4 parts: Body, Seaming, Hood.
- Change color at the end of every two rounds to begin the next round.
- Sizing includes 2.5-4” of positive ease.
- Choose the size that is closest to the wearer’s Shoulder to Shoulder measurement.
- CSDC can be replaced with ch 2 and then dc in the first st
- Changes in size are listed in parentheses in the following format Size 2 (Size 4, Size 6, Size 8, Size 10, Size 12, Size 14, Size 16).
- If one number is listed, it applies to all sizes.
Purchase the ad-free PDF from your favorite pattern shop


Don’t forget to join the Creations By Courtney Community for CALs, crochet tips, and yarnie fun.
INSTRUCTIONS
Body
Make 2
Rnd 1: With Color A, magic circle, CSDC in center, 14 dc in center, tighten, sl st to join. 15 dc
Rnd 2: CSDC in first st, (tr, dc) in same st, 2 dc in next st, dc in next st, *(dc, tr, dc) in next st, 2 dc in next st, dc in next st, rep from * 3 more times, change to B, sl st to join. 5 tr, 25 dc
Rnd 3: CSDC in first st, *(dc, tr, dc) in next st, 2/2 tr-RC, dc in next st, rep from * 3 more times, (dc, tr, dc) in next st, 2/2 tr-RC, sl st to join, turn. 5 tr, 5 2/2 tr-RC, 15 dc
Rnd 4: CSDC in first st, 2/2 tr-LC, dc in next st, [(dc, tr, dc) in next st, dc in next 2 sts, 2/2 tr-LC, dc in next st] 4 times, (dc, tr, dc) in next st, dc in next st, change to C, sl st to join, turn. 5 tr, 25 dc, 5 2/2 tr-LC
Rnd 5: CSDC in first st, dc in next 2 sts, [(dc, tr, dc) in next st, dc in next 2 sts, 2/2 tr-RC, dc in next 3 sts] 4 times, (dc, tr, dc) in next st, dc in next 2 sts, 2/2 tr-RC, dc in next st, sl st to join, turn. 5 tr, 35 dc, 5 2/2 tr-RC
Rnd 6: CSDC in first st, 2/2 tr-LC, dc in next 3 sts, [(dc, tr, dc) in next st, dc in next 4 sts, 2/2 tr-LC, dc in next 3 sts] 4 times, (dc, tr, dc) in next st, dc in next 3 sts, change to D, sl st to join, turn. 5 tr, 45 dc, 5 2/2 tr-RC
Rnd 7: CSDC in first st, dc in next 3 sts, [(dc, tr, dc) in next st, dc in next 4 sts, 2/2 tr-RC, dc in next 5 sts] 4 times, (dc, tr, dc) in next st, dc in next 4 sts, 2/2 tr-RC, dc in next st, sl st to join, turn. 5 tr, 55 dc, 5 2/2 tr-RC
Rnd 8: CSDC in first st, 2/2 tr-LC, dc in next 5 sts, [(dc, tr, dc) in next st, dc in next 6 sts, 2/2 tr-LC, dc in next 5 sts] 4 times, (dc, tr, dc) in next st, dc in next 5 sts, change to E, sl st to join, turn. 5 tr, 65 dc, 5 2/2 tr-RC
Rnd 9: CSDC in first st, dc in next 5 sts, [(dc, tr, dc) in next st, dc in next 6 sts, 2/2 tr-RC, dc in next 7 sts] 4 times, (dc, tr, dc) in next st, dc in next 6 sts, 2/2 tr-RC, dc in next st, sl st to join, turn. 5 tr, 75 dc, 5 2/2 tr-RC
Rnd 10: CSDC in first st, 2/2 tr-LC, dc in next 7 sts, [(dc, tr, dc) in next st, dc in next 8 sts, 2/2 tr-LC, dc in next 7 sts] 4 times, (dc, tr, dc) in next st, dc in next 7 sts, change to A, sl st to join, turn. 5 tr, 85 dc, 5 2/2 tr-RC
Rnd 11: CSDC in first st, dc in next 7 sts, [(dc, tr, dc) in next st, dc in next 8 sts, 2/2 tr-RC, dc in next 9 sts] 4 times, (dc, tr, dc) in next st, dc in next 8 sts, 2/2 tr-RC, dc in next st, sl st to join, turn. 5 tr, 95 dc, 5 2/2 tr-RC
Rnd 12: CSDC in first st, 2/2 tr-LC, dc in next 9 sts, [(dc, tr, dc) in next st, dc in next 9 sts, 2/2 tr-LC, dc in next 10 sts] 4 times, (dc, tr, dc) in next st, dc in next 9 sts, change to B, sl st to join, turn. 5 tr, 105 dc, 5 2/2 tr-LC
STOP HERE FOR SIZE 2 & SIZE 4, Continue to Edging
Rnd 13: CSDC in first st, dc in next 9 sts, [(dc, tr, dc) in next st, dc in next 10 sts, 2/2 tr-RC, dc in next 11 sts] 4 times, (dc, tr, dc) in next st, dc in next 10 sts, 2/2 tr-RC, dc in next st, sl st to join, turn. 5 tr, 115 dc, 5 2/2 tr-RC
Rnd 14: CSDC in first st, 2/2 tr-LC, dc in next 11 sts, [(dc, tr, dc) in next st, dc in next 12 sts, 2/2 tr-LC, dc in next 10 sts] 4 times, (dc, tr, dc) in next st, dc in next 11 sts, change to C, sl st to join, turn. 5 tr, 125 dc, 5 2/2 tr-RC
STOP HERE FOR SIZE 6 & SIZE 8, Continue to Edging
Rnd 15: CSDC in first st, dc in next 11 sts, [(dc, tr, dc) in next st, dc in next 12 sts, 2/2 tr-RC, dc in next 13 sts] 4 times, (dc, tr, dc) in next st, dc in next 12 sts, 2/2 tr-RC, dc in next st, sl st to join, turn. 5 tr, 135 dc, 5 2/2 tr-RC
Rnd 16: CSDC in first st, 2/2 tr-LC, dc in next 13 sts, [(dc, tr, dc) in next st, dc in next 14 sts, 2/2 tr-LC, dc in next 13 sts] 4 times, (dc, tr, dc) in next st, dc in next 13 sts, change to D, sl st to join, turn. 5 tr, 145 dc, 5 2/2 tr-RC
STOP HERE FOR SIZE 10, Continue to Edging
Rnd 17: CSDC in first st, dc in next 13 sts, [(dc, tr, dc) in next st, dc in next 14 sts, 2/2 tr-RC, dc in next 15 sts] 4 times, (dc, tr, dc) in next st, dc in next 14 sts, 2/2 tr-RC, dc in next st, sl st to join, turn. 5 tr, 155 dc, 5 2/2 tr-RC
Rnd 18: CSDC in first st, 2/2 tr-LC, dc in next 15 sts, [(dc, tr, dc) in next st, dc in next 16 sts, 2/2 tr-LC, dc in next 15 sts] 4 times, (dc, tr, dc) in next st, dc in next 15 sts, change to E, sl st to join, turn. 5 tr, 165 dc, 5 2/2 tr-RC
STOP HERE FOR SIZE 12, Continue to Edging
Rnd 19: CSDC in first st, dc in next 15 sts, [(dc, tr, dc) in next st, dc in next 16 sts, 2/2 tr-RC, dc in next 17 sts] 4 times, (dc, tr, dc) in next st, dc in next 16 sts, 2/2 tr-RC, dc in next st, sl st to join, turn. 5 tr, 175 dc, 5 2/2 tr-RC
Rnd 20: CSDC in first st, 2/2 tr-LC, dc in next 17 sts, [(dc, tr, dc) in next st, dc in next 18 sts, 2/2 tr-LC, dc in next 17 sts] 4 times, (dc, tr, dc) in next st, dc in next 17 sts, change to A, sl st to join, turn. 5 tr, 185 dc, 5 2/2 tr-RC
STOP HERE FOR SIZE 14, Continue to Edging
Rnd 21: CSDC in first st, dc in next 17 sts, [(dc, tr, dc) in next st, dc in next 18 sts, 2/2 tr-RC, dc in next 19 sts] 4 times, (dc, tr, dc) in next st, dc in next 18 sts, 2/2 tr-RC, dc in next st, sl st to join, turn. 5 tr, 195 dc, 5 2/2 tr-RC
Rnd 22: CSDC in first st, 2/2 tr-LC, dc in next 19 sts, [(dc, tr, dc) in next st, dc in next 20 sts, 2/2 tr-LC, dc in next 19 sts] 4 times, (dc, tr, dc) in next st, dc in next 19 sts, change to E, sl st to join, FO. 5 tr, 205 dc, 5 2/2 tr-RC
STOP HERE FOR SIZE 16, Continue to Edging
Edging of First Body Piece
Rnd 1: Change to next color, ch 1, *sc in each st until tr, 3 sc in tr, rep from * four more times, sc in each st, sl st to join, FO.
Edging of Second Body Piece, Shoulders and Seaming
Rnd 1: Change to next color, ch 1, *sc in each st until tr, 3 sc in tr, rep from * four more times, sc in each st, sl st to join.
Row 2: PM in 6th (6th, 6th, 10th, 10th, 10th, 11th, 12th) st from each center st of cnr at top, this marks the neck opening; should be 13 (13, 16, 13, 17, 17, 19, 21), sc in each st until M, sc blo in each st until cnr, sc blo in next 6 (6, 10, 10, 14, 14, 16, 16) sts, turn.
Row 3: Ch 1, sc in each st to M, leave rem sts unworked, turn
Rows 4-5 (5, 7, 9, 9, 11, 11, 13): Ch 1, sc in each st, turn.
Row 6 (6, 8, 10, 10, 12, 12, 14): Mark same sts on second piece; holding the RS of both pieces together, line up sts of second piece on the with first piece, ch 1, sc through BL of Shoulder and BL of Second Piece, sc in each st across the first piece until next M, sc blo in next 12 (12, 20, 20, 24, 24, 27, 28)sts, turn.
Row 7-9 (7-9, 9-13, 11-17, 11-17, 13-21, 13-21, 15-23): Ch 1, sc in next 12 (12, 20, 20, 24, 24, 27, 28)sts, turn.
Row 10 (10, 14, 18, 18, 22, 22, 24): Line up both pieces with RS together, line up sts of second piece on the with first piece, ch 1, sc through BL of Shoulder and BL of first Piece in next 12 (12, 20, 20, 24, 24, 27, 28)sts, sc in rem sts, sl st to join, FO.
Hood
Row 1: With next color and larger hook, 40 fsc, turn.
Count 8 sts from each end, PM in next st; sk next 2 sts, PM in next st; sk next 7 sts, PM in next st; 6 M placed.
Row 2: CSDC in first st, dc in next 6 sts, *2/2 tr-RC, dc in next 7 sts, rep from * 2 more times, turn. 28 dc, 2 2/2 tr-RC
Row 3: CSDC in first st, dc in next 6 sts, *2/2 tr-LC, dc in next 7 sts, rep from * 2 more times, turn. 28 dc, 2 2/2 tr-LC, change to next color, turn.
Row 4: CSDC in first st, dc in same st, dc in next 6 sts, *[2/2 tr-RC, dc in next 7 sts] 2 times, 2/2 tr-RC, dc in next 6 sts, 2 dc in last st, turn. 30 dc, 2 2/2 tr-RC
Row 5: CSDC in first st, dc in next 7 sts, [2/2 tr-LC, dc in next 7 sts] 2 times, 2/2 tr-LC, dc in next 8 sts, turn. 30 dc, 2 2/2 tr-LC
Row 6: CSDC in first st, dc in same st, dc in next 7 sts, *[2/2 tr-RC, dc in next 7 sts] 2 times, 2/2 tr-RC, dc in next 7 sts, 2 dc in last st, change to next color, turn. 32 dc, 2 2/2 tr-RC
Row 7: CSDC in first st, dc in next 8 sts, [2/2 tr-LC, dc in next 7 sts] 2 times, 2/2 tr-LC, dc in next 9 sts, turn. 32 dc, 2 2/2 tr-LC
Row 8: CSDC in first st, dc in same st, dc in next 8 sts, *[2/2 tr-RC, dc in next 7 sts] 2 times, 2/2 tr-RC, dc in next 8 sts, 2 dc in last st, turn. 34 dc, 2 2/2 tr-RC
Row 9: CSDC in first st, dc in next 9 sts, [2/2 tr-LC, dc in next 7 sts] 2 times, 2/2 tr-LC, dc in next 10 sts, change to next color, turn. 34 dc, 2 2/2 tr-LC
Row 10: CSDC in first st, dc in same st, dc in next 9 sts, *[2/2 tr-RC, dc in next 7 sts] 2 times, 2/2 tr-RC, dc in next 9 sts, 2 dc in last st, turn. 36 dc, 2 2/2 tr-RC
Row 11: CSDC in first st, dc in next 10 sts, [2/2 tr-LC, dc in next 7 sts] 2 times, 2/2 tr-LC, dc in next 10 sts, turn. 36 dc, 2 2/2 tr-LC
Row 12: CSDC in first st, dc in same st, dc in next 10 sts, *[2/2 tr-RC, dc in next 7 sts] 2 times, 2/2 tr-RC, dc in next 10 sts, 2 dc in last st, turn. 38 dc, 2 2/2 tr-RC
Row 13: CSDC in first st, dc in next 11 sts, [2/2 tr-LC, dc in next 7 sts] 2 times, 2/2 tr-LC, dc in next 12 sts, turn. 38 dc, 2 2/2 tr-LC
Row 14: CSDC in first st, dc in same st, dc in next 11 sts, *[2/2 tr-RC, dc in next 7 sts] 2 times, 2/2 tr-RC, dc in next 11 sts, 2 dc in last st, turn. 40 dc, 2 2/2 tr-RC
Row 15: CSDC in first st, dc in next 11 sts, [2/2 tr-LC, dc in next 7 sts] 2 times, 2/2 tr-LC, dc in next 12 sts, FO. 40 dc, 2 2/2 tr-LC
Seam & Continue Hood
Fold Hood in half, attach yarn in the center, ch 1, sc through both stitches to end, FO. 20 sc
Row 1: Working along bottom of Hood, attach yarn to first st, CSDC in first st, evenly space 59 dc, change to next color and FO current color, turn. 60 dc
Row 2: CSDC in first st, dc in same st, dc in next 9 sts, *2 dc in next st, dc in next 9 sts, rep from * to end, change to next color, turn. 66 dc
Rows 3-5: CSDC in first st, dc in each st, change to next color, turn. FO
Edging
Rnd 1: Attach Color B to cnr, ch 1 (does not count as st), evenly hdc up the front, around the neck and down the other side of the Front to the next cnr, ch 1, turn to work along the Back, evenly hdc to first cnr, ch 1, sl st to join, turn.
Rnd 2: Ch 1, *2 hdc in ch-1 sp of cnr, hdc in each st to next cnr; rep from * around, sl st to join.
Ties
- Cut 6 strands of yarn that are at least 24”.
- Take 3 strands, fold in half, pull fold through one corner of the Hood, and then pull all ends through the loop to pull tight.
- Split the 6 strands into three groups of two, and then braid, and knot.
- Trim ends to be the same length.
- Repeat steps 2-4 in the second corner of the Hood.
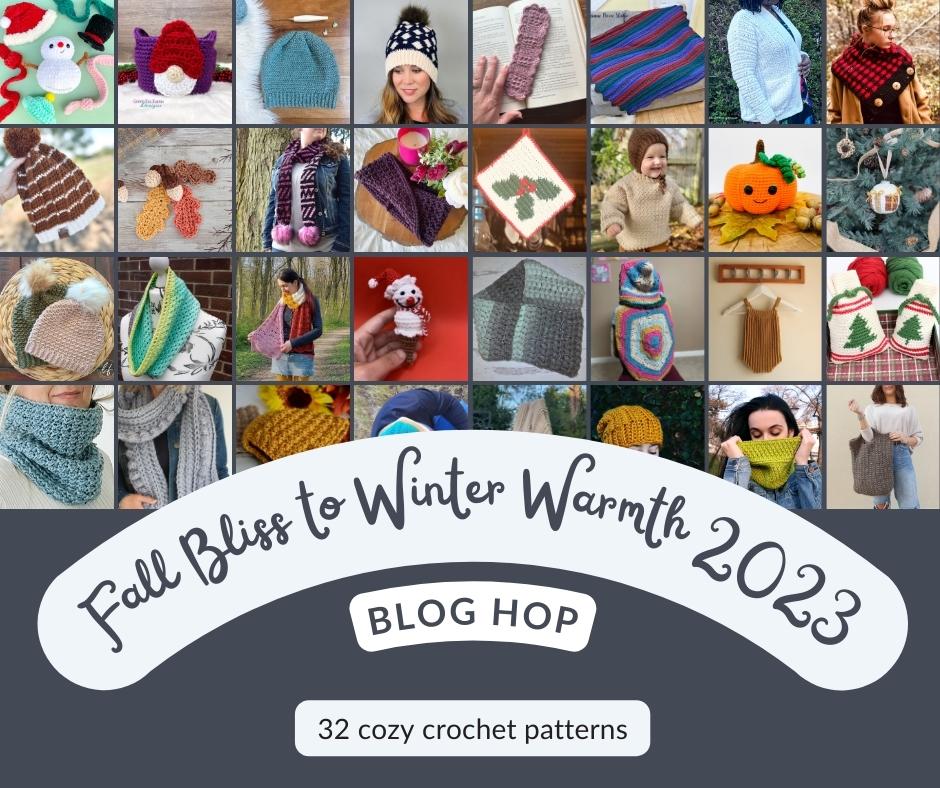
Fall Bliss to Winter Warmth 2023
Sweater Weather has officially arrived when all you can think about is making cozy hats, scarves, and holiday decor in the northern hemisphere.
The Fall Bliss to Winter Warmth blog hop offers 32 crochet pattern in total with an opportunity to download one each day. If you’ve been busy this month, and missed any of the gorgeous patterns, purchase the pattern bundle!
I’m excited to be the featured designer for November 26th, which is also my dad’s birthday! I can’t think of a better way to celebrate his birthday than sharing a brand new crochet design with fiber friends. Head over to Ned & Mimi to get today’s coupon code by clicking the Roundup button below, and then head back here to download your copy of the Radiant Pentagon Crochet Poncho.
I look forward to seeing lots of Radiant Pentagon Ponchos being crocheted this winter and upcoming spring. Be sure to use #creationsbycourtney and #radiantpentagonponcho when sharing your in progress and finished project pictures.
To download a copy of the Radiant Pentagon Poncho PDF, click the “DOWNLOAD” button below. If you want to purchase the pattern bundle, use the “BUY IT HERE”,


You may enjoy these patterns too
Pin it for Later

Want to talk about yarn goodness, crochet tips, and exclusive weekly deals? Join my Facebook Group, Creations By Courtney Community.
If we’re not hanging out on social media yet, come check me out on Facebook, Instagram and Pinterest.
Join my newsletter for sneak peeks, crochet tips, and more. HERE
Use #CreationsByCourtney on social media when sharing your projects.
This pattern is not to be duplicated or resold, and not to be reproduced commercially. You may sell finished products on Etsy, at farmers markets, and craft fairs, but please credit Creations By Courtney as the pattern’s author.